Showing posts with label design process. Show all posts

Wednesday, December 21, 2016

How to Create a Concept Board

Game Design Concept Board
Sample Game Design Concept Board
This article will focus on the development of a concept board (also know as a presentation board) for a game, however the same approach can be applied for the design of any type of design project in areas like architecture, 3D modelling, product design, interior design etc. So whatever design project you are pitching or presenting then you can follow these steps to ensure you create a great concept board design. To prepare even better you might also like to read our article on design presentation boards which gives a good insight into the theories and techniques to creating a great concept/presentation board. For now though, we are focused on the practical, so let's get started!

The Concept:

It may sound obvious but the first thing you need to do when creating a concept board is to create the concept and write it down! Of course everyone does this but not everyone does it correctly. Your concept board should have details of all areas of your proposed project design and therefore your concept/idea needs to be fully developed with all decisions finalized so you don't have to edit your concept board after you thought you were finished or even worse, leave something out that you should have displayed. For example, for a computer game concept board your idea should include....
  • The full story/plot of the game to set the scene.
  • Where and when the game is set and details about how it looks eg. abandoned water mill in the valley between two snow covered mountains ranges
  • Who are the game players/enemies and what do they look like 
  • What objects/vehicles will be involved in the game
  • What is the main game objective eg. kill enemies, score points, survive, collect objects, solve puzzles etc.
Just a reminder to write all these things down as our memories are not as good as we like to think!

Research:

Concept Board Research
A selection of images on the concept theme which could be used in the concept board
There are two stages of research that need to be completed - I call these general and specific research.

The first stage, general, involves researching existing concept boards to help you gain an understanding of what a concept board is, what it can look like, the variety of possible style and layouts etc.

The second stage of research, which I call specific research, is where you will search for images of the things which you described in your concept board. You will later use these images to create a single image "collage". This might not make sense yet but basically, we will use a combination of multiple images (all edited from their original state) to form a single image which, along with some text will explain your idea is a way that is visually interesting and informative.

Blocking Out:

Concept Board Layout and Composition
"Blocking out" is a graphic design layout technique
"Blocking Out" is a graphic design technique used to quickly mock up the composition or layout of a design in a software package using only blocks to represent different areas or aspects of the design. The colour of the blocks does not matter so it is best to keep them in shades of grey to allow you to focus on their shape, scale and position within the design. If it helps you can also add text into each block to remind you what it is for.

In the sample image above the top-right represent where the title and story text will go. The vertical block in the center represents a lighthouse on a rock (the horizontal block it is on). The large horizontal block taking up a third of the canvas represents the ocean while the blank white space in the background is the sky. Finally, the 3 circles represents areas for explanatory text to go. Can you visualize it yet?

It may seem a strange way to start a concept board design but it has many advantages...

  • Helps you quickly and easily arrange a suitable layout of the content you need to include
  • You can easily add, remove, scale and rotate elements within the layout.
  • Creates all the main layers that you will need
  • You can focus on layout without the distraction of actual images or colour
  • Helps you to visualize the final design before you have any images in place

Breaking The Ice:
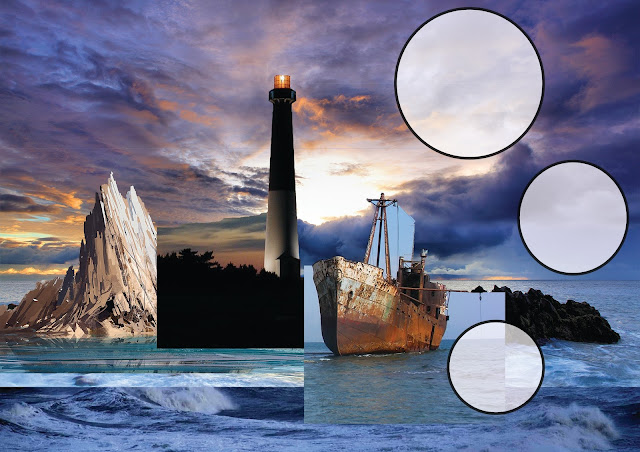
Getting started with your Concept Board
Add in the images you want in a "rough and ready" way just to get started
Once you know the composition/layout you want to achieve, roughly at least, the next stage is to get all the pieces of the puzzle on the one canvas. It is a common mistake to edit each part separately, trying to get them all perfect and then bring them together at the end only to realise the colours/resolution/style don't match.

Breaking the ice simply means getting started. The best way to start is to put all the images you think you will need onto the canvas, ideally overlapping them on your "blocking out" layout.

As these elements will eventually all be viewed together it is important that you edit them all together so you can easily judge their scale, colour, resolution and style proportionate to one another. It also removes any confusion about the potential complexity of bringing images together properly, which would arise if you have edited each one separately.

Finally, it forces you to start. It can be hard to imagine how a design will look when it is completely finished and people often stop themselves from starting or judge their designs too soon. This leads to hesitation, time wasting and unnecessary editing. Once you break the ice and put all the pieces of the puzzle in place it will be much easier to finish, after all you wouldn't try to do a jigsaw without having all the pieces there!

Blending Images:

Concept Board Image Collage
Try to make your separate images look like part of one large image
Blending images refers to the process of editing all the imported images so that they appear as a single image, like in this Photoshop tutorial. This is possibly the most difficult stage of the process but if you take the right approach to it then it can be made much easier. I would recommend the following steps to blending the images together to form a single scene.....
  1. Remove all the background/unneeded content from each individual image
  2. Scale, position and layer the images as you want them
  3. Use filters/effects/layers styles to ensure the images are all of the same graphic design styles
  4. Edit the images hue/saturation so that they are all of similar colouration
  5. If images over lap or meet in a non exact way, such as waves crashing over rocks, use the clone stamp tool or a semi opaque eraser tool to help them blend together more realistically

Adding Text:
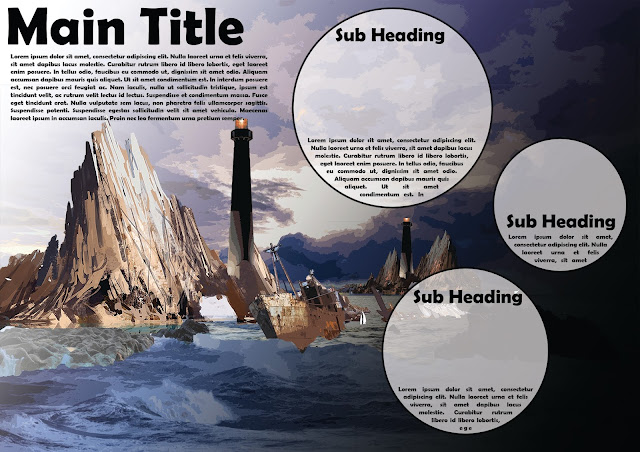
Concept Board Text
Keep the text to a minimum and utilise headings for each section
Probably the most obvious step in the process. The heading says it all really - add text. The advice I can give you is short and simple.
  • www.dafont.com is a great place to get place to get interesting and unique font.
  • Make sure any fonts you choose are still legible (easy to read)
  • Make sure the colour of the text contrasts with the images behind it, possibly use semi transparent layers to help with this. (see image above)
  • Use headings for each section
  • Only include important information - the less text the better
  • Try out these Photoshop text tips

Optimise:

Sample Game Design Concept Board
Add detailed content and additional images to complete the effect
This step should be completed after you have reflected on your progress so far, evaluating the look of the design and checking that all required content is in place. Take note of all the changes you want to make - this will be your final "to do" list. You might also consider making use of some of the design principles to make your concept board more aesthetic.

So tips to consider when optimising your concept board are...

  • Print off the design, it will look different when printed than on the screen and will give you a better idea of scale and colour.
  • Show it to others and ask for feedback - you don't have to agree with them but their opinions may spark an idea for you or may identify something you overlooked.
  • Try to have a foreground, middle ground and background to your image. This helps draw people into it.
  • Whatever you do, don't clutter it by adding in too many images or too much text. The simpler the better.
  • Consider these presentation board tips.

Some More Sample Concept Boards...

Click on any of the sample concept boards below to view full size...


Thursday, October 6, 2016

Read How to model and texture a chair in Blender Now

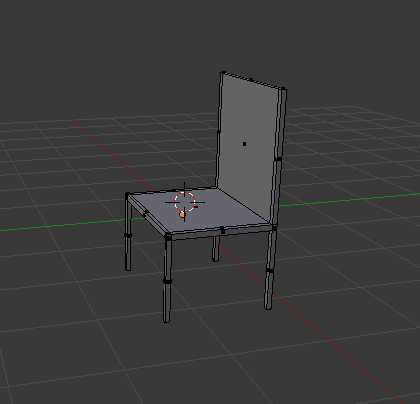
Chair with texture

In this tutorial you will learn how to create a basic chair and add a texture onto the chair.


Step 1

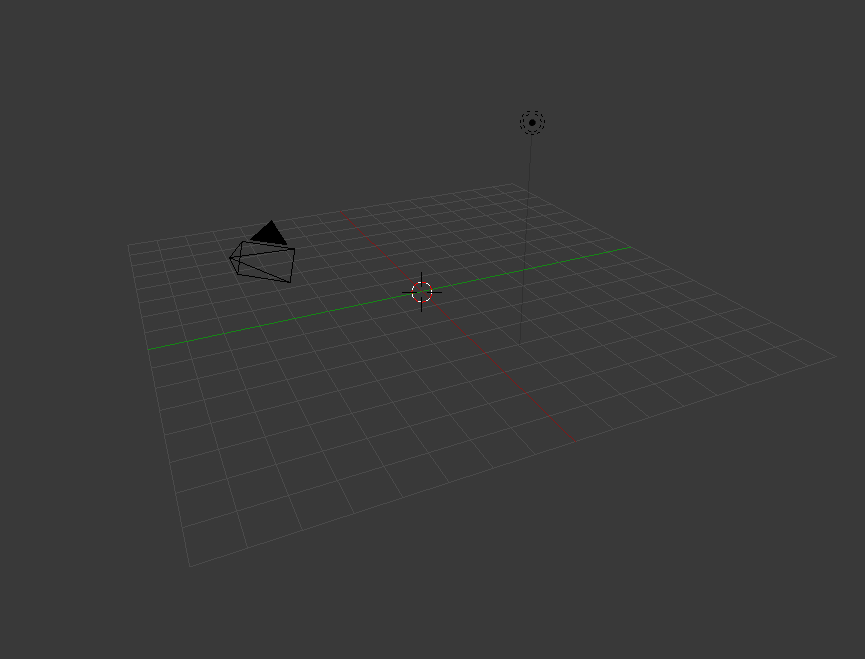
Delete the default cube by pressing X and delete.

with no cube 

Step 2

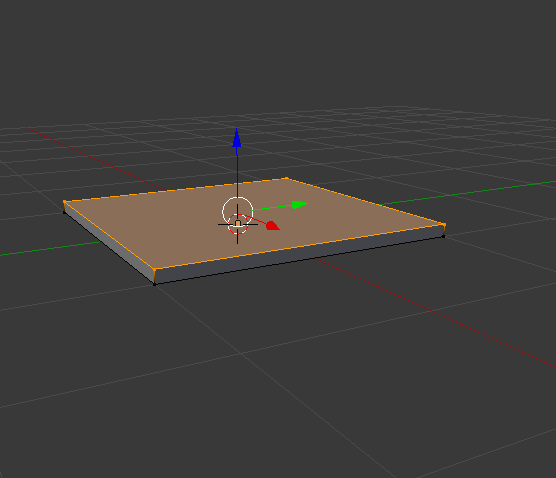
Add mesh plane or shift A mesh and plane.Zoom in with the middle mouse button, or press 1 for a side view, press Tab to go into edit mode it should turn orange. E to extrude.

plane that's extruded


Step 3 

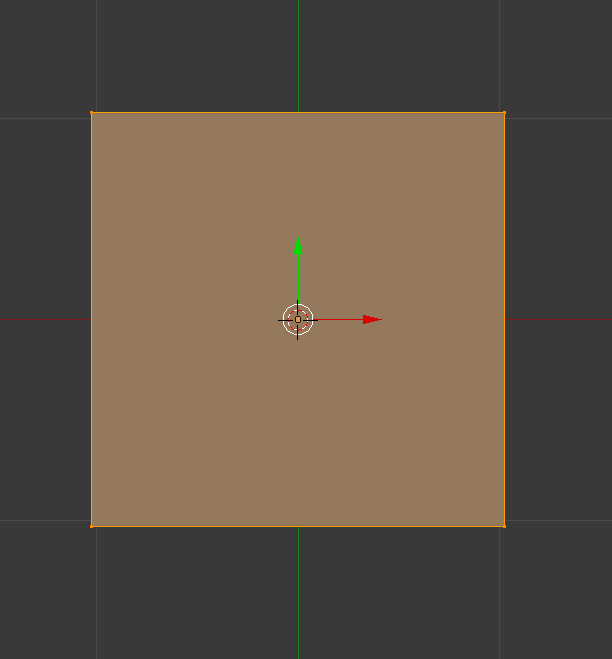
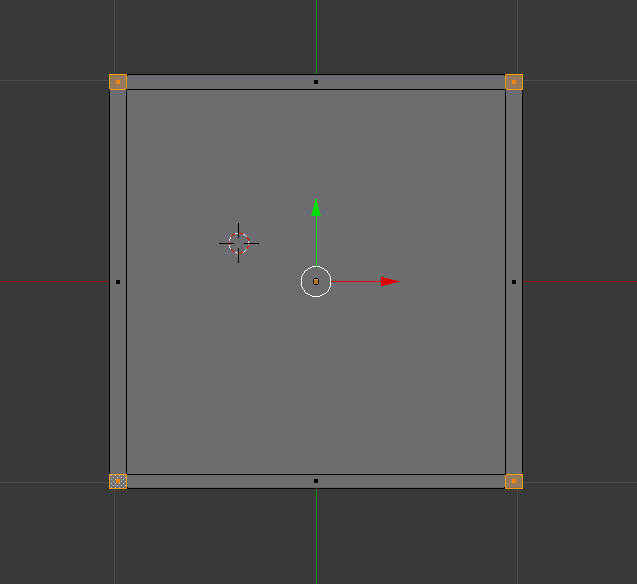
Press 7 on the number pad to get a better view. Use the middle mouse button to zoom in or out.

top down view of the plane in edit mode

Step 4

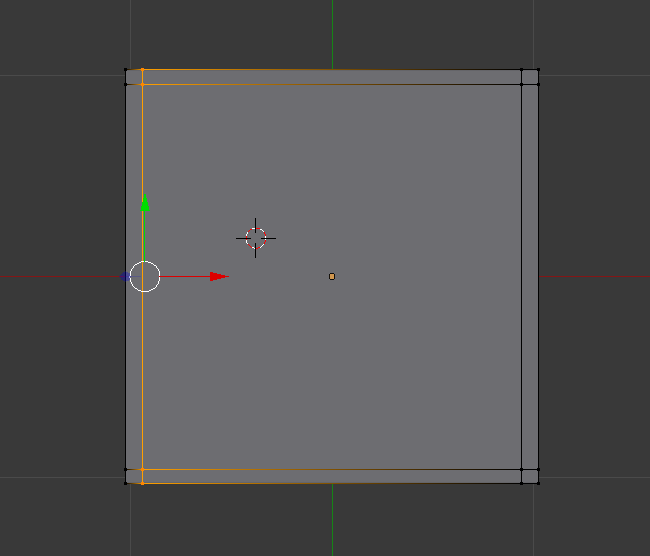
Press ctrl R to create a loop and place a loop at each side. Total of 4 loops.

plane with four loops

Step 5

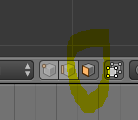
Select face select. 

face select

Step 6 

Press the number 8 to flip to the opposite side(underneath the plane),Select one box then press Shift and right click on each of the boxes.

plane with all four corners selected

Step 7 

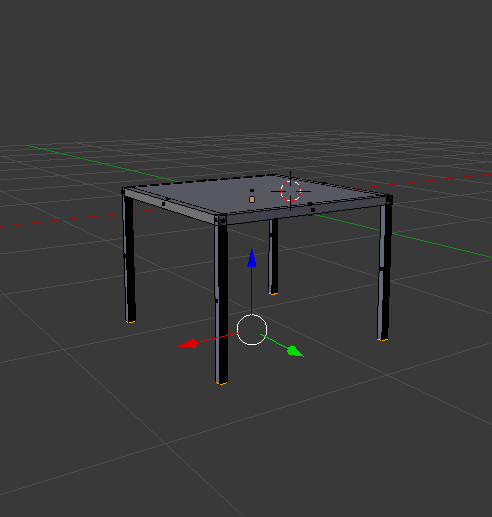
Press number 1, press E to extrude to your desired length. Use the middle mouse button to move around to get different angles.

plane with all legs

Step 8 

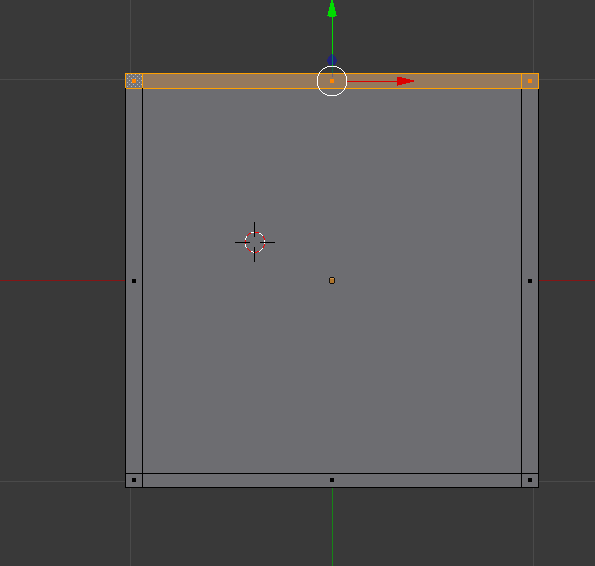
Press A to deselect, select one side and E to extrude. 

top down view with one side selected

basic model of a chair

Step 9 

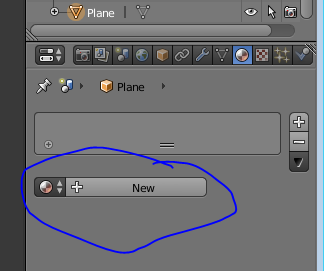
To add a texture onto the chair go to materials bar on the top right corner of the screen, click on new.

adding a new material

Step 10

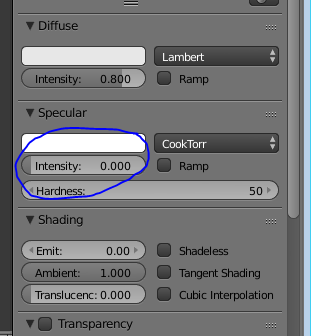
Change the specular to zero so a glossy effect wont appear onto the chair.

lowering the specular

Step 11 

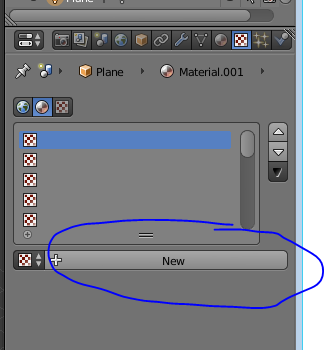
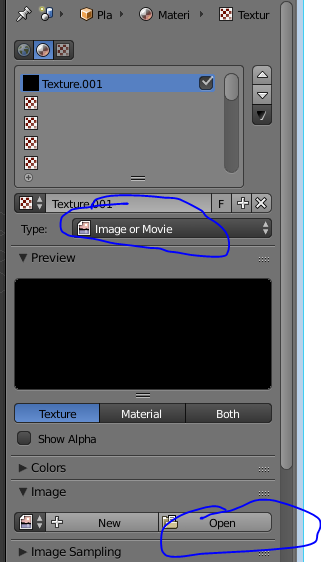
Go to the texture section beside the material on the top right corner, click on new, change the type image to image and movie, click on open and navigate to your texture that you have downloaded.

adding a new texture

importing a texture

Step 12 

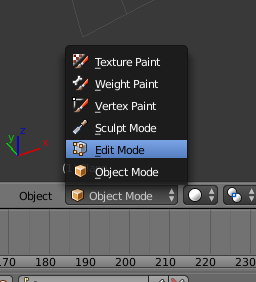
The texture will look like this on the chair, to fix this the texture needs to be unwrapped. Change object mode to edit mode.
changing to edit mode
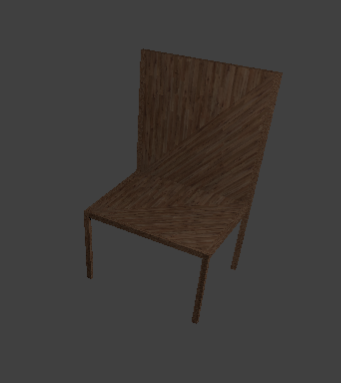
chair with texture

Step 13 

Go to mesh, uv unwrap, unwrap. this will fix the texture on the chair.

unwrapping 


rendered result 

finished chair with a texture

Thursday, June 16, 2016

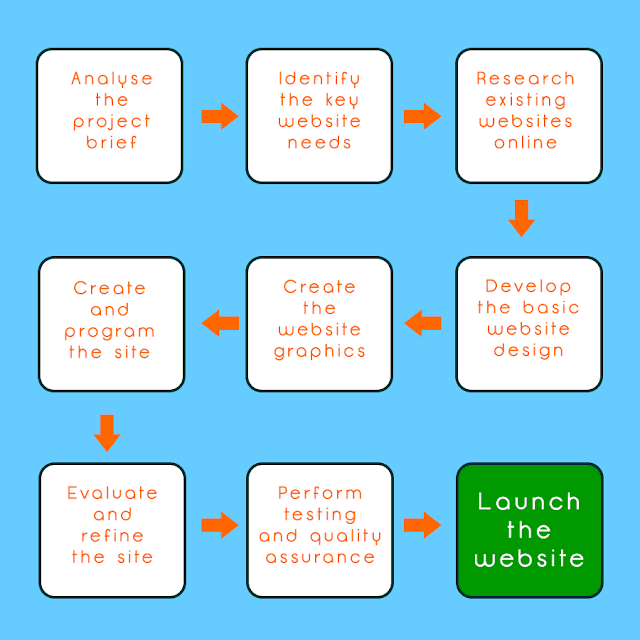
Web Design Process

Web Design Process
The Web Design Process

1. The project brief

It is very important to meet with the client, either in person, over the phone or through e-mail or Skype in order to create the project brief for the website or so you can analyse and discuss the brief the client had already created. The brief should be detailed and specific and must be documented and agreed upon in order to allow it to be referred to later in the process. As a web designer you can also state your price and outline a time frame based on the brief. Without a detailed brief these things would not be possible.


2. Identify key requirements

Based on the brief and your discussion with the client, you should first identify the key requirements that the website must meet. Is it an e-commerce website? Does the client require a content management system? Does it require special effects? Factors like these would decide the design approach you take and these should be allocated the most time in your time-frame and they should be the central features around which the site is designed.


3. Research existing websites

If the website is to be a business venture it is important to first assess the competition. Sometimes a client may request that their new site appears higher in search engine rankings than a competitors or that it have extra or additional features therefore it is important to assess what you are up against, so to speak. It is also important to be aware of what the industry standards are for a particular type of website if you are not familiar with them. As a designer constantly browsing, reviewing and analysing new websites is good practice and can provide a source of inspiration for your future designs.


4. Develop the basic website structure

Before you begin the technical design and programming of the website you should first develop ideas for the basic site structure and layout through sketching and drawing. Ideas can be developed quickly and easily in this manner, much quicker than through Dreamweaver or Photoshop, and 'boxing out' the design will make the actual creation of the website a simpler process further down the line. Refer to the web design tips section for guidance in how best to layout your website. At this stage a quick check-in with the client would be recommended before you progress to the next stage.


5. Create the website graphics

Once you have identified the layout and style you want for your site you can begin to create the graphics you will need for the website. This may include the website logo, banner, buttons, image maps, resizing and formatting pictures etc. All these should be designed with consideration to the style and colour scheme of the website. There are a variety of file formats you can use for your graphics, the most common being .gif and .jpg. To help you choose the format which is best for you see the common file formats section. For help and assistance with the creating the graphics you may find our Photoshop and illustrator tutorials useful.


6. Create and program the website

With the layout decided upon and the graphics ready to be put in place you can now begin creating the basic site structure. Begin with the HTML template and use it to create a site master page which will be the starting point for creating all your web pages. Ideally you you should use CSS media queries to make this template responsive. In most cases the majority of your web pages will have the same basic layout so creating a 'master page' first, which can be the template for all other pages, is an approach which will save you time. Once the template is set the graphics and content created earlier can be inserted into the relevant pages easily and quickly completing the website. Once again this would be a good time to get feedback from the client so they can review the design.


7. Refine the website design

Based on the clients feedback and having reflected on the design yourself, make any necessary changes to the website. This may involve subtle changes to the colours, editing or changing images, changing the font style or small layout changes and spacing. Search Engine Optimisation (S.E.O.) should also be part of this process where including certain keywords, tagging images and using meta-tags are all part of the process. For more in depth information see the section on SEO.


8. Website testing and QA

This is a simple task that involves proofreading all the website content, testing all the links and any interactive features of the website. It may also be suitable to get feedback from a select group of people matching the demographic of the website's target audience to test the suitability of the website design and functionality.


9. Launch the website

Getting the website online is the culmination of the process but the old adage of 'build it and they will come' is certainly not applicable to websites. It is vital to index the website in as many search engine directories as possible to ensure visitors can find the website, advertising the site across a variety of media is also useful. On-line advertising through methods like Google Adwords is a recommended approach as well as using social media like Facebook, twitter, Google+ and others will also increase your websites online presence as well as driving traffic to the site.

If you enjoyed this article then perhaps our articles on the graphic, interior, games or furniture design processes may also be of interest.


Thursday, March 3, 2016

Graphic Design Process

Graphic Design Process

The Graphic Design Process

The Graphic Design Process is a series of steps that a designer takes when working on a graphic design project; put simply it is a more graphic design focused version of the general design process. The details of each stage will differ depending on the type of design but the approach should always be the same. It is vital to stick to the process during a design as skipping a stage, completing stages out of order of not using the process at all will result in a lower quality outcome, an outcome the client is not happy with or even worse no outcome at all.

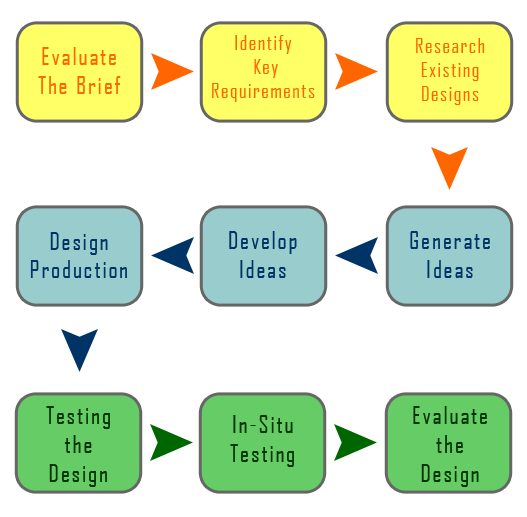
The diagram above outlines the basic stages of the graphic design process and below each stage is explained in more detail.


1. Analyse The Brief

Each design project will begin when a client delivers the designer with a brief. The brief will outline what the client wants although as the client will likely have no design experience it is important for the designer to carefully analyse all details given by the client and if necessary to make further enquiries about the needs of the client.


2. Identify Key Requirements

Based on the analysis of the brief you must identify the most important parts/key requirements. Ask yourself, what requirements must I fulfil? For example when designing a poster for an event, the simple act of including the time, date and venue are much more important than any other aspect as a poster without the necessary details is useless. It is therefore important to identify and prioritise the key requirements of the brief. The graphic design style most appropriate to the brief should also be identified at this point.


3. Research Existing Designs

Research is important to identify possible design styles and ideas which may also suit the needs of your client. These samples can be used when meeting with the client to identify the style of image/design which they prefer. For students research will also help to familiarise yourself with industry standard designs and the quality of design which is required.


4. Generate Ideas

Coming up with an idea for the design, a slogan for a campaign, an image for a poster, a name for a website etc. can be difficult. However, by focusing on fulfilling the key requirements of the brief and allowing your research to inspire you it is possible to generate original designs for your project. Brainstorming is often used where a lack of ideas is a problem. Free writing is a type of brainstorming which simply involves relaxing your mind and writing down any and all ideas you have as quickly as possible without really thinking. Having your research around you can help when doing this. It may seem very simple but generally people have numerous ideas but they tend to dismiss them before writing them down, considering them down and allowing them to be developed into viable design solutions. For help and assistance visit our article on idea generation.


5. Develop Ideas

It is good practice not to settle on simply one idea but rather to choose 2 or 3 of your best ideas and develop them through simple sketches, drawings, colour scheme test pages and font style sheets. These steps all help to develop your ideas and highlight which one has the most potential for success. Sketching will also help to identify possible layouts/compositions that can be used.


6. Produce The Design

Once an idea has been selected and sufficiently developed it is time to begin producing/creating the design. It is important to note that this is commonly the stage that overeager student designers begin at and without stating the obvious this should never be done. Depending on the type of design different softwares or materials will be used to create the design but regardless of the means of production it is important that the previous stages are not forgotten and that the key requirements are fulfilled. For help and assistance with the graphic design production stage you may find our Photoshop tutorials useful.


7. Test The Design

This is a quick and simple stage of the process but one that is often overlooked. For printed designs testing simply involves printing the design to ensure the resolution and colours are of good quality, that no clipping of important details occur and that text is readable and without errors. For website design this stage will involve checking that all features are functional, that links are working and that page loading speeds are acceptable.


8. Place The Design Insitu

For printed designs this will involve placing the poster/logo/sign/banner etc. in its intended position and ensuring that text is readable from an acceptable distant, images are clear and that the colours do not clash with or blend into their surroundings. For websites this will involve publishing the website online and rechecking all features and functions. For other types of designs, such as architecture or interior design, a programme such as Photoshop can be used to digitally place the design into its intended environment.


9. Evaluate The Design:

Before presenting your final design to the client it is vital that you evaluate it without bias. The easiest way to do this is simply return to stage 2 where you identified the key requirements of the brief and see if you have successfully fulfilled them. It may also be useful to get the opinion of others at this stage if you fear you will be unable to objectively evaluate your own design.


10. Redesign:

This step is only necessary if, after evaluation, you feel you have not successfully met the key requirements of the design brief. This stage involves returning to the beginning of the process and returning through each step correcting the errors which led to the key requirements not been fulfilled.


If you enjoyed this article then perhaps our articles on the web, interior, games or furniture design processes may also be of interest.


Monday, February 29, 2016

Magazine Cover Design Features


Magazine Cover Design Features
Magazine Cover Design Layout

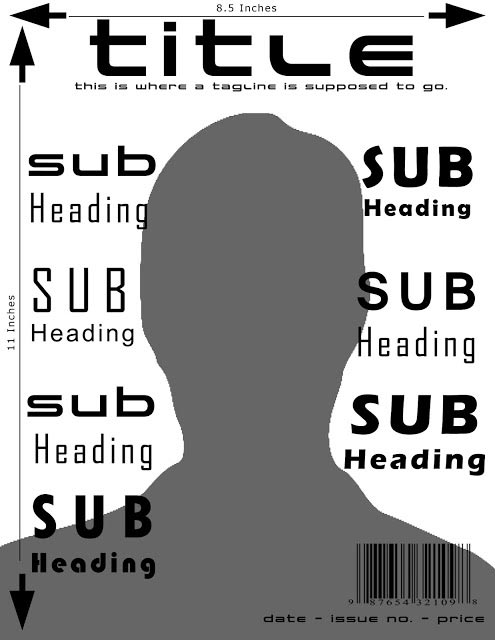
Designing a Magazine Cover? Then you need to be aware of these industry standard features, Both from a technical and a design point of view. First the Technical...

TECHNICAL

Size: 

Professional Magazine Covers (and therefore magazines themselves) are not A4 in size. This is a common misconception. The actual size is similar to A4 though; 8.5 inches x 11 inches is the standard.

Text: 

Your Magazine Cover should include the magazine name, tagline and selected article headings.

Main Image: 

You should ideally use just one main image. It should be a high quality image ideally on a plain background.

Little Details:  

Don't forget the Date, Price, Issue No. and Barcode

So with all those things in place you will technically have a magazine cover, but how do you make sure it is a good one...? Now lets look at the design.

DESIGN

Main Image:

Your image should be the dominant element on the cover, it should take up at least two thirds of the cover and should contrast with the background, keeping it centrally aligned it also best. It should also utilise at least one of the Attention Grabbing Technique. The most effective being Sexy or Iconic, if you use an attractive celebrity you will be achieving both at the same time, hence the reason they adorn the cover of most magazines. When using people use either head and shoulders or waist up photos for best impact.

Magazine Cover with Iconic Celebrity
Magazine Cover Using Iconic Celebrity On The Cover
The magazine title text is best large and bold old in a sans-serif font. The style of the font should also be appropriate to the style and topic of the magazine.  

Sub-Headings are best aligned to the sides, should include a variety of font styles, colours and sizes all still in sans-serif (see the sample below), contrast with the background and use buzz words or better still any of the 12 most powerful words


Magazine Cover
Magazine Cover utilising variety of sub heading styles, colours and sizes

And not forgetting the little details: They should be kept small, discreet and out of view (unless they are a feature of the sale – e.g. special discounted price)


So if you have taken all this on board are are still interested in creating your own magazine cover design then see our create a magazine cover tutorial. You may also be interested in reading about the most powerful words in the English language, which tend to feature regularly and prominently on magazine covers.


Saturday, February 20, 2016

Interior Design Process

The Interior Design Process

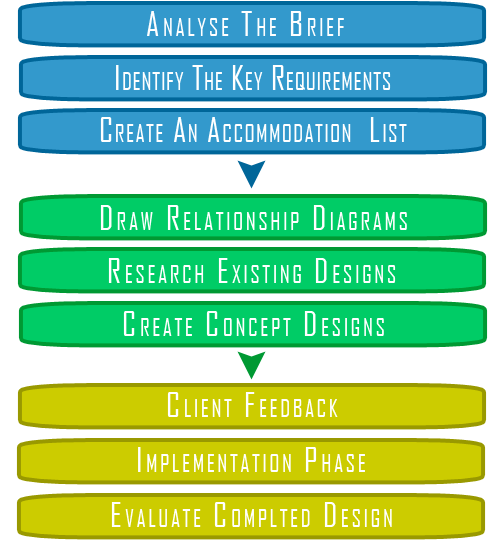
The Interior Design Process is a series of steps that a designer takes when working on an interior design project. The details of each stage will differ depending on the type of design but the approach will always be similar. It is vital to stick to the design process during a project as skipping a stage, completing stages out of order of not using the process at all will result in a lower quality outcome, an outcome the client is not happy with or even worse no outcome at all. But if you do follow the steps of the process it will help you complete your project to the highest standard possible. The steps of the interior design process are outlined below, they are not definitive but they are the recommended stages in order to achieve a successful outcome.


1. Analyse The Brief

Each design project will begin when a client delivers the designer with a brief. The brief will outline what the client wants although as the client will likely have no design experience it is important for the designer to carefully analyse all details given by the client and if necessary to make further enquiries about the needs of the client. The success of an interior design scheme will depend not only upon on the skills and creativity of the designer, but their ability to answer the brief set by the client. A good brief will be as detailed and project-specific as possible. It will outline the client's requirements and aspirations, set down a budget for works and the time scale in which the project must be realised.


2. Identify The Key Requirements

Based on the analysis of the brief you must identify the most important parts. Ask yourself, what requirements must I fulfil? It is therefore important to identify and prioritise the key requirements of the brief. If the brief is not as detailed as you would like it may be a good idea to meet with the client and ask them some questions in order to discover their exact requirements, the style of design that would suit them, the spaces that their way of living will require etc.


3. Create An Accommodation List

An accommodation list is a list of spaces/areas (as opposed to rooms) that will accommodate the activities of the client. If the brief is for the interior design of an entire house or office then the list may include activities such as living, dining, receiving, sleeping etc. While for a single space brief the list may include activities such as seating, storage, playing etc. Designing a space by rooms can be very restrictive and therefore designing to meet the needs of the client is a more direct and accurate approach.


4. Draw Relationship Diagrams

Relationship diagrams follow on from the accommodation list and, as the name suggests, they diagrammatically present the relationship between the selected spaces. During this process it is important to consider factors such as light, noise, function etc. The function of each space will have an effect on where it is positioned within a building or, on a smaller scale, the function of an object/furniture piece will have an effect on where it is positioned within a space. To give just a single example of the multiple factors of relationships that are associated with an object, a desk will be best positioned near a socket (to allow a computer to be plugged), where it gets good natural/artificial light, away from nearby noise (so as not to distract from work), facing out a window or toward objects of interest (for inspiration) and of course where there is room to sit comfortably at it. This seemingly simple example demonstrates the wide variety of factors which can effect the decision making process when positioning spaces or objects within spaces.


5. Research Existing Designs

Research is important to identify possible design styles and ideas which may also suit the needs of your client. These samples can be used when meeting with the client to identify the style of design which they prefer. For students research will also help to familiarise yourself with industry standard designs and the quality of design which is required. See the section on Interior Design Styles as a starting point.


6. Create a Concept Design

With the increase in design technology in recent years design concept designs can just as easily refer to 2D or 3D digital graphics as it can to traditional perspective drawings or floor plans. What remains consistently important is that your designs successfully display your ideas in a way that the client can understand and visualise. As well as the aforementioned perspectives it can also be useful to create 'mood' boards to help present the style and colour scheme of your design concept. A mood board is a type of poster design that may consist of images, text, colours or textures samples of objects to communicate ideas to the client.


7. Obtain Client Feedback

As an interior design project cannot be easily edited, like digital designs can, it is vital to get feedback from the client before proceeding with the implementation stage. Clients are often uncertain about what they really want so it is important to present your design concept in a positive manner and highlight the positive features of the design to the client. The reason for this is that an indecisive client may result in numerous design solutions being presented without any real progress being made. This stage can be a real sticking point in the design process and can result in wasted time and resources so remember that you are the designer and it is up to you to guide the client in their decision making, that is why they hired you after all!


8. Implement The Design

This is the fun part. Realising your design concept and seeing it come to life. This stage may require sub sections of its own depending on the size of the project. However it is impossible to say exactly how as the number of variables is almost unlimited but what is important is to plan this stage extensively before you begin by preparing and clearing the space, ordering materials in advance and having them at hand on the day as well as hiring the staff required to get the project completed on time and within budget.


9. Evaluate The Design

Reflecting on a completed design is important in order to ensure you learn from experience and identify the successful parts of the design to allow you to replicate them in future design projects as well as identifying the parts of the design that did not go well in order to avoid or solve them in future designs.It may also be useful to get the opinion of others at this stage if you fear you will be unable to objectively evaluate your own design. As well as the design itself it is just as important to reflect on your process and ask yourself some questions such as, did I meet the requirements set out in brief? Did I keep to the budget? Did I complete the project on time? If the answer to any of these question is 'No' then you you need to assess your design process and identifying flaws in it or areas where you can be more efficient.

If you enjoyed this article then perhaps our articles on the web, graphicgames or furniture design processes may also be of interest.


Furniture Design Process

The Furniture Design Process

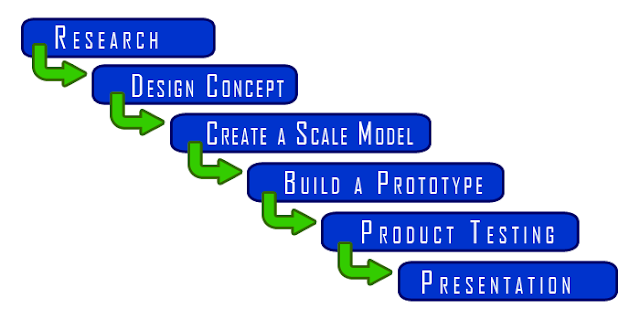
1. Research:

Unlike other design processes the furniture design process does not begin with a brief, as the client, if there is one, is usually requesting a bespoke piece of furniture without any specific requirements, other than perhaps the size. Also, furniture designers who are self employed often create pieces as they go and sell them on afterwards. In this sense the term furniture is referring to a wide range of items from chairs to cabinets to wardrobes to beds. In order for a furniture designer, or any designer for that matter, to be continually inspired it helps to be well researched. Understanding what other designers have done before you and what your contemporary peers are doing helps you to come up with your own ideas too. In this way, the research is non specific and it is simply recommended to continually keep up to date with what is happening in your area and to be aware of the furniture design history which preceded you. See the furniture design history timeline to gain an insight into the various types and styles of furniture that exist.

2. Design Concept:

The first real step in the process is the idea or concept; this is the starting point from which everything else grows. How you come up with the idea may be through an organised brainstorming session or it may occur naturally while researching or it may be just a eureka moment that happens out of the blue. However the idea comes to you it is important to document your idea by writing it down, sketching the general design form and perhaps the joinery methods too. As well as keeping the concept exactly as you originally imagined it, this documentation will also serve as evidence that it was your original idea in case it is later copied by someone else, so it may be a good idea to sign and date it.

3. Scale Model:

Next you should build a small, scale model of the idea as a way of seeing how it will look and to identify any problems before proceeding to build a full scale prototype. Sometimes there can be unforeseen complications that don't show up on paper, and they can be dealt with at this stage before realising it later and wasting full sized materials in order to do so. The scale model may also help identify which type of joinery techniques are most appropriate.

4. Prototype:

The next step is to build a to-scale (full size), working prototype.A prototype is basically the small scale model made full sized. If this is a once of piece, what this means is that you are in fact building the finished product while if the design is intended for mass production you are simply building a single piece to ensure all of the construction techniques and materials that will be used are suitable. This means that the exact same construction process that will be used for the final product should be used for the prototype too. See the furniture joinery section for help on choosing your construction method. Additionally, any errors that didn't show up in the small scale design will be worked out with the prototype so that there will be no further complications before manufacturing of the furniture begins.

5. Testing:

Once the prototype has been built, it needs to be tested. If it's a chair, someone needs to sit on it, if it's a shelf, something needs to be put on it, simple really. For the purposes of mass production, furniture should be stress tested and sometimes several prototypes are made so that a few can be broken in order to find out what the limits of the piece of furniture are.

6. Presentation:

Once completed the finished piece should be photographed for portfolio purposes. If there is a client then once all of the testing has been completed, the piece is presented to them. They will either take it as it is or they ,may ask for the piece to be changed or tweaked in some way. If it's the former than the design process is complete, and if it's the latter then it may be back to the workshop! If there is no client then the finished piece should be put on display for sale. 

If you enjoyed this article then perhaps our articles on the web, graphic, interior or games design processes may also be of interest.


Thursday, November 26, 2015

The Design Process

The Design Process
The Design Process

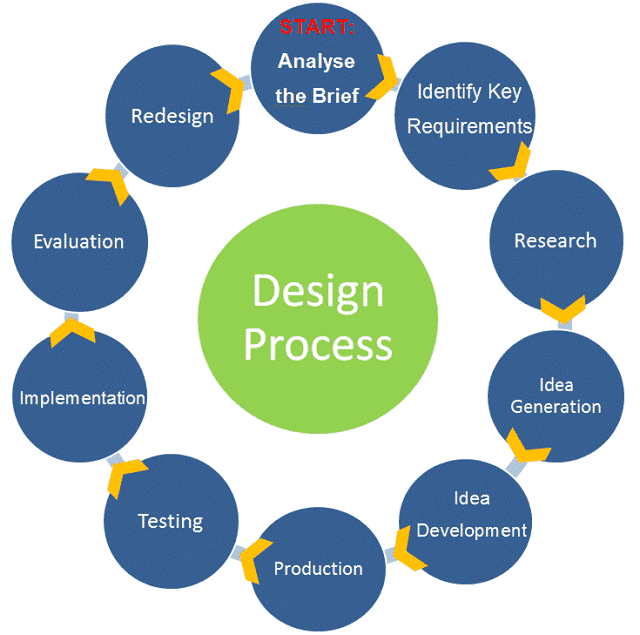
The Design process is a series of steps that a designer takes when working on a project. The details of each stage will differ depending on the type of design but the approach should always be the same. It is vital to stick to the design process during a design as skipping a stage, completing stages out of order or not using the design process at all will result in a lower quality outcome, an outcome the client is not happy with or even worse no outcome at all.

The diagram above outlines the basic stages of the design process and below each stage of the process is explained in more detail.


1. Analyse The Brief

The design process will begin when a client delivers the designer with a brief. The brief will outline what the client wants although as the client will likely have no design experience it is important for the designer to carefully analyse all details given by the client and if necessary to make further enquiries about the needs of the client. It may seem overly simple or just plain obvious but this is a key satge in the design process as if you start out with the wrong idea of what you are being asked to do then you will never be successful. On the other hand, a specific and detailed outline of the clients needs based on the brief will allow for a smooth and successful completion of the design process.


2. Identify The Key Requirements

The next step of the design process is based on the analysis of the brief , now you must identify the most important parts of the brief and what is required to achieve them, whether it is time, software, hardware, samples or something else. Ask yourself, what requirements must I fulfil? For example when designing a poster for an event, the simple act of including the time, date and venue are much more important than any aspect as a poster without the necessary details is useless. It is therefore important to identify and prioritise the key requirements of the brief.

3. Research Existing Design Solutions

Research is important part of the design process in order to identify possible design styles and ideas which may also suit the needs of your client. These samples can be used when meeting with the client to identify the style of image/design which they prefer. For students research will also help to familiarise yourself with industry standard designs and the quality of design which is required.


4. Generate Ideas/Brainstorming

Coming up with an idea for the design, a slogan for a campaign, an image for a poster, a name for a website etc. can be difficult. However, by focussing on fulfilling the key requirements of the brief and allowing your research to inspire you it is possible to generate original designs for your project. Brainstorming is often used where a lack of ideas is a problem. Free writing is a type of brainstorming which simply involves relaxing your mind and writing down any and all ideas you have as quickly as possible without really thinking. Having your research around you can help when doing this. It may seem very simple but generally people have numerous ideas but they tend to dismiss them before writing them down, considering them down and allowing them to be developed into viable design solutions. For help and assistance visit our article on idea generation.


5. Develop Ideas

It is good practice not to settle on simply one idea but rather to choose 2 or 3 of your best ideas and develop them through simple sketches, drawings, colour scheme test pages and font style sheets. These steps all help to develop your ideas and highlight which one has the most potential for success. Sketching will also help to identify possible layouts/compositions that can be used.


6. Produce The Design

Once an idea has been selected and sufficiently developed it is time to begin producing/creating the design. It is important to note that this is commonly the stage of the design process that overeager student designers begin at and without stating the obvious this should never be done. Depending on the type of design different softwares or materials will be used to create the design but regardless of the means of production it is important that the previous stages are not forgotten and that the key requirements are fulfilled.


7. Testing The Design

This is a quick and simple stage of the design process but one that is often overlooked. For printed designs testing simply involves printing the design to ensure the resolution and colours are of good quality, that no clipping of important details occur and that text is readable and without errors. For website design this stage will involve checking that all features are functional, that links are working and that page loading speeds are acceptable.


8. Place the design into the intended environment

For printed designs this will involve placing the poster/logo/sign/banner etc. in its intended position and ensuring that text is readable from an acceptable distant, images are clear and that the colours do not clash with or blend into their surroundings. For websites this will involve publishing the website online and rechecking all features and functions. For other types of designs, such as architecture or interior design, a programme such as Photoshop can be used to digitally place the design into its intended environment.


9. Evaluate The Completed Design

Before printing your final design to the client it is vital that you evaluate it without bias. The easiest way to do this is simply return to stage 2 of the design process where you identified the key requirements of the brief and see if you have successfully fulfilled them. It may also be useful to get the opinion of others at this stage if you fear you will be unable to objectively evaluate your own design.


10. Redesign

This step in the process is only necessary if, after evaluation, you feel you have not successfully met the key requirements of the design brief. This stage involves returning to the beginning of the design process and returning through each step correcting the errors which led to the key requirements not been fulfilled.

If you enjoyed this article then perhaps our articles on the webinterior, games, graphic or furniture design processes may also be of interest.


close
Banner iklan disini