|
| Sample Game Design Concept Board |
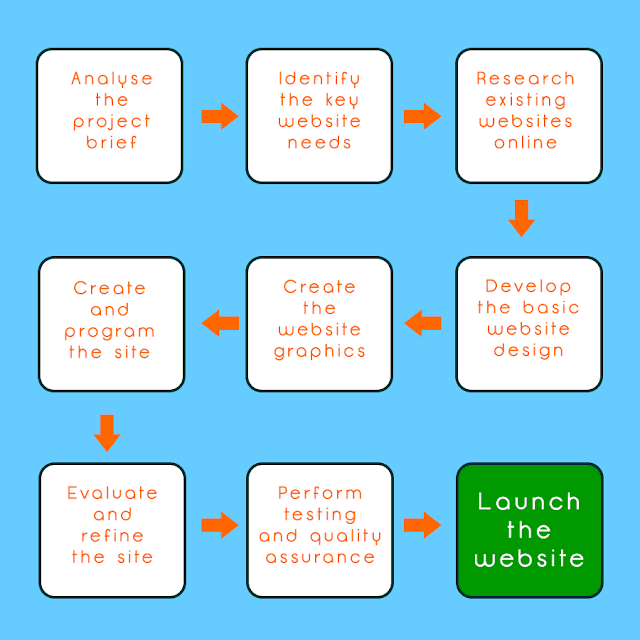
The Concept:
It may sound obvious but the first thing you need to do when creating a concept board is to create the concept and write it down! Of course everyone does this but not everyone does it correctly. Your concept board should have details of all areas of your proposed project design and therefore your concept/idea needs to be fully developed with all decisions finalized so you don't have to edit your concept board after you thought you were finished or even worse, leave something out that you should have displayed. For example, for a computer game concept board your idea should include....- The full story/plot of the game to set the scene.
- Where and when the game is set and details about how it looks eg. abandoned water mill in the valley between two snow covered mountains ranges
- Who are the game players/enemies and what do they look like
- What objects/vehicles will be involved in the game
- What is the main game objective eg. kill enemies, score points, survive, collect objects, solve puzzles etc.
Just a reminder to write all these things down as our memories are not as good as we like to think!
Research:
 |
| A selection of images on the concept theme which could be used in the concept board |
There are two stages of research that need to be completed - I call these general and specific research.
The first stage, general, involves researching existing concept boards to help you gain an understanding of what a concept board is, what it can look like, the variety of possible style and layouts etc.
The first stage, general, involves researching existing concept boards to help you gain an understanding of what a concept board is, what it can look like, the variety of possible style and layouts etc.
The second stage of research, which I call specific research, is where you will search for images of the things which you described in your concept board. You will later use these images to create a single image "collage". This might not make sense yet but basically, we will use a combination of multiple images (all edited from their original state) to form a single image which, along with some text will explain your idea is a way that is visually interesting and informative.
Blocking Out:
 |
| "Blocking out" is a graphic design layout technique |
"Blocking Out" is a graphic design technique used to quickly mock up the composition or layout of a design in a software package using only blocks to represent different areas or aspects of the design. The colour of the blocks does not matter so it is best to keep them in shades of grey to allow you to focus on their shape, scale and position within the design. If it helps you can also add text into each block to remind you what it is for.
In the sample image above the top-right represent where the title and story text will go. The vertical block in the center represents a lighthouse on a rock (the horizontal block it is on). The large horizontal block taking up a third of the canvas represents the ocean while the blank white space in the background is the sky. Finally, the 3 circles represents areas for explanatory text to go. Can you visualize it yet?
It may seem a strange way to start a concept board design but it has many advantages...
- Helps you quickly and easily arrange a suitable layout of the content you need to include
- You can easily add, remove, scale and rotate elements within the layout.
- Creates all the main layers that you will need
- You can focus on layout without the distraction of actual images or colour
- Helps you to visualize the final design before you have any images in place
Breaking The Ice:
 |
| Add in the images you want in a "rough and ready" way just to get started |
Once you know the composition/layout you want to achieve, roughly at least, the next stage is to get all the pieces of the puzzle on the one canvas. It is a common mistake to edit each part separately, trying to get them all perfect and then bring them together at the end only to realise the colours/resolution/style don't match.
Breaking the ice simply means getting started. The best way to start is to put all the images you think you will need onto the canvas, ideally overlapping them on your "blocking out" layout.
As these elements will eventually all be viewed together it is important that you edit them all together so you can easily judge their scale, colour, resolution and style proportionate to one another. It also removes any confusion about the potential complexity of bringing images together properly, which would arise if you have edited each one separately.
Finally, it forces you to start. It can be hard to imagine how a design will look when it is completely finished and people often stop themselves from starting or judge their designs too soon. This leads to hesitation, time wasting and unnecessary editing. Once you break the ice and put all the pieces of the puzzle in place it will be much easier to finish, after all you wouldn't try to do a jigsaw without having all the pieces there!
Blending Images:
 |
| Try to make your separate images look like part of one large image |
Blending images refers to the process of editing all the imported images so that they appear as a single image, like in this Photoshop tutorial. This is possibly the most difficult stage of the process but if you take the right approach to it then it can be made much easier. I would recommend the following steps to blending the images together to form a single scene.....
- Remove all the background/unneeded content from each individual image
- Scale, position and layer the images as you want them
- Use filters/effects/layers styles to ensure the images are all of the same graphic design styles
- Edit the images hue/saturation so that they are all of similar colouration
- If images over lap or meet in a non exact way, such as waves crashing over rocks, use the clone stamp tool or a semi opaque eraser tool to help them blend together more realistically
Adding Text:
 |
| Keep the text to a minimum and utilise headings for each section |
Probably the most obvious step in the process. The heading says it all really - add text. The advice I can give you is short and simple.
- www.dafont.com is a great place to get place to get interesting and unique font.
- Make sure any fonts you choose are still legible (easy to read)
- Make sure the colour of the text contrasts with the images behind it, possibly use semi transparent layers to help with this. (see image above)
- Use headings for each section
- Only include important information - the less text the better
- Try out these Photoshop text tips
Optimise:
 |
| Add detailed content and additional images to complete the effect |
This step should be completed after you have reflected on your progress so far, evaluating the look of the design and checking that all required content is in place. Take note of all the changes you want to make - this will be your final "to do" list. You might also consider making use of some of the design principles to make your concept board more aesthetic.
So tips to consider when optimising your concept board are...
- Print off the design, it will look different when printed than on the screen and will give you a better idea of scale and colour.
- Show it to others and ask for feedback - you don't have to agree with them but their opinions may spark an idea for you or may identify something you overlooked.
- Try to have a foreground, middle ground and background to your image. This helps draw people into it.
- Whatever you do, don't clutter it by adding in too many images or too much text. The simpler the better.
- Consider these presentation board tips.
Some More Sample Concept Boards...
Click on any of the sample concept boards below to view full size...