Showing posts with label process. Show all posts

Saturday, February 20, 2016

Furniture Design Process

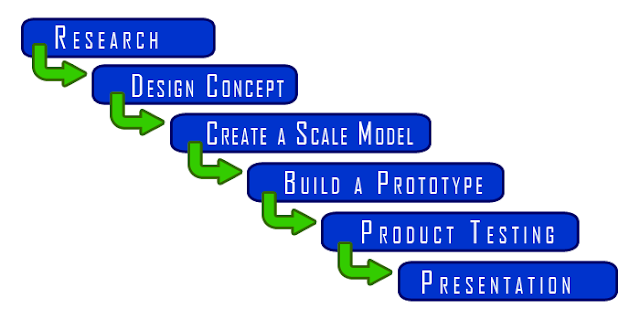
The Furniture Design Process

1. Research:

Unlike other design processes the furniture design process does not begin with a brief, as the client, if there is one, is usually requesting a bespoke piece of furniture without any specific requirements, other than perhaps the size. Also, furniture designers who are self employed often create pieces as they go and sell them on afterwards. In this sense the term furniture is referring to a wide range of items from chairs to cabinets to wardrobes to beds. In order for a furniture designer, or any designer for that matter, to be continually inspired it helps to be well researched. Understanding what other designers have done before you and what your contemporary peers are doing helps you to come up with your own ideas too. In this way, the research is non specific and it is simply recommended to continually keep up to date with what is happening in your area and to be aware of the furniture design history which preceded you. See the furniture design history timeline to gain an insight into the various types and styles of furniture that exist.

2. Design Concept:

The first real step in the process is the idea or concept; this is the starting point from which everything else grows. How you come up with the idea may be through an organised brainstorming session or it may occur naturally while researching or it may be just a eureka moment that happens out of the blue. However the idea comes to you it is important to document your idea by writing it down, sketching the general design form and perhaps the joinery methods too. As well as keeping the concept exactly as you originally imagined it, this documentation will also serve as evidence that it was your original idea in case it is later copied by someone else, so it may be a good idea to sign and date it.

3. Scale Model:

Next you should build a small, scale model of the idea as a way of seeing how it will look and to identify any problems before proceeding to build a full scale prototype. Sometimes there can be unforeseen complications that don't show up on paper, and they can be dealt with at this stage before realising it later and wasting full sized materials in order to do so. The scale model may also help identify which type of joinery techniques are most appropriate.

4. Prototype:

The next step is to build a to-scale (full size), working prototype.A prototype is basically the small scale model made full sized. If this is a once of piece, what this means is that you are in fact building the finished product while if the design is intended for mass production you are simply building a single piece to ensure all of the construction techniques and materials that will be used are suitable. This means that the exact same construction process that will be used for the final product should be used for the prototype too. See the furniture joinery section for help on choosing your construction method. Additionally, any errors that didn't show up in the small scale design will be worked out with the prototype so that there will be no further complications before manufacturing of the furniture begins.

5. Testing:

Once the prototype has been built, it needs to be tested. If it's a chair, someone needs to sit on it, if it's a shelf, something needs to be put on it, simple really. For the purposes of mass production, furniture should be stress tested and sometimes several prototypes are made so that a few can be broken in order to find out what the limits of the piece of furniture are.

6. Presentation:

Once completed the finished piece should be photographed for portfolio purposes. If there is a client then once all of the testing has been completed, the piece is presented to them. They will either take it as it is or they ,may ask for the piece to be changed or tweaked in some way. If it's the former than the design process is complete, and if it's the latter then it may be back to the workshop! If there is no client then the finished piece should be put on display for sale. 

If you enjoyed this article then perhaps our articles on the web, graphic, interior or games design processes may also be of interest.


Thursday, November 26, 2015

The Design Process

The Design Process
The Design Process

The Design process is a series of steps that a designer takes when working on a project. The details of each stage will differ depending on the type of design but the approach should always be the same. It is vital to stick to the design process during a design as skipping a stage, completing stages out of order or not using the design process at all will result in a lower quality outcome, an outcome the client is not happy with or even worse no outcome at all.

The diagram above outlines the basic stages of the design process and below each stage of the process is explained in more detail.


1. Analyse The Brief

The design process will begin when a client delivers the designer with a brief. The brief will outline what the client wants although as the client will likely have no design experience it is important for the designer to carefully analyse all details given by the client and if necessary to make further enquiries about the needs of the client. It may seem overly simple or just plain obvious but this is a key satge in the design process as if you start out with the wrong idea of what you are being asked to do then you will never be successful. On the other hand, a specific and detailed outline of the clients needs based on the brief will allow for a smooth and successful completion of the design process.


2. Identify The Key Requirements

The next step of the design process is based on the analysis of the brief , now you must identify the most important parts of the brief and what is required to achieve them, whether it is time, software, hardware, samples or something else. Ask yourself, what requirements must I fulfil? For example when designing a poster for an event, the simple act of including the time, date and venue are much more important than any aspect as a poster without the necessary details is useless. It is therefore important to identify and prioritise the key requirements of the brief.

3. Research Existing Design Solutions

Research is important part of the design process in order to identify possible design styles and ideas which may also suit the needs of your client. These samples can be used when meeting with the client to identify the style of image/design which they prefer. For students research will also help to familiarise yourself with industry standard designs and the quality of design which is required.


4. Generate Ideas/Brainstorming

Coming up with an idea for the design, a slogan for a campaign, an image for a poster, a name for a website etc. can be difficult. However, by focussing on fulfilling the key requirements of the brief and allowing your research to inspire you it is possible to generate original designs for your project. Brainstorming is often used where a lack of ideas is a problem. Free writing is a type of brainstorming which simply involves relaxing your mind and writing down any and all ideas you have as quickly as possible without really thinking. Having your research around you can help when doing this. It may seem very simple but generally people have numerous ideas but they tend to dismiss them before writing them down, considering them down and allowing them to be developed into viable design solutions. For help and assistance visit our article on idea generation.


5. Develop Ideas

It is good practice not to settle on simply one idea but rather to choose 2 or 3 of your best ideas and develop them through simple sketches, drawings, colour scheme test pages and font style sheets. These steps all help to develop your ideas and highlight which one has the most potential for success. Sketching will also help to identify possible layouts/compositions that can be used.


6. Produce The Design

Once an idea has been selected and sufficiently developed it is time to begin producing/creating the design. It is important to note that this is commonly the stage of the design process that overeager student designers begin at and without stating the obvious this should never be done. Depending on the type of design different softwares or materials will be used to create the design but regardless of the means of production it is important that the previous stages are not forgotten and that the key requirements are fulfilled.


7. Testing The Design

This is a quick and simple stage of the design process but one that is often overlooked. For printed designs testing simply involves printing the design to ensure the resolution and colours are of good quality, that no clipping of important details occur and that text is readable and without errors. For website design this stage will involve checking that all features are functional, that links are working and that page loading speeds are acceptable.


8. Place the design into the intended environment

For printed designs this will involve placing the poster/logo/sign/banner etc. in its intended position and ensuring that text is readable from an acceptable distant, images are clear and that the colours do not clash with or blend into their surroundings. For websites this will involve publishing the website online and rechecking all features and functions. For other types of designs, such as architecture or interior design, a programme such as Photoshop can be used to digitally place the design into its intended environment.


9. Evaluate The Completed Design

Before printing your final design to the client it is vital that you evaluate it without bias. The easiest way to do this is simply return to stage 2 of the design process where you identified the key requirements of the brief and see if you have successfully fulfilled them. It may also be useful to get the opinion of others at this stage if you fear you will be unable to objectively evaluate your own design.


10. Redesign

This step in the process is only necessary if, after evaluation, you feel you have not successfully met the key requirements of the design brief. This stage involves returning to the beginning of the design process and returning through each step correcting the errors which led to the key requirements not been fulfilled.

If you enjoyed this article then perhaps our articles on the webinterior, games, graphic or furniture design processes may also be of interest.


close
Banner iklan disini