Showing posts with label design. Show all posts

Thursday, October 6, 2016

Read How to make a Start Screen for UE4 Now

Menu
The Completed Start Screen


This tutorial will go through how to create a Start/Main Menu for a game on Unreal Engine. In a previous tutorial we showed that when setting up a level on Unreal Engine, for settings we added With Starter Content.

Starter Content
Starter Content

Getting Started

The first thing you do go to your user interface folder in the Content Browser. When you click into the folder and then right click on a black space anywhere in the folder. A tool bar will then appear. Scroll down and click on the User Interface bar and then select the Widget Blueprints sub bar.  A new widget file will appear and you then name it, for example Start_Screen. You then save it.

Content Browser
UI Folder

Design

With your new User Interface file, you click into it which brings you into widget editor. We will be making the buttons and background image with the designer.

Widget Editor
Widget Editor

Palette
Palette
You first select Button on the Palette. To place it onto the screen. Note: if anything is unable to be dragged onto the screen, you can still drag it onto the Hierarchy, onto the Canvas Panel, it will still appear. A Details Panel will show like in the Level Editor where you can fix anchor points, positioning etc. 

Details
Button Details

Button
Button
Hierachy
Hierarchy

After you place your buttons onto the screen, you bring in a text block for each of your buttons.For the Text that you're going to use for your title and your buttons, have a custom font installed, and have it looking suitable to your game.
Text Block
Text Block
You use the Details Panel to make the colour, font and text content. 

Text Details
Text Details
So for each button we need to give each a name and a background colour. So for this we will name our buttons START and QUIT. 

Buttons
Menu Buttons

After you have your buttons made, bring in your background image. The image that we use is was imported into the UI folder in the Content Browser. From the Palette, drag on IMAGE. In the Details Panel, in Appearances, click into Brush. Here you can select the image you have imported by searching for it. When you have your image, adjust its size so it fills as a background screen.

Image Details
Image Details
Background Image
Background Image

When you have made your background screen, add in another text block to give your add your game name. 
Game Title
Title

Blueprints

After you have your Menu designed, click onto the Blueprints and click on, Open Level Blueprints.

Blueprints Buttton
Blueprints Button
These are the codes for your menu...

Blueprints
Menu Blueprints
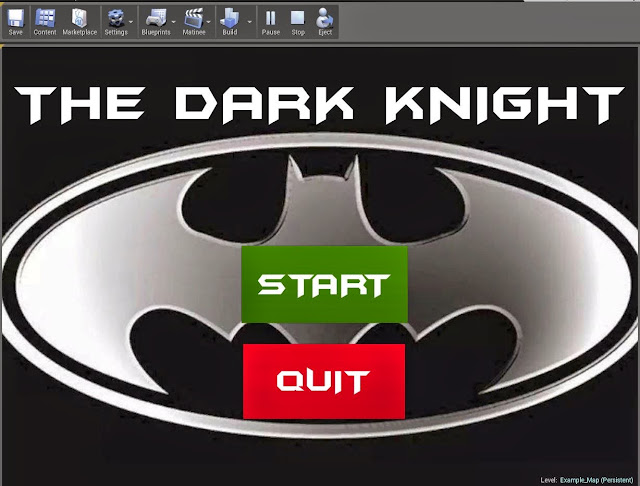
After that is done, press play to test out your menu. It should look something like the image below.


Finished Screen
Finished Screen


Read How To Create A Tileable Texture Now

Tillable Texture
This image shows a finished texture that can be used in a game.

Steps To Create The "Diffuse" Texture


1. Search for an image that will be suitable for your game and an image that you want to be your tileable texture. the best website is http://www.textures.com/

2. Put an image that you want to be your texture in to Photoshop software.

Brick Wall
This image shows the brick wall.

3. Crop the image, removing any potentially troublesome areas.

Crop Image
This image shows Crop tool has taken away part of the image.

4. Then resize image to be power of 2.

Image Resize
This image shows the Image size setting in power of 2.
5. Press filter on top software tool bar than select other option and then select offset.

Offset
This image shows the right setting for offset.

Offset divide image
This image shows an image that is divided into two parts the better one in on top and the bad one is on bottom of the picture. The bottom part will be covered with clone tool.

6. We will use clone tool to copy good parts of image.

Clone
This image shows that the clone tool created a copy of the top part of the image.
7. Use Sharpen tool to get rid of the blur but do not over use Sharpen tool because we get bad effect.

8. Use dodge tool to make shadows lighter and burn tool to make highlights darker.

Dodge
This image shows how you can make image brighter by using Dodge Tool.

Burn
This image shows how you can make image darker by using Burn Tool.

9. On tap bar go to Image\Adjustment\Hue and Saturation.Add Hue and Saturation adjustment the way that you want to make this texture more interesting. Make sure that there is not any defects.

Hue & Saturation
This image shows settings for Hue and Saturation Adjustment.

10. If everything is good and you are happy of effects save as targa file. You should save your targa with a resolution of 32 bits/pixel.

A finished texture
This image shows a finished texture that can be used in a game.

Steps To Create The "Normal" Texture

1. Search in Google for NVIDIA texture tool the best way to find it is: “NVIDIA Texture Tools for Adobe Photoshop”. If you cannot find there is a link for website where you can download NVIDIA plugging tool.

https://developer.nvidia.com/nvidia-texture-tools-adobe-photoshop

2. Press download and chose version of Windows that you work with either 32 bit or 64 bit.

3. When download is finish just install the program.

4. Open Photoshop and check in NVIDIA installed right be pressing filter and down in list should be NVIDIA Tool.

5. Open your texture targa file.

This image shows the file name and format that is saved.
6. Unlock layer so you can work with NVIDIA Tool.

This image shows layer blocked.

This image shows layer unblocked.
7. Go to filter and select NVIDIA Tool and take “NormalMapFilter” option.
This image shows setting of NVIDIA Tool.

This image shows some effect that we can get from NVIDIA Tool.
8. Duplicate the layer until you get effect that you want.

This image shows Duplicate layer which give better effect.

This image shows last step that you should take after last duplicate layer.

9. If you are happy of yours effect save in targa(tga) file.

This image shows saving mode.


This image shows a finished texture that can be used in a game. The texture is in targa(tga) file.


This image shows right format that you can save your targa format and it shows the resolution that you can chose the best options is 16 bits/pixel and 32 bits/pixel because is the power of 2.

This link shows Video Tutorial about how to install NVIDIA Texture tool and how creating Tillable texture.

The Next Step

Now that you have created the texture the next step is to import and add them to whatever software you need them for.


Read How to make a sword in Blender Now


finished result 

In this tutorial you learn the necessary skills on how to make a sword. In this tutorial we will be making a Japanese Katana.


Part 1 The Blade


Change to cycles render

Cycles Render


Delete cube, press 1 and then 5 for orthographic view, shift A to add plane, R to rotate on the X axis by pressing X then 90.

plane 


Tab for edit mode S scale on the X axis

plane scaled 


Press shift and tab for the snap during transform button or hit the magnet button, select the top vertex
Snap during transform 


vertex selected


E to extrude up to 16 boxes, turn on proportional editing,

extruded plane


Once proportional editing is on G to grab on the X axis, scroll mouse button

Proportional editing

Change to sharp

sharp

Move too two boxes to the right
sharp tool in use

Click the right vertex then the second, press W to merge, at first,

merge

at first

merged point 


Turn proportional editing and snap during transform off, select the outside of the blade by pressing B and dragging it along the left side or by selecting each vertex individual by hitting shift and right clickE to extrude on the X axis a small bit.


extruded


Merge the top vertex, move the bottom one slightly to the right

merged


Press A to select everything, change view by 3 on the keypad, E to extrude.
extruded

Merge the two points together

merged points 

Select the next vertex underneath the top point and its opposite one press W , merge, at centre do this to the rest.
at center

To fix the lighting and shade go to mesh, normals, recalculate outside or inside this will prevent the blade from being dark at certain angles.

Normals 

Tab and smooth. the smooth button is to the left it will show if your out of edit mode. add a modifier, subdivision surface, change render to 1.The blade will look off, go into edit mode by pressing Tab, select the these 4 vertex

subdivision

4 points selected


To fix the problem that will happen go to mesh, edges, edge crease. once clicked drag your mouse across the screen to the right side. this fill the empty space, repeat this for the bottom of the blade.

edge crease

using edge crease


edge crease used at the top of the sword


edge crease used at the bottom of the sword

To add a flare onto it create a loop cut ctrl R lenght wise twice 

creating a flare in the sword

Press E to extrude and right click straight away so it sits on top, S scale on the Y axis pull it in to your desired depth. Then add edge crease to make the depth stand out.

adding depth 


Part 2 The Hilt 

Select all of the vertexes by pressing  Band dragging it across or by selecting each one individual by shift and right click.
bottom all selected

Mesh, snap cursor to selected that will center the 3d cursor at the bottom of the blade, shift A add a circle, tab into edit mode, select these vertices
six vertices selected

S scale them inwards like so

scale inwards

go into front view 1 select the circle E extrude on the Z axis


extrude

 Create a face by hitting F

add face


E to extrude right click straight away scale a small bit extrude on the Z axis downward to create a small lip. Repeat this step for the bottom

creating small lip


Click on the hilt, click on smooth this will create an issue to fix this, add a modifier, edge split this will fix it.

smooth

edge split
Select the face underneath the the hilt, then place the cursor in the centre by going to mesh, snap, cursor to centred. add a circle by shift A, add circle, S for scale to whatever size you want your handle to be.

circle 


scale

scale on x,z,y axis 


 E extrude a small bit downwards, press enter  extrude right click straight away scale a notch inwards to create a small lip then extrude to your desired length

extrude

extrude

Extrude again, scale inwards and create a face by hitting

add face


Select the top vertex,

top selected

 shift D to duplicate, right click to place then right on top, hit P to make it a brand new section.

duplicate


 Drag it down, extrude around this size, create three loop cuts

creating loop cuts


Use the knife tool, hit Z so it will cut through the mesh, create a diamond shape, select all the faces and press X delete faces.

Knife tool


selected faces

Add an Array modifier 

Array modifier 

Use this to move and duplicate the design onto the hilt 

Array modifier 


Array modifier used

To add a material and a texture check out the tutorial on how to add a texture in Blender at

Add lighting around the scene by hitting shift A, lamp choose a type a light that suits you.
you can check the tutorial about adding light in Blender 

light placed in scene

rendered view


close
Banner iklan disini