Showing posts with label importing textures. Show all posts

Thursday, October 6, 2016

Read Importing and Applying a Decal Texture in UE4 Now

Importing Textures Into UE4

Welcome to this tutorial, today we are going to work on bringing textures into your game. We are going to cover three different types of textures and how they can be imported into your game, along with how to apply them.

Sample Decal Texture


Step 1: Importing a texture


The first thing we need to do is source a texture.

I’m going to use a rust texture made in an earlier tutorial and import that into my game. The first thing we need to do is import the texture into Unreal. To do this open your game. Then in the context browser select the Starter Content folder and in the textures folder we are going to select import.

We click the import button beside new.

The file type for the decal should ideally be a .TGA (Targa File). Once you click import you will be asked to select the file, locate your file and click open, but make sure you select the TARGA file type and not the .PSD file.


Step 2: Creating the decal material

My texture has been imported into the game. Now we need to add a material.

The texture is imported but the star symbol means it is unsaved.

To add the new material scroll down to the bottom of the textures folder and right click in an empty space, from the pop up menu select the material option. Then name your material decal rust. 

Here we can see the blank material that I have created.

If you then double click on the newly made material, it will open the material editor which should look like this.

Our texture is not in the material editor yet, that is why the ball is black. 

Now the problem here is that we have no actual image to create our decal from, so what we need to do is take the imported decal from our content browser on the left and drag it into the grid on our material editor.

The decal  has been brought into the material editor.

The next thing we need to do is connect the decal to the info panel.

Here we connect the detail to the info panel.

Once this is connected click on the info panel. The options on the left will change.
What I've done below is selected the info panel and changed the blend mode from opaque to translucent. This is one step closer to eliminating the background so the decal goes on without a pure white background.

The details on the left hand side have changed.

We connect the bottom most channel on the texture to the opacity option on the info panel.
We also need to change the material from a ‘Surface’ to ‘Deferred Decal’. The result is we now have a decal texture. Hit save at this point.

All I did here was click the black triangle beside surface and select deferred decal.


Step 3: Applying the decal material

Now that we have this done let’s get a surface prepared to apply the decal to.
What I have done in the below picture is I’ve opened the starter content folder and I dragged a copper material from the materials folder directly onto the wall.

Note: the material came from the materials folder, not the textures.

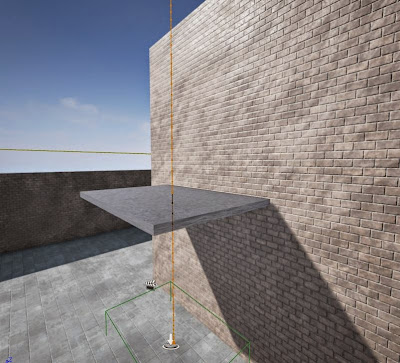
Now that this is done we need to take in a deferred decal from the place section under the visual option scroll down to find deferred decal. Once you drag this into the game this is how it will look.

The material we created with the decal needs to be applied to this.

Now that we have entered the deferred decal we need to actually connect our decal to this decal.
To do this drag the material you created in the textures folder and drag it over to the materials box on the left hand side.

We drag and drop the material into one of the empty boxes and this will apply it.

Now to get this decal to actually work is going to take some manipulation, because of the way the deferred decal is positioned, so with it selected, hit the space bar in order to bring up the rotate widget, then click and drag along the blue and red arcs to the decal to rotate into a position that you are happy with. 

The purple arrow tells us the direction in which the decal is facing.

Now I'm happy with the location but not the scale. So if you hit space again you will get this widget (below) this is used for scaling and I'm going to scale mine till I am happy with how it looks.

Clicking on the green arrow and dragging up or down will scale the decal.

I'm happy with the scale of this decal. Now we are finished applying the decal we can save the progress and move on to the next texture.


Read How to make a moving Elevator for UE4 Now

Elevator
Elevator

In this tutorial, we will be showing how to make a working elevator. 

Getting Started

First we will add a block and then scale it for the elevator to travel its way up the side.

Tower
Tower
Then we make a platform for the actual elevator. Note: when making an elevator, make sure that you change it form a BSP to a Static Mesh. Also, you change the mobility for Static to Moveable.

Platform
Elevator Platform

Mobility
Moveable

Static Mesh
Static Mesh

Triggering

As we showed in a previous tutorial about triggering an open door, now were going to trigger a lifting elevator. First we drag a box trigger, onto the platform. You also need to change the mobility to Moveable.

Box Trigger
Trigger
You then add a Matinee to your elevator.

Matinee
Matinee

Moving

You select all actors and select a movement. Add a key frame of 5 seconds. Now your elevator can move.

Movement
Movement

Movable Elevator
Movable Elevator

Add your blueprints for triggering the elevator to lift.

Blueprints
Blueprints
Make sure that your platform is a collision, so your player is able to stand on it. That's it, your done!


Read How to make a sword in Blender Now


finished result 

In this tutorial you learn the necessary skills on how to make a sword. In this tutorial we will be making a Japanese Katana.


Part 1 The Blade


Change to cycles render

Cycles Render


Delete cube, press 1 and then 5 for orthographic view, shift A to add plane, R to rotate on the X axis by pressing X then 90.

plane 


Tab for edit mode S scale on the X axis

plane scaled 


Press shift and tab for the snap during transform button or hit the magnet button, select the top vertex
Snap during transform 


vertex selected


E to extrude up to 16 boxes, turn on proportional editing,

extruded plane


Once proportional editing is on G to grab on the X axis, scroll mouse button

Proportional editing

Change to sharp

sharp

Move too two boxes to the right
sharp tool in use

Click the right vertex then the second, press W to merge, at first,

merge

at first

merged point 


Turn proportional editing and snap during transform off, select the outside of the blade by pressing B and dragging it along the left side or by selecting each vertex individual by hitting shift and right clickE to extrude on the X axis a small bit.


extruded


Merge the top vertex, move the bottom one slightly to the right

merged


Press A to select everything, change view by 3 on the keypad, E to extrude.
extruded

Merge the two points together

merged points 

Select the next vertex underneath the top point and its opposite one press W , merge, at centre do this to the rest.
at center

To fix the lighting and shade go to mesh, normals, recalculate outside or inside this will prevent the blade from being dark at certain angles.

Normals 

Tab and smooth. the smooth button is to the left it will show if your out of edit mode. add a modifier, subdivision surface, change render to 1.The blade will look off, go into edit mode by pressing Tab, select the these 4 vertex

subdivision

4 points selected


To fix the problem that will happen go to mesh, edges, edge crease. once clicked drag your mouse across the screen to the right side. this fill the empty space, repeat this for the bottom of the blade.

edge crease

using edge crease


edge crease used at the top of the sword


edge crease used at the bottom of the sword

To add a flare onto it create a loop cut ctrl R lenght wise twice 

creating a flare in the sword

Press E to extrude and right click straight away so it sits on top, S scale on the Y axis pull it in to your desired depth. Then add edge crease to make the depth stand out.

adding depth 


Part 2 The Hilt 

Select all of the vertexes by pressing  Band dragging it across or by selecting each one individual by shift and right click.
bottom all selected

Mesh, snap cursor to selected that will center the 3d cursor at the bottom of the blade, shift A add a circle, tab into edit mode, select these vertices
six vertices selected

S scale them inwards like so

scale inwards

go into front view 1 select the circle E extrude on the Z axis


extrude

 Create a face by hitting F

add face


E to extrude right click straight away scale a small bit extrude on the Z axis downward to create a small lip. Repeat this step for the bottom

creating small lip


Click on the hilt, click on smooth this will create an issue to fix this, add a modifier, edge split this will fix it.

smooth

edge split
Select the face underneath the the hilt, then place the cursor in the centre by going to mesh, snap, cursor to centred. add a circle by shift A, add circle, S for scale to whatever size you want your handle to be.

circle 


scale

scale on x,z,y axis 


 E extrude a small bit downwards, press enter  extrude right click straight away scale a notch inwards to create a small lip then extrude to your desired length

extrude

extrude

Extrude again, scale inwards and create a face by hitting

add face


Select the top vertex,

top selected

 shift D to duplicate, right click to place then right on top, hit P to make it a brand new section.

duplicate


 Drag it down, extrude around this size, create three loop cuts

creating loop cuts


Use the knife tool, hit Z so it will cut through the mesh, create a diamond shape, select all the faces and press X delete faces.

Knife tool


selected faces

Add an Array modifier 

Array modifier 

Use this to move and duplicate the design onto the hilt 

Array modifier 


Array modifier used

To add a material and a texture check out the tutorial on how to add a texture in Blender at

Add lighting around the scene by hitting shift A, lamp choose a type a light that suits you.
you can check the tutorial about adding light in Blender 

light placed in scene

rendered view


close
Banner iklan disini