Showing posts with label game design. Show all posts

Tuesday, January 3, 2017

Learn A New Skill For The New Year

Learn A New Skill For The New Year
Giving things up for new year is a common practice but also a very difficult one that most people break after just a few weeks. So this year make your resolution be to learn something new, to up-skill, to re-skill; here's a few good reasons why ...

  • A new skill to put you ahead of other job candidates
  • A new skill for a change in career, 
  • A new skill to enhance your studies 
  • Or just a new skill for fun! 

But what skill should I choose? Well, design skills are one of the most adaptable and sought after skills around as they show you to be creative and innovative but also logical and organised. So here are the top 5 design areas for you to up-skill in...

Web Design:


More and more business is being done online everyday and because of this every business from your local coffee shop to the multinational corporations has a website. This means there is a growing demand for web designers to create, update, moderate and redesign all these websites. To get in on the action, you will need to learn HTML5, CSS3 and at least a little JavaScript. These programming skills will be further enhanced with knowledge of SEO (Search Engine Optimisation) and design skills like the ability to use Photoshop. Using the web design process is also an essential skill that is unfortunately overlooked by many web developers who call themselves "designers".


Graphic Design:

Sample Poster

A lot of people group the ability the use Photoshop and being a graphic design together as if they were the same thing... they are not! Photoshop is a great software and the Adobe Creative Suite of which it is part is certainly the industry standard for graphic designers but there is a lot more to graphic design that using software, after all, graphic design still existed before computers! Back then, just like for modern graphic designers, the graphic design process, an understanding of colour theorytypography and composition were all keys skills. Some more modern techniques such as the use of attention grabbing techniques in your imagery and the use of the most powerful words in your typography will further enhance your skill base.


Games Design:

Games design with Unreal Engine

The games design process can be completed by just one person but that person would need to be highly skilled in many different areas of the design process and production stages and have a lot of time on their hands! For these reasons computer games, much like anything else, are designed and built by a team of people each with their own specific set of relevant skills. See which role would interest you most or dabble in a little bit of each before focussing on one area to learn. Start your journey here.


Interior Design:

An example of the Urban Interior design style
 Interior design is another misunderstood craft with numerous people claiming to be interior designers simply because they have "an eye for it". The interior design process, when done properly, is a complex task which requires multiple skills and the knowledge of key areas such as interior design styles, colour theory, room layout techniques and an awareness of a multitude of materials and finishes for walls, floors and furniture. Perspective drawing skills and the ability to create presentation boards for potential clients are also valuable skills for any professional interior designer.


Furniture Design:


The most practical and hands on of our top 5 skills for the new year is furniture design. Like all the others understanding the process is key and the furniture design process should be your starting point. After that a look into furniture design history will give you an understanding of traditional and contemporary furniture styles. An awareness of the available and industry standard furniture materials is also a must which will be complemented by a knowledge of the different furniture joinery techniques when you go to build your design prototypes.

Thursday, October 6, 2016

Read How to create Pause Screen in UE4 Now

This image shows a finished Paused screen.

Step 1:

Before you open Unreal Engine go to http://www.dafont.com/ for download a font suitable for your game. One you download extract the file and installed ttf file. Copy the ttf file and paste in C:\Program Files(Program Files (x86))\Unreal Engine(Epic Games)\4.5(engine version)\Engine\Content\Slate\Fonts

After when you installed font open Unreal Engine. Content Browser is located in folder “Game” create new folder for User interface screens call it “UI”. In UI folder press right mouse bottom and select “User Interface” option then select “Widget Blueprint” in order to save press right click on widget blueprint and select save. Then double click on the widget blueprint to enter to edit menu.

This image show where you should create folder for User Interface.

This image shows where you should create Widget Blueprint.


Step 2:

On left top corner of the screen there is a folder called “Palette” expand “Common” select “Text Box” hold and drag on canvas or you can hold and drag on canvas under [Root] but make sure that you put on canvas.

This image shows Pause Screen editor.

This image shows canvas for screen.

Steps 3:

If you select text box then on the top right side of User Interface editor you can see “Details” options. Chose “Layout (Canvas Panel Slot) and press on Anchors and choose the middle. You can mess around and change “Style”, “Appearance” and other options. In “Content” option you can type the heading of your title.

This image shows options for Pause Screen.

This image show Text Block applied on canvas.
This image shows Text Block operation.

This image shows text applied on canvas.
This image shows colour options.
This image shows costumer font style. This is spot where you should put the font name that you want use.

Step 4:

You can add image if you want by dragging image box. To select image that you want to use and drag to “UI” folder. When your Pause screen is finished and you are happy of it than press Compile. Save and close the editor. You can find good image on http://www.freeimages.com/ .

This image shows an image box applied on canvas.


This image shows an image box applied on canvas.
The image that I chose is grunge border from http://vyawie.deviantart.com/art/Border-Black-Grunge-187744467 . You can search in Google Image for grunge border.

This image shows an image that I use for Paused Screen.

Step 5:

Select “Blueprints” then select “Open Level Blueprint”. Press right click and search for letter “P” to pause game and “X” to un paused game and add other important objects that will be needed for “Pause Screen” to work. Create new variable and select and then in variable type change to Boolean. Then create new Variable but this time change to Float.

This image show programmer for Paused screen.

This image shows the program for Paused screen.

Step 6:

If you finish coding press compile and save your Pause screen and you can exit programming. The last thing that is left to test if pause screen is working is to “x” out of programming editor and see if it works.

This image shows a finished Game Paused screen.
You can also watch a video tutorial about how to create a Pause Screen.


Read Importing and Applying a Decal Texture in UE4 Now

Importing Textures Into UE4

Welcome to this tutorial, today we are going to work on bringing textures into your game. We are going to cover three different types of textures and how they can be imported into your game, along with how to apply them.

Sample Decal Texture


Step 1: Importing a texture


The first thing we need to do is source a texture.

I’m going to use a rust texture made in an earlier tutorial and import that into my game. The first thing we need to do is import the texture into Unreal. To do this open your game. Then in the context browser select the Starter Content folder and in the textures folder we are going to select import.

We click the import button beside new.

The file type for the decal should ideally be a .TGA (Targa File). Once you click import you will be asked to select the file, locate your file and click open, but make sure you select the TARGA file type and not the .PSD file.


Step 2: Creating the decal material

My texture has been imported into the game. Now we need to add a material.

The texture is imported but the star symbol means it is unsaved.

To add the new material scroll down to the bottom of the textures folder and right click in an empty space, from the pop up menu select the material option. Then name your material decal rust. 

Here we can see the blank material that I have created.

If you then double click on the newly made material, it will open the material editor which should look like this.

Our texture is not in the material editor yet, that is why the ball is black. 

Now the problem here is that we have no actual image to create our decal from, so what we need to do is take the imported decal from our content browser on the left and drag it into the grid on our material editor.

The decal  has been brought into the material editor.

The next thing we need to do is connect the decal to the info panel.

Here we connect the detail to the info panel.

Once this is connected click on the info panel. The options on the left will change.
What I've done below is selected the info panel and changed the blend mode from opaque to translucent. This is one step closer to eliminating the background so the decal goes on without a pure white background.

The details on the left hand side have changed.

We connect the bottom most channel on the texture to the opacity option on the info panel.
We also need to change the material from a ‘Surface’ to ‘Deferred Decal’. The result is we now have a decal texture. Hit save at this point.

All I did here was click the black triangle beside surface and select deferred decal.


Step 3: Applying the decal material

Now that we have this done let’s get a surface prepared to apply the decal to.
What I have done in the below picture is I’ve opened the starter content folder and I dragged a copper material from the materials folder directly onto the wall.

Note: the material came from the materials folder, not the textures.
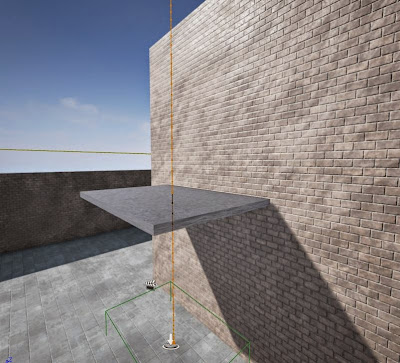
Now that this is done we need to take in a deferred decal from the place section under the visual option scroll down to find deferred decal. Once you drag this into the game this is how it will look.

The material we created with the decal needs to be applied to this.

Now that we have entered the deferred decal we need to actually connect our decal to this decal.
To do this drag the material you created in the textures folder and drag it over to the materials box on the left hand side.

We drag and drop the material into one of the empty boxes and this will apply it.

Now to get this decal to actually work is going to take some manipulation, because of the way the deferred decal is positioned, so with it selected, hit the space bar in order to bring up the rotate widget, then click and drag along the blue and red arcs to the decal to rotate into a position that you are happy with. 

The purple arrow tells us the direction in which the decal is facing.

Now I'm happy with the location but not the scale. So if you hit space again you will get this widget (below) this is used for scaling and I'm going to scale mine till I am happy with how it looks.

Clicking on the green arrow and dragging up or down will scale the decal.

I'm happy with the scale of this decal. Now we are finished applying the decal we can save the progress and move on to the next texture.


Read How to make a moving Elevator for UE4 Now

Elevator
Elevator

In this tutorial, we will be showing how to make a working elevator. 

Getting Started

First we will add a block and then scale it for the elevator to travel its way up the side.

Tower
Tower
Then we make a platform for the actual elevator. Note: when making an elevator, make sure that you change it form a BSP to a Static Mesh. Also, you change the mobility for Static to Moveable.

Platform
Elevator Platform

Mobility
Moveable

Static Mesh
Static Mesh

Triggering

As we showed in a previous tutorial about triggering an open door, now were going to trigger a lifting elevator. First we drag a box trigger, onto the platform. You also need to change the mobility to Moveable.

Box Trigger
Trigger
You then add a Matinee to your elevator.

Matinee
Matinee

Moving

You select all actors and select a movement. Add a key frame of 5 seconds. Now your elevator can move.

Movement
Movement

Movable Elevator
Movable Elevator

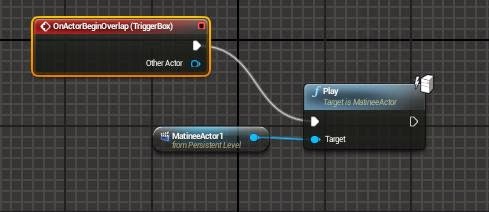
Add your blueprints for triggering the elevator to lift.

Blueprints
Blueprints
Make sure that your platform is a collision, so your player is able to stand on it. That's it, your done!


Read How To Create A Tileable Texture Now

Tillable Texture
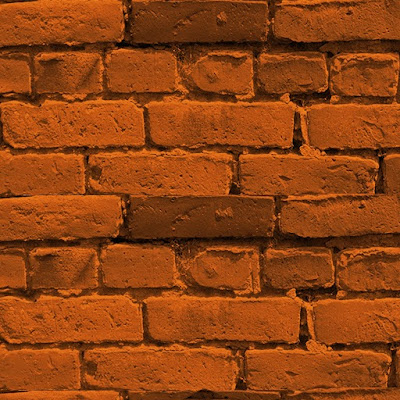
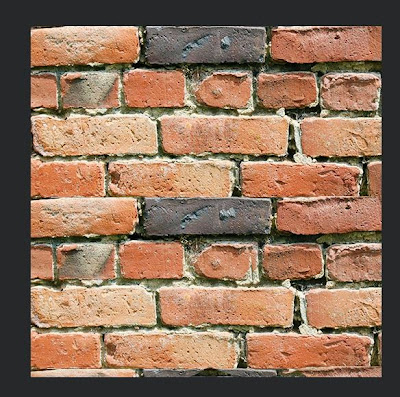
This image shows a finished texture that can be used in a game.

Steps To Create The "Diffuse" Texture


1. Search for an image that will be suitable for your game and an image that you want to be your tileable texture. the best website is http://www.textures.com/

2. Put an image that you want to be your texture in to Photoshop software.

Brick Wall
This image shows the brick wall.

3. Crop the image, removing any potentially troublesome areas.

Crop Image
This image shows Crop tool has taken away part of the image.

4. Then resize image to be power of 2.

Image Resize
This image shows the Image size setting in power of 2.
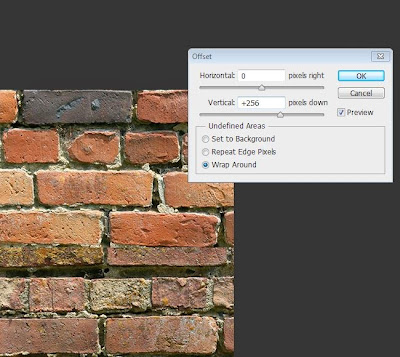
5. Press filter on top software tool bar than select other option and then select offset.

Offset
This image shows the right setting for offset.

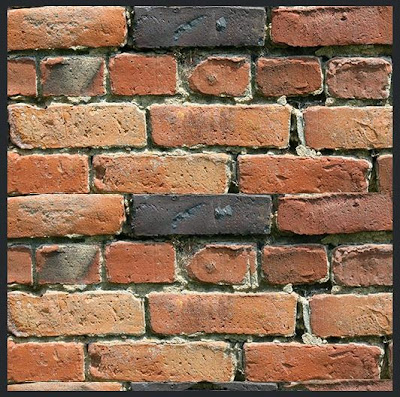
Offset divide image
This image shows an image that is divided into two parts the better one in on top and the bad one is on bottom of the picture. The bottom part will be covered with clone tool.

6. We will use clone tool to copy good parts of image.

Clone
This image shows that the clone tool created a copy of the top part of the image.
7. Use Sharpen tool to get rid of the blur but do not over use Sharpen tool because we get bad effect.

8. Use dodge tool to make shadows lighter and burn tool to make highlights darker.

Dodge
This image shows how you can make image brighter by using Dodge Tool.

Burn
This image shows how you can make image darker by using Burn Tool.

9. On tap bar go to Image\Adjustment\Hue and Saturation.Add Hue and Saturation adjustment the way that you want to make this texture more interesting. Make sure that there is not any defects.

Hue & Saturation
This image shows settings for Hue and Saturation Adjustment.

10. If everything is good and you are happy of effects save as targa file. You should save your targa with a resolution of 32 bits/pixel.

A finished texture
This image shows a finished texture that can be used in a game.

Steps To Create The "Normal" Texture

1. Search in Google for NVIDIA texture tool the best way to find it is: “NVIDIA Texture Tools for Adobe Photoshop”. If you cannot find there is a link for website where you can download NVIDIA plugging tool.

https://developer.nvidia.com/nvidia-texture-tools-adobe-photoshop

2. Press download and chose version of Windows that you work with either 32 bit or 64 bit.

3. When download is finish just install the program.

4. Open Photoshop and check in NVIDIA installed right be pressing filter and down in list should be NVIDIA Tool.

5. Open your texture targa file.

This image shows the file name and format that is saved.
6. Unlock layer so you can work with NVIDIA Tool.

This image shows layer blocked.

This image shows layer unblocked.
7. Go to filter and select NVIDIA Tool and take “NormalMapFilter” option.
This image shows setting of NVIDIA Tool.

This image shows some effect that we can get from NVIDIA Tool.
8. Duplicate the layer until you get effect that you want.

This image shows Duplicate layer which give better effect.

This image shows last step that you should take after last duplicate layer.

9. If you are happy of yours effect save in targa(tga) file.

This image shows saving mode.


This image shows a finished texture that can be used in a game. The texture is in targa(tga) file.


This image shows right format that you can save your targa format and it shows the resolution that you can chose the best options is 16 bits/pixel and 32 bits/pixel because is the power of 2.

This link shows Video Tutorial about how to install NVIDIA Texture tool and how creating Tillable texture.

The Next Step

Now that you have created the texture the next step is to import and add them to whatever software you need them for.


close
Banner iklan disini