 |
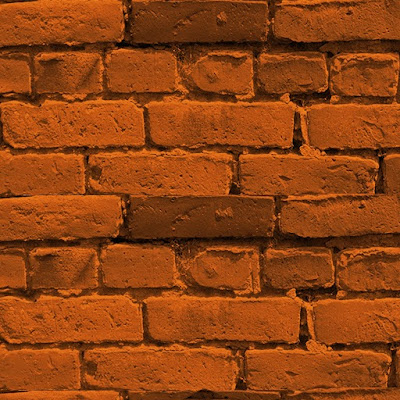
| This image shows a finished texture that can be used in a game. |
Steps To Create The "Diffuse" Texture
1. Search for an image that will be suitable for your game and an image that you want to be your tileable texture. the best website is http://www.textures.com/
2. Put an image that you want to be your texture in to Photoshop software.
 |
| This image shows the brick wall. |
 |
| This image shows Crop tool has taken away part of the image. |
4. Then resize image to be power of 2.
 |
| This image shows the Image size setting in power of 2. |
 |
| This image shows the right setting for offset. |
 |
| This image shows an image that is divided into two parts the better one in on top and the bad one is on bottom of the picture. The bottom part will be covered with clone tool. |
6. We will use clone tool to copy good parts of image.
 |
| This image shows that the clone tool created a copy of the top part of the image. |
8. Use dodge tool to make shadows lighter and burn tool to make highlights darker.
 |
| This image shows how you can make image brighter by using Dodge Tool. |
 |
| This image shows how you can make image darker by using Burn Tool. |
9. On tap bar go to Image\Adjustment\Hue and Saturation.Add Hue and Saturation adjustment the way that you want to make this texture more interesting. Make sure that there is not any defects.
 |
| This image shows settings for Hue and Saturation Adjustment. |
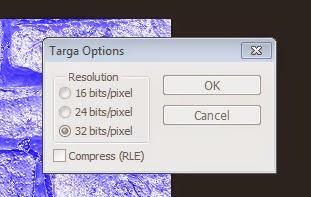
10. If everything is good and you are happy of effects save as targa file. You should save your targa with a resolution of 32 bits/pixel.
 |
| This image shows a finished texture that can be used in a game. |
Steps To Create The "Normal" Texture
1. Search in Google for NVIDIA texture tool the best way to find it is: “NVIDIA Texture Tools for Adobe Photoshop”. If you cannot find there is a link for website where you can download NVIDIA plugging tool.https://developer.nvidia.com/nvidia-texture-tools-adobe-photoshop
2. Press download and chose version of Windows that you work with either 32 bit or 64 bit.
3. When download is finish just install the program.
4. Open Photoshop and check in NVIDIA installed right be pressing filter and down in list should be NVIDIA Tool.
5. Open your texture targa file.
 |
| This image shows the file name and format that is saved. |
 |
| This image shows layer blocked. |
 |
| This image shows layer unblocked. |
 |
| This image shows setting of NVIDIA Tool. |
 |
| This image shows some effect that we can get from NVIDIA Tool. |
 |
| This image shows Duplicate layer which give better effect. |
 |
| This image shows last step that you should take after last duplicate layer. |
9. If you are happy of yours effect save in targa(tga) file.
 |
| This image shows saving mode. |
 |
 |
This link shows Video Tutorial about how to install NVIDIA Texture tool and how creating Tillable texture.