To show you how layers work in this tutorial I am going to create the flag of Chile as an example.
Layers are an important part of Adobe Photoshop to understand and using groups to keep them organised is also important to help make it easier to keep track of layers. I will show you how to use groups in this tutorial.
Step 1:
Create a white background, in this example I have used an A-3 size which is 420 x 297 mm in landscape mode. |
| Setting Up The Page |
Step 2:
Select the rectangle shape tool and create a rectangle by holding shift which will keep all sides at the same aspect ratio.
 |
| Using The Shape Tool To Make A Blue Rectangle |
Step 3:
Select the rectangle tool again and create another red rectangle that takes up the bottom half of the white A-3 background.
 |
| Using The Shape Tool To Make A Red Rectangle |
Step 4:
Select the custom shape tool and go to all shapes. Select the star shape and size it appropriately to the size of the flag. Then place it over the blue rectangle layer.
 |
| Using The Custom Shape Tool To Place A Star |
Step 5:
To make the area inside the star white, select the eraser tool and erase the blue part to reveal the white background layer underneath it.
 |
| Using The Eraser Tool On The Inside Of The Star |
Step 6:
As you see if you press the eye symbol beside a layer the layer will no longer be visible. To make the layer visible again simply press the box where the eye symbol was and the layer will now be visible again. Here I have turned off the blue rectangle layer.
 |
| Demonstrating Layer Visibility |
Step 7:
To put all of the shapes into the one layer you need to combine the layers. To do this go to Layer and select Merge Layers and all of the shapes will now be in one layer. |
| Layers Merged Together |
Grouping Layers
Putting layers in groups is a good way to keep a project organised.
Step 1:
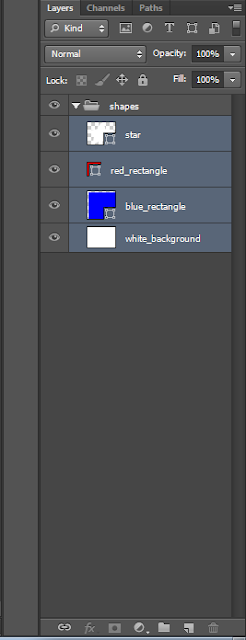
Select the "create new group" folder icon underneath the layer section on the right side of the page. Name the group accordingly to what you will put in it. Here I have named the group "shapes".
 |
| Group Created |
Step 2:
Hold the shift key and click on the layers that you wish to put into a group. Now drag them into the group by holding the mouse over the group and let go. The layers are now placed in the group.
 |
| Layers Inside Group |


