Showing posts with label 3d software. Show all posts

Thursday, October 6, 2016

Read Lighting in blender Now


title image
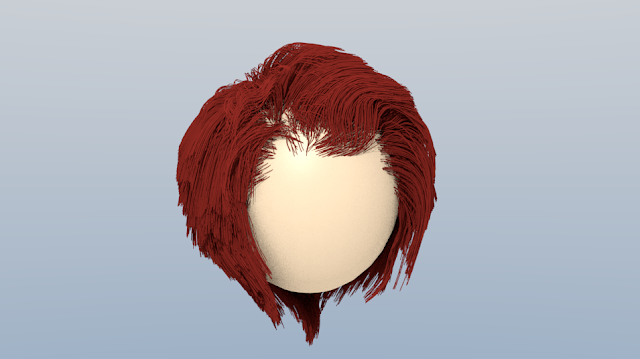
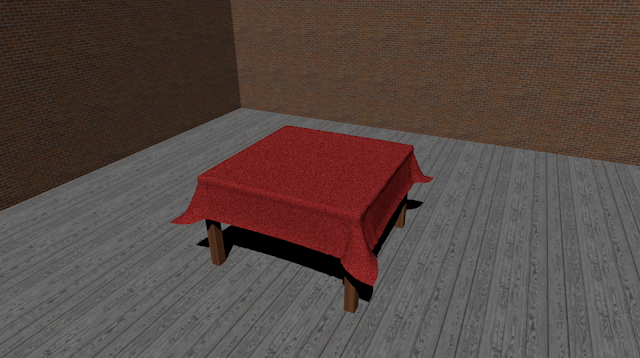
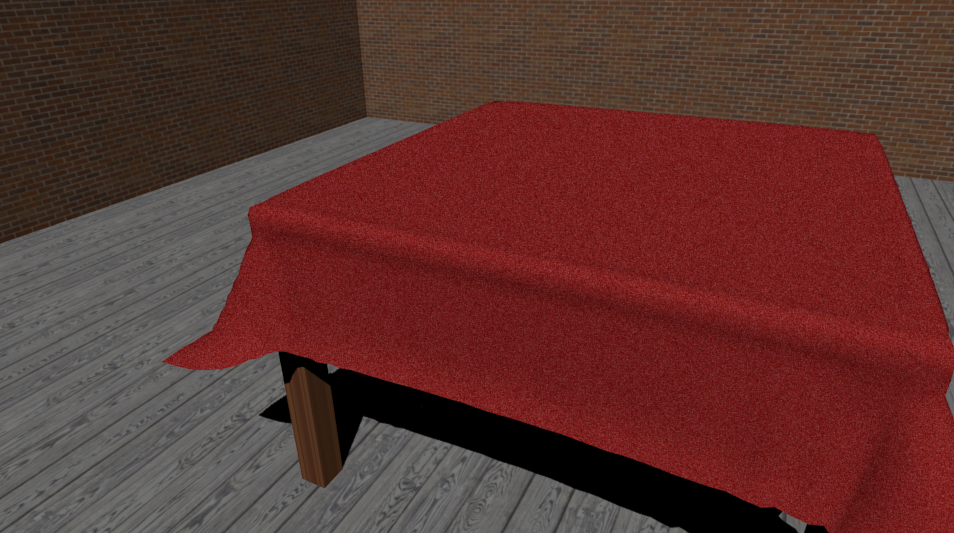
finished lighting result

What is Lighting?

Lighting is a very important topic in rendering, standing equal to modelling, materials and textures. The most accurately modelled and textured scene will yield poor results without a proper lighting scheme, while a simple model can become very realistic if skilfully lit.

Why would you use it? 

People use lighting in order to make their object more realistic and easier to see. It also makes your object better looking in general. You also need lighting in your scene if you wish to create a rendered video or image.


Different types of lighting

Point light:

1. In order to do this you must press shift + A and select lamp then select point then place this light somewhere on your scene

table with a point lamp
point lamp

Sun light:

1. Repeat the same process that you did for point but this time select sun, you should try place this light up high and at an angle to your object in order to get a good effect

table with a sun lamp
sun lamp


Spot light:


1. Again, repeat the same process except select spot, you should place this above your object in order to get the desired effect. This light emits light in a cone like direction

table with a spot lamp
spot lamp


Hemi light:

1. Same again, repeat the process and select hemi. This is a 180® directional light which emits light downwards

table with a hemi lamp
hemi lamp


Area light:

1. Same steps again just select area instead. This is an upward light that emits light from the plane.

table with an area lamp
area lamp

How to effectively light an object in blender

1. Press F12 for camera perspective


camera perspective of human head
camera perspective


2. Then open up the world tab and tick ambient occlusion


world tab in blender
world tab

3. Turn ambient occlusion to full


full ambient occlusion


4. Reduce ambient occlusion to 0.5

ambient occlusion 0.5
half ambient occlusion


5. Go to the Gather column in World tab

gather in blender
gather column
6.  Adjust samples to preferred amount of samples. This makes the picture more realistic but my recommendation is not to go over 10 as it may crash your computer


samples - human head
samples human head
sample at 10
gather sample 10
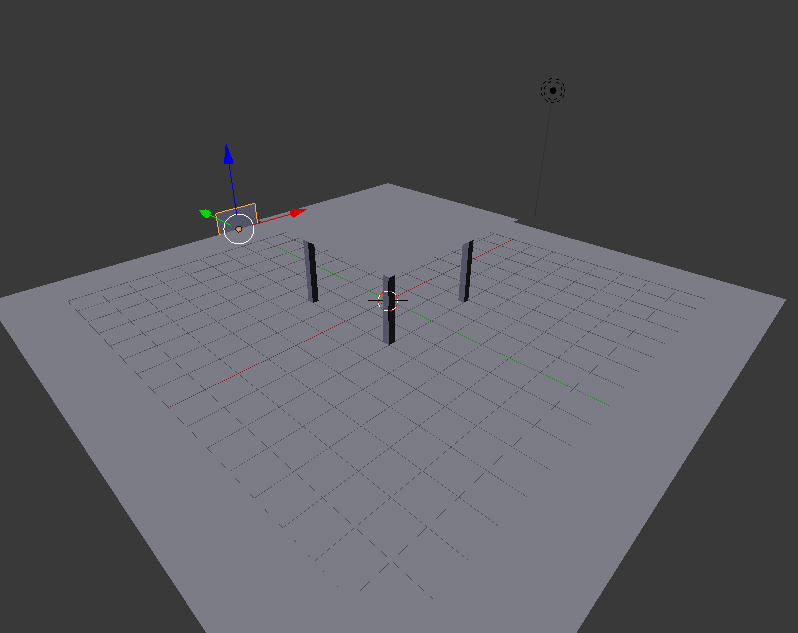
7. Press 7 for top view


top view of human head
top view


8. Then duplicate the lamp by pressing Shift + D and place lamps at the front, the back, and the side


3 point lamp of human head
3 point lamp


9.  Then adjust the energy on both duplicate lamps. To do this you have to go to the object data tab and adjust the energy settings

energy settings in blender
energy settings
10. Set the lamp behind the object to 0.8 and the one beside it to 0.5


closer view of energy settings
energy settings 2
11. Once this is done press F12 and that is the lighting of the object done.


finished image of lighting
finished lighting

Friday, January 29, 2016

Create Hair in Blender

In Blender, we'll be making hair by using the 'Particles' tab. You can use hair in a lot of different ways, whether it is for making a simply rug for a room scene, or designing your own 3D character for a game. As it can be used in a wide range of different ways to create different outcomes.
We'll also take a look at the tools we use to shape and change the hair in Blender, and I'll explain each so that you will have more control over how you want the hair to appear in it's final render.

Hair in Blender
Hair in Blender

Step 1: Open a new project

To begin, I'm going to open a new project and delete the default cube that appears. You can use this if you like, but for now I'll be using a UV Sphere, in order to create hair on a sample head shape.

New Project

UV Sample scaled up slightly on 'Z' axis

If you'd like to do the same as me, or perhaps use a different shape, use shift + A, and select a shape from the 'Mesh' dropdown. You can also 'scale' the shape to a different size by pressing the 'S' key, followed by whichever axis you want to scale it along (X, Y or Z), or just use your mouse to manually resize it.

Step 2: Vertex Groups 


In order for hair to be placed correctly on the head, there needs to be a section where we can apply it to directly, like how hair grows from the scalp on our heads. To do this, we need to create a 'Vertex Group'. To begin, select the 'Object Data' menu on the right hand side of the screen.

Select 'Object Data', which is highlighted

Before we do anything in this tab, we need to go into 'edit mode' (tab), and select whereabouts we want our 'scalp' to be. To do this quickly, once you are in edit mode, hit the 'C' key and use this to highlight the scalp on your head or object. If you wants to 'Deselect' any parts, use shift + click after hitting you 'C' key. Once you have finished selecting your scalp, it should appear something like this;

'Scalp' selected

Now that we've selected the area in which we want our hair to grow from, we need to go to the 'Vertex Group' dropdown in the 'Object Data' tab we had previously selected. It should look like this:

Vertex Group dropdown
Select the '+' symbol to add a new group, and double-click it to rename it 'Scalp'. With this group now created, and the scalp selected on the actual object, we can now press 'Assign'. This action will ensure that this section in particular can be selected as the origin of hair on our object.

Assign the selected vertices on the object to this group
You can now go back into object mode by hitting the tab key again.

Step 3: Particles and Adding Hair


Using the 'Particles' tab, we can now create the hair on the object. Go into the 'Particles' tab, which is located on the same bar as the 'Object Data' tab we had previously selected.

Select 'Particles', which is highlighted

Once inside this, select the 'New' button. Upon doing this, you should see the following menu show up:

After selecting 'New'

I began by renaming the particles system from 'ParticleSystem' to 'Hair'. I then also renamed the 'ParticleSettings' to 'Hair' as well.

Renamed 'Hair'
As you can see, underneath the 'Settings' is the 'Type' selection. Select the 'Emitter' selection and change it to 'Hair'. Immediately after you do this, you'll see that your object will suddenly sprout out hairs from all over itself, as opposed to the section we had previously assigned, such as shown below.

Hair appears from everywhere on object
To quickly change this so that it only on the 'Scalp' we had created earlier, scroll down on the Particles tab until you find the 'Vertex Groups' dropdown, and open it. Once you do this, you'll see a selection of groups. All we have to do here is select the 'Density' option, and select the group we had created earlier. My one was called 'Scalp'.

Vertex Group dropdown
As soon as you select your group on 'Density', the hair on your object will only originate from the scalp we had created earlier. 

Hair now only originates from selected scalp

Step 4: Editing the Hair

Personally speaking, I find that working with long hair to begin with is extremely hard. For this tutorial, We'll start by working with shorter hair than the default length we were given. To change the length, scroll up on the 'Particles' tab until you find the 'Emission' dropdown. Underneath this you'll see 'Number' and 'Hair Length'. The 'Number' is the amount of parent hairs on the hair so far, and it's default number is '1000'. I left it at '1000' and changed the 'Hair Length' down to '1'.

Hair length changed to 1
Once you have completed this, go to the 'Render' dropdown. You will see 'Steps' at the bottom of this dropdown. Bump up the number of steps to '6'.

Change steps to 6 in Render dropdown
Then, underneath the 'Display' dropdown, which should be located directly underneath the 'Render' dropdown, change the 'Steps' to '6' as well.

Change steps to 6 in Display dropdown

This next part is a vital part of creating your hair. In the 'Children' dropdown, you will find three options; 'None', 'Simple' and 'Interpolated'.

Children dropdown
If you select 'Simple' or 'Interpolated', you will find that the object produces a larger mass of hair from the '1000' parents hairs already present on the object. The 'Interpolated' selection takes longer to render, but is of a higher quality. Select 'Interpolated'.
Your object should look something like this;

Interpolated in 'Children' dropdown
Immediately underneath the three selections, after selecting 'Interpolated', change the 'Display' number to '25', and the 'Render' number to '25'.

Step 5: Tools

Once you've finished preparing the hair in the 'Particles' tab, we can now begin editing the hair to any sort of style or shape we like. To do this, we will need to go from 'Object Mode' to 'Particle Edit' by selecting the interaction at the bottom of the screen, and selecting 'Particle Edit'. Once you enter this, the hair should go back to only showing the 1000 parent hairs, as well as a tool menu on the left with the 'Brush' and 'Options' dropdowns.

Particle Edit mode
Before we begin editing the hair, we should go through each option in the 'Brush' dropdown.

Brush options

Comb:

The 'Comb' option allows us to literally comb the hair we have previously created, and place it in a huge variety of shapes and styles manually.

Comb tool

Smooth:

The 'Smooth' tool is used in order to neaten out a part of the hair, for example, if you wanted the hair to all go one way, however it is not, you would use the 'Smooth' tool over the section in order to smooth it out.

Smooth tool

Add:

The 'Add' tool is used to add more hairs in places where you may want more, or if there are blank patches on your object that you want filled in more.

Add tool

Length:

The 'Length' tool simply extends the length of selected hairs.

Length tool

Puff:

The 'Puff' tool would essentially give the hair more volume, and puff it up if you want it bigger.

Puff tool

Cut:

The 'Cut' tool simply cuts the hair shorter.

Cut tool

Weight:

The 'Weight' tool is used in animating the hair, and is used to weigh the hair down.

Weight tool

Step 6: Using the Tools

Now that you're well acquainted with the tools used to style your hair, you can start styling it. If you want a better idea of how the hair will look when it is rendered, you can check the 'Children' box under the 'Options' menu on the left. This will make the 'Children' hairs appear and allow you to have a better visual on how your hair will turn out in it's final render.

'Children' selected 

Step 7: Render

When you are finished styling your hair, you may want to render it. To gain a high quality final render, you simply hit the 'F12' key on your keyboard. This will render your scene through the view of your camera in your project. If it isn't in a place that you find particularly attractive, you can move it and rotate it to suit your final render. You can also adjust the lighting settings by selecting the lamp in the project and adjusting the type of light, intensity, etc.

Final Render


Once you have your final piece, you can use the tools you have learnt about to experiment with different shapes, or try adding materials to your object and hair.

Different shapes


Thursday, January 21, 2016

Creating a Room in Blender

Creating a Room in Blender
Final Render of a basic room in blender


In Blender, we use rendering to complete the creation of our 3D scenes and objects. It is used to showcase the scene with all applied textures, materials and lighting, in order to give it the realistic appearance we aim for. We used this process to complete work with the highest standard possible.


In this tutorial, we will be focusing on the actual rendering of the scene. To begin, I will create a room scene, and ensure that the lighting is correctly added, as well as the materials and textures to each object. I will provide a walk-through on how I go about creating this room scene.


Step 1: Making the Tabletop

My scene will mostly be made up of planes, which can be added by pressing shift + A. The plane is located in the ‘Mesh’ dropdown. For this tutorial, I started with a table, and scaled it (S) by 2. Then lift the table on the 'Z' axis, by pressing the 'G' key, then 'Z', then type '2.5'. This will lift the plane higher and give room for the table legs. 

Added Plane
You may want to extrude the tabletop, so as to make it thicker as well. To do this, select the table and enter edit mode (tab). Ensure that Blender is in 'Face Select' (located at the bottom of your screen), and extrude the tabletop (E). You can make it as thick as you want it to be by entering a number after pressing 'E'. My tabletop is '0.1' extruded.


Extruded Tabletop

Step 2: Making the Table Legs

Once we have scaled the plane, go into edit mode (tab) and ensure that the 'Face select' is on (located on the bar at the bottom of the screen). Once you're sure it's on, I would advise using Isometric view by pressing 5, then pres Ctrl+7 to view the bottom of your object, then click subdivide (located on the left in edit mode) three or four times, depending on how wide you want the tables legs to be.


Scaled plane in edit mode

Subdivided plane, with corners selected

Once you have finished subdividing the bottom of your table-top, press shift + right-click each corner face. You can then extrude (E) these faces and in doing so, create your table legs.

Extruded table legs

Step 3: Making the Table Cloth

You can then add a table cloth over the top of the table. In order to do this we must simply add another plane, and scale it up. For this tutorial, I scaled mine by 3. Then grab it (G), and bring it up over the table. You can do this by pulling it up by the blue arrow on screen also.


Cloth plane added
After you have moved the cloth, go into edit mode (tab) and click 'Subdivide' around 5-6 times. This will divide the plane's faces, which will play an important role in giving it the fabric-look we want it to have. Go into the 'Physics' tab on the right hand side of the screen.


Edit Mode Menu
Cloth plane subdivided

Cloth Physics
Add the 'Collision' and 'Cloth' physics to the object. You should then select the table and enable the 'Collision' physics for that as well. These physics allow the cloth to fall onto the table and register the table as something to make contact with in the scene.


Once this is done, select the 'Play Animation' button at the bottom of your screen (or use Alt + A). You should see the table cloth you had previously created drop onto the table and take the appearance of a realistic piece of fabric.


'Play Animation' - Middle-Right play button

You may notice how the cloth may still look slightly unrealistic, as shown below:


Unrealistic Cloth

To fix this, simply select the cloth and select the 'Smooth' button underneath the 'Shading' dropdown on the left hand side of the screen.

Shading Settings
The fabric will then appear as shown below, which is much smoother and realistic:


Realistic, 'Smooth' cloth

Step 4: Making the Floor

Once the physics have been applied to the table cloth and table, you can move onto making the actual room. This requires only three planes, each scaled up to represent the walls and the floor.

Added Floor
Add your first plane. This will be the floor of the room. In my own scene, I scaled it by 10. It's far easier working with even numbers when creating room scenes. 


Scaled Floor

Step 5: Making and Moving the Walls

Once you've scaled the floor, you need to add two more planes for the walls. Again, add a plane from the 'Mesh' menu. Rotate it on the 'X' axis ('R', 'X') by 90 degrees. Then proceed to move the plane along the 'Y' axis by 10. It should appear as follows.

First wall moved
The next step is to scale the wall to fit along the floor, and make it taller. To scale it to fit the floor only, it's important that you only scale it on the 'X' axis. This will increase the length of it only. Do this by pressing the scale key (S), then 'X', and finally scale it by ten. Then proceed to do the same again, except on the 'Y' axis and by 5. You should then grab the wall, and move it up on the 'Z' axis until the bottom of the wall is in line with the floor (follow this sequence for accuracy; 'G', 'Z', 5)

It should appear as follows:

First wall scaled
After you've finished this, you need to repeat the process of creating a wall, only this time, things should be done the other way around. Add your second plane, and rotate it on the 'Y' axis this time. Then move it on the 'X' axis by 10. 
It should appear as follows:

Second wall moved

Then proceed to scale the wall on the 'Y' axis, by 10. Again, you will see that this will make the plane as long as the floor. Make this wall the same height as the other by scaling it on the 'Z' axis, just as you had done before, and move it up on the 'Z' axis by 5.

It should look like this:

All walls added

Step 6: Adding Materials and Textures

Once you've finished the room, you will probably want to add materials and textures. To do this, you must select each object and add a material to each. This can be done in the materials tab on the right hand side of the screen, as shown below:


Materials tab highlighted
Texture Tab highlighted


In this tab, select the 'New' button. This will give the object a material. Materials have to be added to an object in order to use textures to make the object appear more realistic.


After the material has been added, proceed to the Textures tab, which is directly to the right of the materials tab. Then select the 'New' button, and use the 'Open' selection under the 'Image' dropdown to open whichever texture you wish to use from your computer. Do this for each object.

If you were to select the 'Rendered' view now, you would see the room with all it's textures and materials added to each object, however, you may notice that each object may an unrealistic shine to it - depending on where your lamp placement is. If you want to get rid of this and produce a more realistic scene, simply select an object, go onto your 'Materials' tab, and turn the 'Intensity' under 'Specular' down to zero. This reduces the shine of the objects in your scene. You will need to do this for each object.

Specular in Materials Tab

Step 7: Lighting

Before you complete your final render, you may want to change or alter the lighting in the scene. For this tutorial, I used a 'Sun' light, which is a light that does not originate from a certain point, but simply from the sky in Blender. It acts as general sunlight, and can create shadows, which is the reason I did not create a roof on the scene.


Sun Light


You may want to experiment with your own lighting, by selecting the lamp and trying out the different options.

Step 8: Final Render

Finally, we can render our scene. To render the scene, press 'F12' on your keyboard. This will give you a rendered view through the camera on your scene. If the render is not centering at the point in which you want it to, you can move your camera around on the 'X', 'Y' and 'Z' axis'.


Camera selected and moved


Once you are satisfied with your camera placement, you will end up with a final render that you feel is the best, probably something like the following:


Final Render


Final Render 2


Final Render 3


close
Banner iklan disini