Showing posts with label logo. Show all posts

Friday, April 27, 2018

5 Approaches For Creating A Recognizable Logo Design For Your Brand

A Strong, Distinctive Logo will represent your brand as strong and distinctive

Strong Logo, Strong Brand

Many companies out there require a strong logo to discern them from all the others out there. One of the best ways to do this is to create a powerful logo that engages people and serves as a recognizable symbol of your brand. If you have this, your customers can easily identify your products or services from those of others.

The right logo is an essential part of branding. Think about all the biggest brands: Nike, Apple, Starbucks - they all have great logos that prove their success and make them stand out even when there is no context around them. A great logo will allow you to instantly capture a user’s attention, and let them understand what your brand represents.

Look at the Nike tick. What does this tell you and what can one learn from this logo? It’s certainly recognizable and only created using two skewed lines, so its simplicity is the key to its design. The design indicates a strong sense of positivity and motion that is synonymous with this brand, and its ethos of providing the best sporting equipment. This logo has survived the test of time and has become affiliated with all aspects of transcendence through sports – from basketball to running. Nike and its tick have penetrated all sports markets and much more.

So what is the right logo? You’ll need something that can represent your brand in a visual way, whilst also embodies your company ethos without sacrificing its visual appeal in any way. How can one work to create this perfect logo? We’ve come up with five key tips to help you out.


1. Simplicity Is the Key
Clever design can allow a very simple logo to be effective

Good logo design means that your logo should be kept simple. Too many distractions for the eye and too many things for the eye to focus on will serve to not recognize the logo, not remember it and not let it represent your brand as easily as possible. Try and represent your brand as best you can with a punchy and simple logo. Why is design so difficult when it should be so simple? Your logo should be able to thrive in a variety of different contexts, just like Nike’s logo, through pure simplicity.

If you’re coming up with a logo from scratch or redesigning an outdated but effective one, you should keep it simple and in tune with your brand. Keep things appealing visually, whilst also retaining a clean and simple design. A good design tip is to make sure your logo appears strong in black on a plain white background, or with a duo-tone. As an example, consider the Windows logo - what is it about this logo that retains the brand image over time, even as the logo has undergone several design changes? 

The simple and digital feel of two windows shows that the brand is at the forefront of the digital age, and will continue to be through the rest of time. It’s a statement that is easily read from the logo in its simplicity. A simple logo will also fit harmoniously with other materials that your company produces.


2. Where Will the Logo Go?

Your logo will appear is a wide variety of locations, it's important to have it right

As a part of the design process, one needs to consider just where the logo will go within your brand, and how this will appear among other materials? You may have a logo that would look great on a poster, but wouldn’t work well on a business card, so you’ll want to think it over to visualize where your logo will be. Think about flexibility and where your logo can work, and where it can’t.

Deliveroo recently took major design steps to simplify and more accurately represent their brand story given that most of their users work with smartphones. This is a good example of thinking about where your logo will go - failing to grasp this, as your brand is growing, can lead to difficulties further down the line. Deliveroo may have been thinking about the fact that their logo would have looked good on a delivery motorbike bag; however, most people are seeing it online via their phone and app. 

The result of their change was to take a complex drawing of a kangaroo carrying food to a much more minimalist abstract shape depicting the kangaroo’s face – this can work well and be placed in all sorts of places now that it is a whole lot simpler. Something may look good on a motorbike bag that might not necessarily be appealing on an app - redesigning for a smartphone use was the clever solution. If you fail to grasp this at first, this could result in a lot of future failure for your brand further down the line.


3. A Design that Lasts Through Time

A logo should not be designed to be trendy, it needs to be timeless

The best thing one can do is try and stick to a design that lasts through time - something iconic and timeless that people can remember forever. A common mistake is that brand's design logos are trendy, but these trends won’t last forever. The best approach is not to go down a trendy feel and look because it won’t work over a long period of time, and we can expect that you’re in it for the long haul. However, you’ll want to pay close attention to the fact that if you choose something too classic and timely, there is a good chance that a lot of other brands have also used a similar design and also it may not fit in with your brand value. Think about your brand and its message more than what the trends of the year are. You will want your logo to shine and engage through every year.


4. But... Update the Design When it Needs to Be

The ford logo has evolved over time, most noticeably twice in 1912 as the initial redesign was not well received.

Your company may change over time and even though you want your logo to be timeless, it won’t last forever. To stay as up to date as possible, whilst also keeping your theme current, one needs to occasionally change their logo to keep up with the times. If your logo has been rather successful in the past, it’s not ideal to significantly change from the design you’ve already been using for a whole, so sometimes just a simple change of type or a slicker icon will make your logo more appropriate for the current times.

A good example of this is with Marriott hotel’s recent shift from an old to a newer look, whilst also refraining from giving into current trends. The logo was redesigned, keeping their giant “M” but also making the other text within colored black as opposed to red. This logo is now a whole lot more modern and wasn’t a great shift from the original, but it certainly packs more of a punch. 


5. Don’t Copy Clichés

All these company logos are too similar for any of them to stand out from the crowd

When designing a logo, one should make a serious effort not to use clip art or copy other people’s work. The final approach to any logo design should be that you don’t copy cliché work and come up with something unique; otherwise, your logo will look like someone else’s and won’t help cement the brand image. You’ll need something that’s instantly recognizable and not confused with someone else’s brand.

Your logo should have some form of original art that tells the audience what the company is and how their ethos shines through. Sure, you can draw inspiration from other logos, but make sure your work is unique and not just a copy of something else.

Definitely, don’t try and emulate commonplace forms of art in your logo such as clipart. This will cause your logo to have an amateur and childish appearance, without being special in any way at all. If you want something that’s memorable, it needs to be special. Your logo will want to make an instant click with whoever is looking at it. Make it stand out from your competitors in an instant – don’t make your audience have to think about how your logo is similar to something else. 

Conclusion

Approaching a logo designing process isn’t a walk in the park, it’s a walk along several different paths in one’s mind, exploring different possibilities whilst always trying to channel the audience into the direction you want them to go in. Take note of the five tips above to help you do well on your way, ensuring that you have a cutting edge and unique design that will engage your audience in an instant.

Remember that your design should aim to depict your brand and ethos in a way that is instantly recognizable without any thought. You should have a logo that packs a punch but is also simple and visible, wherever you decide that you want to use it.

We hope that you have fun in your creative process and create a logo that your company can look back on with pride through the ages.

About the Author:

Richard Nolan is a professional educator and team building coach, sharing his experience in spheres of writing, blogging, entrepreneurship, web design and psychology. Currently, Richard works as an editor-in-chief for essaywritersite.com. Follow him on Facebook


Thursday, October 6, 2016

Read How to use Bezier Curves in Blender Now


An edited curve

What are curves within Blender?

Curves within blender are normally used to create the outline of an object or trace over something e.g. a picture. It is similar to the pen tool in Photoshop as to how it works and what it’s used for. There are two types of Curves, Bezier and Circle.

How to use the Curve tool

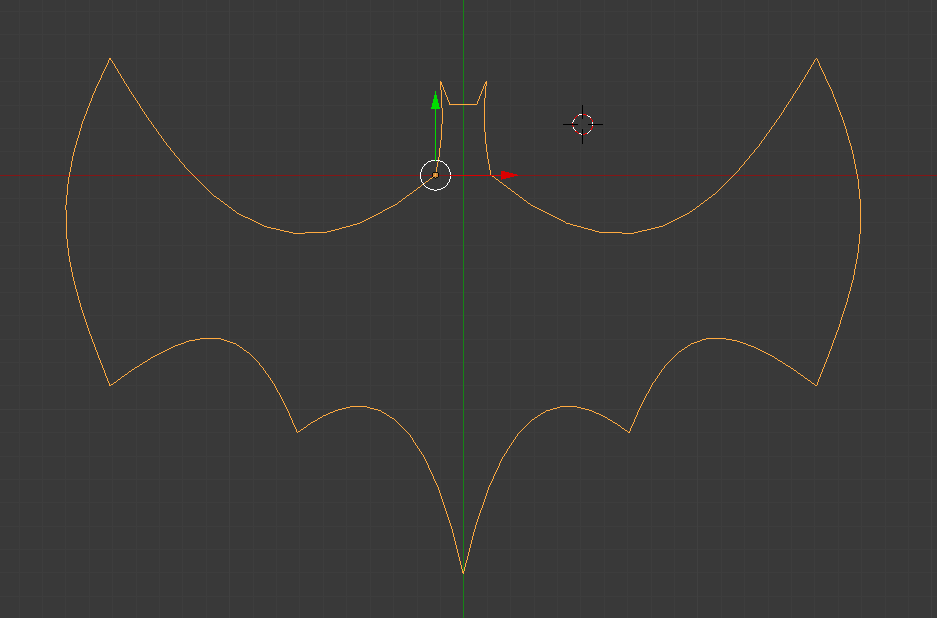
In this tutorial I will be drawing a Batman logo to show you how to use the Bezier Curve.

Step One:When you are ready to add your curve in to the stage, go into Orthographic view (numpad 5) and top down view (numpad 7) and delete the default box by right clicking it and pressing x then clicking delete. Then press shift+A> Curves>Bezier Curve and you will see the following:


newly added curve

This is your curve. It cannot be edited or re-shaped until you go into edit mode by pressing TAB. Once there you should see this:

handles on curve

The layout the curve is in can look quite complicated and the arrows tend to throw people off. If you’d prefer to turn them off press N then in the new menu that appears, under “Curve display” un-tick normal as shown below and the arrows will disappear.

getting rid of normal

Step Two: To change the shape of the curves you use the handles which are the red straight lines coming from the points. The points between the two red handles, on the curved line are where the curve's control points are. These points can be moved to change where the curve actually is. The red lines can be adjusted in length and position. The length changes how big the curve is and the position changes the direction. Play around with the handles a bit to get used to them.

adjusting the handles

Step Three:If you practised step two you will notice that when you change the position of one handle, the other handle stays in line with the one you changed. This is because of the handle type. To change this press V and click on vector and you will notice the handles go green and can be adjusted freely.

vector handles

The vector handles are necessary to create shapes where the curves on either side of a point go in different directions e.g. the Batman logo wings as seen below. To add a new point, right click the point you want it added on to, and press E (for extrude). You will then notice you are dragging a new point. Place it in a suitable location and adjust it how you want.

adding a new point

Continue this process until you have the shape you want. If the shape you want to make is symmetrical, you only need to draw up half of the shape. To see the shape without handles, go back into object mode using TAB. To continue editing, press TAB again.

how to see your shape

Step Four:If the shape your drawing with your curves is symmetrical then you will need to duplicate it, then mirror it. To do this get out of edit mode into object mode, press Shift+D then enter and then press CTRL+M+X then enter. Reposition it if it is off.

mirroring your shape

This has given us two different Bezier curves which can’t be edited at the same time. To change this go into object mode, right click one so it is highlighted as above, then Shift right click the other and press Shift+J to join them. You can then TAB back into edit mode. Here you can right click one point, then shift right click the corresponding one on the mirror side, and press F to connect them (stands for fill).This is how I connected the head above and the tail below.

finished shape

When you connect the two points at the bottom for the tail, you need to add a new point in the middle to drag down. To do this click subdivide in the left toolbar after you connect them by pressing F, as shown below:

subdividing your curve line

Step Five:We now have the outline of our shape finished but now we can make it more detailed, or turn it into a rendered image. This last step is not necessary, but it is good practice and turns the curve into a nice image.To begin this process we have to click the curves tab in the right toolbar and change it to 2D to fill the shape in. make sure you have the curve selected to get the curve tab to show. you can also change the resolution to 24 to give it more definition.

making your curve solid

You can then go to the top of the stage to where it says blender render and change it to cycles render. After that, click the world tab (you must have nothing selected. Press A while over the stage to deselect if you have anything selected) in the right toolbar to get the menu below displayed.

making your curve an image

changing colour of background

In this menu go to surface and change the colour to what you want the background of the image to look like. I chose black.

You can then right click the curve and click the material tab in the same area where the world tab was. Add a material by clicking the add material button then go down to surface. change the surface to emission, then pick the colour you want to use.


changing colour of curve

Finally, position your view of the image to wherever you want the camera to be. I recommend using a top down view (numpad 7). You then press CTRL+ALT+Numpad 0 to set the cameras location. You can press numpad 0 again to exit out of the camera view. Right click the camera then click the camcorder tab in the same place where the world and material tabs were. Change to Orthographic and use the Focal Length and the Shift options shown below to reposition the camera. To view these changes press numpad 0 over the stage again to show the view. It will update to the changes you make in real time.

taking a picture

Once you’re happy with the position of the camera and the other settings you have made, click the camera tab and then click render, or just hover over the stage and press F12 to take a rendered image of your curve. As you can see below, I have a fully finished rendered image of my custom made batman logo.

Bezier Curve Batman Logo in Blender
final image

Thursday, August 11, 2016

Create A Logo In 10 Easy Steps

This tutorial is completed in Illustrator but all the tools and techniques used are also available in Photoshop. The reason I am using Illustrator is that Illustrator is the best program (in my opinion) for creating vector graphics using the pen tool. Professional Logos are made as vector graphics, allowing them to be resized up or down without loss of quality.

Logo Design
The Logo we will be making in this tutorial

Although this tutorial focuses on the actual production stage of the logo it is important to remember that the graphic design process should always be used. Therefore this stage should be preceded by analysis of any brief, research, brainstorming, and idea development (ideally through sketching). Alongside these design process stages you should also be considering the logo design principles.

Ideally read the article in full before completing your own logo design but to recap quickly the principles state the logo should be...

  • Simple 
  • Versatile 
  • Timeless 
  • Memorable 
  • Appropriate 

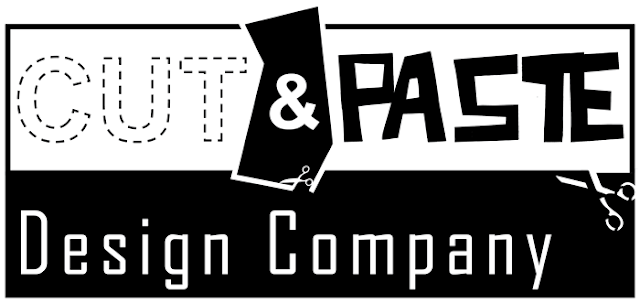
For the purposes of this tutorial we will be creating a logo for a design company called 'Cut & Paste'. The design aims to reference the company name within the text styles and shapes used. Now lets begin.

Logo - Step 1

Go to File-> New and create a canvas 700px wide and 500px tall. This is not a mandatory size, as the logo (once completed and exported) can be scaled up or down to any size. However, if you want to follow the tutorial exactly using the font sizes and other dimensions used then keep to 700px X 500px.

Logo - Step 2

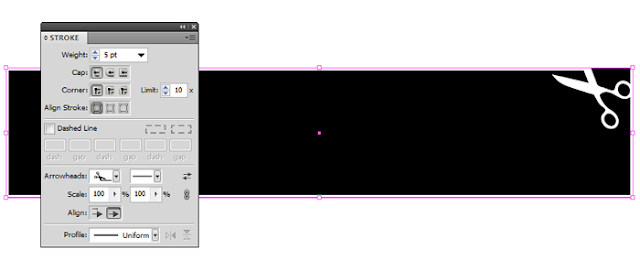
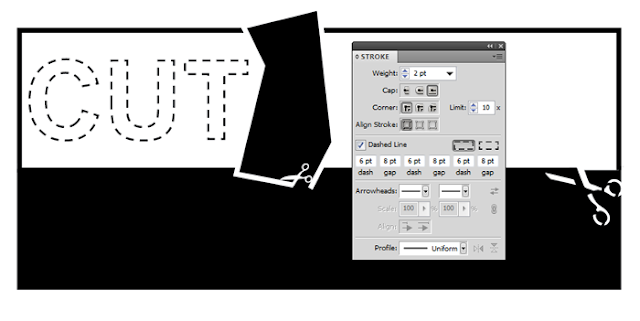
Open the layers window and rename the layer 'Shape 1'. Now use the rectangle shape tool to create a shape 610px x 125px. With the shape selected (with the path selection tool) open the stroke window and add a 5pt white stroke using the settings shown in the image below. Depending on how you clicked and dragged to create the shape the scissors arrow head on the stroke may appear in a different corner. To set the scissors to the position shown, go to Object-> Transform -> Reflect and edit the settings until you get it into the position shown.

Logo Design Stage 1

Logo - Step 3

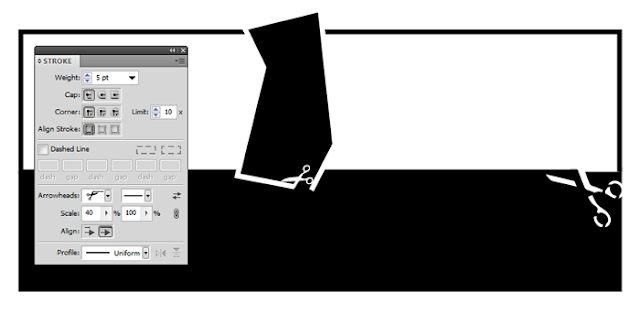
Now, press the new layer button in the layers window and name the layer 'Shape 2'. With the new layer selected use the rectangle shape tool to create a shape 600px x 115px. Set the shape colour to white and add a uniform stroke of 5pt with the scissors arrowhead (the 5pt stroke all around should make the shape the same size as the previous shape). Position the shape directly on top of the first shape getting the scissors arrowheads to overlap as shown below. Once again go to Object-> Transform -> Reflect and edit the settings until you get the arrowheads into the position shown.

Logo Design Stage 2

Logo - Step 4

For the next shape we will once again create a new layer, call it 'Shape 3'. Use the pen tool to create a black coloured shape similar to the one shown below, remember to complete the shape by joining the last anchor point to the initial anchor point. Once completed you can move the anchor points of the shape into the exact form you want using the direct selection tool. Once again set a 5pt white stroke with a scissors arrowhead, the settings are shown alongside the shapes in the image below. That completes our work on the shapes.

Logo Design Stage 3

Logo - Step 5

Now we will add the text. You can add the text all on one layer but as we will be using 4 different fonts in 4 separate text boxes it is easier to create a new layer for each piece of text too.

TIP: For maximum flexibility in graphic design always create a new layer each time you add a new piece of text.

Logo - Step 6

Firstly we will add the 'CUT' text. Create a new layer call it 'CUT' and use the text tool to click and drag out a text box roughly to size you want (you can resize it afterwards if needed) and type the word CUT in Arial Bold and with a font size 110pt.

Logo Design Stage 4

Logo - Step 7

Highlight the text with the text tool and change the text colour to white and add a 2pt black stroke. Open the stroke window and tick the dashed line box and set the values to those shown in the image above.


Logo - Step 8

Next, we will add the ampersand. Create a new layer for the ampersand, and create a text box on that layer. Type '&' in font style Arial Bold, in a font size of 72pt and set the text colour to white.


Logo - Step 9

Now the 'Paste' text. Once again create and name a new layer, use the text tool to create a text box and type 'Paste'. The font used for the paste text is called 'Cut It Out' and is a free to download font available HERE. Set the font colour to Black and the font size to 90pt as shown in the image of the font settings tab below. Use the path selection tool to position the text as shown.
Logo Design Stage 5

Logo - Step 10

Finally the 'Design Company' text. As before, create and name a new layer, add a text box and type in 'Design Company'. The image below shows the text settings used.


The completed logo should now resemble the image below. You can continue to develop the logo by editing the colours of the text or shapes, trying out different font styles or adding effects from the 'Effect' tab in the top menu.
The completed logo design
The completed logo design 

You can easily create your own logo for new your company or a class project using the tools and techniques explained here but always remember to follow the previous steps of the design process as it is always easier and quicker to create the logo once you have a design sketch to follow. Trust me on that, you don't want to have to learn the hard way!

If you are still struggling or feel you need a detailed vector that your skill set isn't capable (yet) of creating you can find free vector graphics that you can then edit tot suit your needs.


Friday, January 22, 2016

How to Curve Text in Photoshop

The final logo
The drop down is at the top Toolbar
When creating curved text, people tend to use the Warp tool to deform and bend the text. This is the incorrect way to create this effect as it makes the text uneven and unsightly. In this tutorial we'll be looking at the proper way to bend and curve text by creating a vector path and then adding text to the path to create the logo shown above.

Image
The drop down is at the top Toolbar
First, select the Ellipse tool and change the setting on the tool bar from shape to path. Holding Shift will create a perfect circle and you can then move it around and edit it further via the Path Selection tool. 
The base of the logo
Adding ellipse along the centre circle

The Path Selection tool icon
Select the Text tool and click anywhere along the path. When hovering over the path while Text tool is selected you should see a small curved line going through the cursor. You can now type in your text, but make sure to align it so that it's centered.  

The text will go along the path you've created

If you want to reposition the text you can hover over the path and adjust the start and stop points of the text. If you switch to the Path Selection tool you're also able to reposition it that way. It's also possible to resize the text using the Transform tool.  

The Direct Path Selection tool can be found by clicking and holding on the Path Selection tool icon

This will change the orientation of the text

You may also edit and use additional text settings by clicking the small icon that appears in the top toolbar ot using the Direct Selection tool. This changes the orientation of the text and can also flip it around the Path.
The finished logo

And now you're done! This is a very useful technique for creating your own logos and graphics.


close
Banner iklan disini