Showing posts with label text effects. Show all posts

Tuesday, April 19, 2016

Image inside text using Photoshop

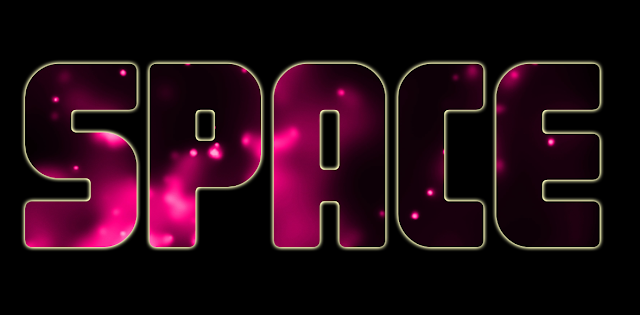
finished piece
Finished piece

Step 1.

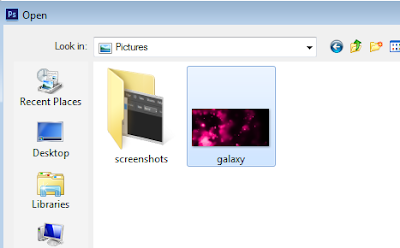
In Photoshop pen up an image you want to be inside the text

open file in Photoshop
Open file in Photoshop


select image
Select image


Step 2.

Create a text layer and add some text to it. In this example, I have typed the word 'Space'.


Step 3.

Right click on your image layer, in my case it is 'pink_gallaxy', and select the 'create clipping mask' option from the list that appears.
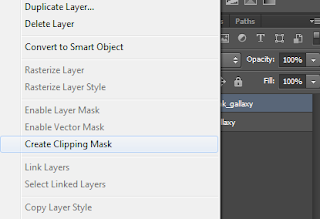
create clipping mask
Create clipping mask


Step 4.

Add a background colour (if you want) and that's it, simple as that.

Completed text effect with image inside it

Tip: you can left click inside the text and drag the image around to set it up the way you want.

Wednesday, March 9, 2016

Photoshop Text Tips

You can do a lot with text in Photoshop through both simple and advanced techniques

Photoshop was and still is primarily a photo editing software and always will be but it does have a wide range of text editing tools and capabilities that often go untapped or unnoticed by us. The tips below will help you to make the most of text in Photoshop.

Box Over Point

Always create a text box rather than a text point. Click and drag when using the text tool to create a text box. This gives you more control and options when positioning and formatting the text.

Diagonal Text

You can have text going horizontally or vertically. If you want to put it diagonally, type it horizontally first then use Edit > Transform > Rotate.

Divide and Conquer

Give separate pieces of text, such as paragraphs, a text box of their own. This will maximise your editing opportunities if you want to make major revisions or changes later. This is especially true with posters, magazines or CD/DVD covers.

Quick Access

To return into a text box double click on the ‘T’ beside the text layer. This is the easiest, fastest and most fool proof method. You may think to just double click on the box in the canvas but you need to be using the text tool first to do this while with the other method you don't.

Colouring In

To change the colour of text you must enter into the text box, highlight it and then choose a colour from the text colour picker at the top of the screen, not the colour picker on your tool bar. You never use the paint bucket or paint brush as this will force rasterisation of the layer. A layer style > colour overall will also work but takes longer to add and to edit.

Don't Rasterize

Never rasterize text unless it is totally necessary, read any pop ups that appear and if it says you must rasterize the text cancel it unless you had intended it. The text will no longer be an actual text layer once rasterized so If you rasterize text you will lose all the text editing capabilities like changing the font style or using text warps.

Text Warp

When using text warp you should reduce the text box to snugly fit the text. This is because the text warp actually warps the text box and not the text directly, so a snugger text box gives you more control with the text warp.

Styles before Filters

Layer styles can be applied to text without rasterizing it but filters from the filter gallery cannot be applied to text without rasterizing it.

Customising Letters

To edit the shape of text by editing anchor points you first need to convert it to a shape. To do this, select the layer, go to layer> type> convert to shape. This will turn the text into a shape layer. You can then edit the individual anchor points using the direct selection tool.

Images as Text

You can use the horizontal or vertical type mask tool to “cut” text from an image. It works by selecting part of the image in the shape of the text you have typed. This can be a nice effect to have an image running through your text as opposed to a flat colour or gradient. This tool works like normal text but after you have typed the text you will then need to use the move tool to move the selection to the canvas or canvas area you want it on.

Character and Paragraph

The Character and Paragraph windows give you additional text editing options such as line height, letter spacing, text height, font weight, alignment and much more. Good text is very important in design, spend time working on it and experimenting with the different options that can be achieved.


Friday, January 22, 2016

How to Curve Text in Photoshop

The final logo
The drop down is at the top Toolbar
When creating curved text, people tend to use the Warp tool to deform and bend the text. This is the incorrect way to create this effect as it makes the text uneven and unsightly. In this tutorial we'll be looking at the proper way to bend and curve text by creating a vector path and then adding text to the path to create the logo shown above.

Image
The drop down is at the top Toolbar
First, select the Ellipse tool and change the setting on the tool bar from shape to path. Holding Shift will create a perfect circle and you can then move it around and edit it further via the Path Selection tool. 
The base of the logo
Adding ellipse along the centre circle

The Path Selection tool icon
Select the Text tool and click anywhere along the path. When hovering over the path while Text tool is selected you should see a small curved line going through the cursor. You can now type in your text, but make sure to align it so that it's centered.  

The text will go along the path you've created

If you want to reposition the text you can hover over the path and adjust the start and stop points of the text. If you switch to the Path Selection tool you're also able to reposition it that way. It's also possible to resize the text using the Transform tool.  

The Direct Path Selection tool can be found by clicking and holding on the Path Selection tool icon

This will change the orientation of the text

You may also edit and use additional text settings by clicking the small icon that appears in the top toolbar ot using the Direct Selection tool. This changes the orientation of the text and can also flip it around the Path.
The finished logo

And now you're done! This is a very useful technique for creating your own logos and graphics.


close
Banner iklan disini