

This tutorial is completed in Illustrator but all the tools and techniques used are also available in Photoshop. The reason I am using Illustrator is that Illustrator is the best program (in my opinion) for creating vector graphics using the pen tool. Professional Logos are made as vector graphics, allowing them to be resized up or down without loss of quality.
Although this tutorial focuses on the actual production stage of the logo it is important to remember that the graphic design process should always be used. Therefore this stage should be preceded by analysis of any brief, research, brainstorming, and idea development (ideally through sketching). Alongside these design process stages you should also be considering the logo design principles.
Ideally read the article in full before completing your own logo design but to recap quickly the principles state the logo should be...
For the purposes of this tutorial we will be creating a logo for a design company called 'Cut & Paste'. The design aims to reference the company name within the text styles and shapes used. Now lets begin.


The completed logo should now resemble the image below. You can continue to develop the logo by editing the colours of the text or shapes, trying out different font styles or adding effects from the 'Effect' tab in the top menu.
You can easily create your own logo for new your company or a class project using the tools and techniques explained here but always remember to follow the previous steps of the design process as it is always easier and quicker to create the logo once you have a design sketch to follow. Trust me on that, you don't want to have to learn the hard way!
If you are still struggling or feel you need a detailed vector that your skill set isn't capable (yet) of creating you can find free vector graphics that you can then edit tot suit your needs.
 |
| The Logo we will be making in this tutorial |
Although this tutorial focuses on the actual production stage of the logo it is important to remember that the graphic design process should always be used. Therefore this stage should be preceded by analysis of any brief, research, brainstorming, and idea development (ideally through sketching). Alongside these design process stages you should also be considering the logo design principles.
Ideally read the article in full before completing your own logo design but to recap quickly the principles state the logo should be...
- Simple
- Versatile
- Timeless
- Memorable
- Appropriate
For the purposes of this tutorial we will be creating a logo for a design company called 'Cut & Paste'. The design aims to reference the company name within the text styles and shapes used. Now lets begin.
Logo - Step 1
Go to File-> New and create a canvas 700px wide and 500px tall. This is not a mandatory size, as the logo (once completed and exported) can be scaled up or down to any size. However, if you want to follow the tutorial exactly using the font sizes and other dimensions used then keep to 700px X 500px.Logo - Step 2
Open the layers window and rename the layer 'Shape 1'. Now use the rectangle shape tool to create a shape 610px x 125px. With the shape selected (with the path selection tool) open the stroke window and add a 5pt white stroke using the settings shown in the image below. Depending on how you clicked and dragged to create the shape the scissors arrow head on the stroke may appear in a different corner. To set the scissors to the position shown, go to Object-> Transform -> Reflect and edit the settings until you get it into the position shown.
Logo - Step 3
Now, press the new layer button in the layers window and name the layer 'Shape 2'. With the new layer selected use the rectangle shape tool to create a shape 600px x 115px. Set the shape colour to white and add a uniform stroke of 5pt with the scissors arrowhead (the 5pt stroke all around should make the shape the same size as the previous shape). Position the shape directly on top of the first shape getting the scissors arrowheads to overlap as shown below. Once again go to Object-> Transform -> Reflect and edit the settings until you get the arrowheads into the position shown.
Logo - Step 4
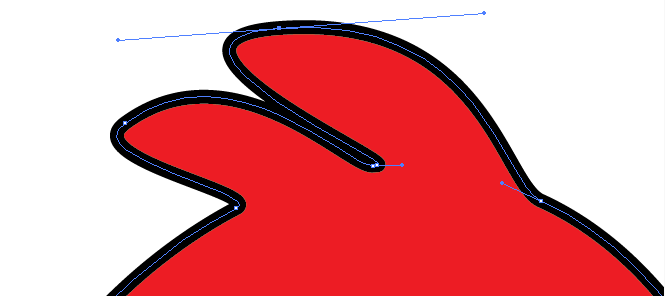
For the next shape we will once again create a new layer, call it 'Shape 3'. Use the pen tool to create a black coloured shape similar to the one shown below, remember to complete the shape by joining the last anchor point to the initial anchor point. Once completed you can move the anchor points of the shape into the exact form you want using the direct selection tool. Once again set a 5pt white stroke with a scissors arrowhead, the settings are shown alongside the shapes in the image below. That completes our work on the shapes.
Logo - Step 5
Now we will add the text. You can add the text all on one layer but as we will be using 4 different fonts in 4 separate text boxes it is easier to create a new layer for each piece of text too.TIP: For maximum flexibility in graphic design always create a new layer each time you add a new piece of text.
Logo - Step 6
Firstly we will add the 'CUT' text. Create a new layer call it 'CUT' and use the text tool to click and drag out a text box roughly to size you want (you can resize it afterwards if needed) and type the word CUT in Arial Bold and with a font size 110pt.
Logo - Step 7
Highlight the text with the text tool and change the text colour to white and add a 2pt black stroke. Open the stroke window and tick the dashed line box and set the values to those shown in the image above.Logo - Step 8
Next, we will add the ampersand. Create a new layer for the ampersand, and create a text box on that layer. Type '&' in font style Arial Bold, in a font size of 72pt and set the text colour to white.Logo - Step 9
Now the 'Paste' text. Once again create and name a new layer, use the text tool to create a text box and type 'Paste'. The font used for the paste text is called 'Cut It Out' and is a free to download font available HERE. Set the font colour to Black and the font size to 90pt as shown in the image of the font settings tab below. Use the path selection tool to position the text as shown.
Logo - Step 10
Finally the 'Design Company' text. As before, create and name a new layer, add a text box and type in 'Design Company'. The image below shows the text settings used.The completed logo should now resemble the image below. You can continue to develop the logo by editing the colours of the text or shapes, trying out different font styles or adding effects from the 'Effect' tab in the top menu.
 |
| The completed logo design |
You can easily create your own logo for new your company or a class project using the tools and techniques explained here but always remember to follow the previous steps of the design process as it is always easier and quicker to create the logo once you have a design sketch to follow. Trust me on that, you don't want to have to learn the hard way!
If you are still struggling or feel you need a detailed vector that your skill set isn't capable (yet) of creating you can find free vector graphics that you can then edit tot suit your needs.


