Showing posts with label vector graphics. Show all posts

Wednesday, January 24, 2018

Top Ten Free Image Editors

best free image editing software
The best free image editing software for you

There’s no argument about it — Adobe Photoshop remains the best photo-editing software on the market. But unless you’ve undergone formal training, it’s a difficult program to master, and it’s not the cheapest of options out there. That’s why we’re taking a look at the best free photo-editing software on the market, each of which provides much of the same functionality as Photoshop but without the associated fees.

Each of the programs below can perform basic and semi-advanced tasks, for instance, allowing you to resize, crop, and correct exposure with ease. And you may be surprised to find that some offer all the features you will ever need. You may not need Photoshop as much as you thought, so read through these Photoshop alternatives and see which free image editor is right for your needs.


Rating 

According to Microsoft "Paint is absolutely the best image editor on the market. Paint allows you to edit existing images and draw your own. Forget about complicated layers and tons of useless effects. 'Paint' contains only tools you really need!". The reality is that unless you're a 9 year old child, that statement is simply not true. As nostalgic as I am about paint, having grown up without the internet, I just can't give it a better rating. In fact 'Paint' is probably what gives free image editors a bad name.

In better news for paint lovers, Microsoft Paint 3D is no available on windows 10 as a free app download. It is the classic Paint reimagined, with an updated look and feel and a ton of new brushes and tools. You can make 2D masterpieces or 3D models that you can play with from all angles.

Visit Website


Easel.ly

Rating 

Easl.ly is a free info-graphic oriented web app with a plethora of templates to choose from. If you want to turn your photo into a chart or include it in a report, this is the best free option you’ll find. The blank template allows you to add a number of objects and effects if you aren’t interested in an infographic but still want to spruce up your photo and have a little fun with it before posting online.

It is free to register but some options and functions are reserved for premium users only. However at $3 per month it is a much cheaper option than it's main rival Canva ($12.95 monthly)

Visit Website


PicMonkey

Rating 

PicMonkey is a free editing tool for amateur photographers who want to quickly edit their images and turn them into mini-masterpieces. There are four primary tools in the PicMonkey holster: Editing, Touch Up, Design, and Collage. Editing probably provides the most functionality, allowing you to apply effects, advanced filters, spot correction, and so on. However, Touch Up is also a popular choice for selfies, profile pics, event photos, and so on.

This suite is designed more for the average person, or those who want the best picture possible for social media or sharing, and aren’t afraid to work on it with more advanced tools. PicMonkey also offers a premium version app which offers added functionality, templates etc. Premium option starts from €7.49 a month with the option to trial for free for a seven-day period.

Visit Website


BeFunky

Rating 

BeFunky is another online photo editor that's really easy to work with. Similar to PicMOnkey it offers multiple tools including Photo Editor, Designer and Collage. There are labels, emoticons, tons of textures and frames, a text tool, several effects like oil painting and cartoonizer, as well as all the basic editing and touch up tools. There's also a Facebook Cover crop tool that crops the image to the exact size required to use as a cover image on Facebook.

Many of the effects, borders, etc. unfortunately require you to upgrade to a paid version of BeFunky to use them. This is a real downside but with premium prices starting at just $2.91 per month it is a very affordable premium option.

Visit Website


iPiccy

Rating 

This is an online editor with multiple tools just like PicMonkey and BeFunky but without the restrictions of premium membership for some features. So it's totally free and although some features require you sign up, there is no charge and no hidden strings attached.There are tons of useful tools and the interface couldn't be easier to work with.

The built-in designer editor is a very capable vector editing system with all the main tools you can think of and the collage maker has lots of interesting and useful layouts and templates for you to use when making a collage.

On the downside there are only two file format options when saving and only one sharing option available. Also, the images can't be resized within the collage editor and you are unable to create your own custom collage layout only being able to choose from the set options.

Visit Website


SumoPaint

Rating 

SumoPaint is one of those “Photoshop lite” image editors that have sprung up in recent years, but it stands out from the rest. There is a web-based editor and a downloadable option as well which is great for those with limited or no internet access. You get 30 days free for the downloadable editor before you need to upgrade to pro but it is so cheap and gives you a load of added features so you'll hardly mind.

You will find plenty of the standard, basic image editing tools in the free version of Sumo Paint plus many fun and whacky paint tool features. Using a menu bar that is similar to Photoshop's, you will find the familiar blur, smudge, gradient fill, line tools, clone, and more. But you will also get other cool features, including a bulky star tool, and symmetry and custom shape tools. Sumo's text tool (for adding text to images) is so simple to use it makes you wonder why other programs often lack in this area of software development.

Visit Website


Pixlr

Rating 

Pixlr is an online photo editing tool. Fast, simple and enough features to make this a great find for moderate-level photo editing. You can create a new image, upload an image, or grab one directly from a URL location. With Pixlr Editor you have full control over your images including layers and effects. I would class it as the best of the in browser image editors.

If you are already familiar with Photoshop, you will find the Pixlr Editor menu options familiar both in layout and in how they work. The website is short on tutorials, however, but if you read Pixlr's blog you will find more information about how to get the most out of Pixlr. If you are new to image editing and do not like to play around in software, KT Forlaget has produced 30 video tutorials in English to help you quickly master all the important basic features and tools Pixlr offers.


Inkscape

Rating 

Inkscape is a free and open source vector graphics editor with a clean, consistent, and very stable interface. It uses SVG and an open XML-based W3C standard. SVG is considered as an excellent format for creating and designing logos and banners or any media that has been modified in vector mode to create graphics that could be scaled to any size while retaining their original quality. Among its interesting features are objection creation and object manipulation, fill and stroke tools, paths operations, text support, rendering, and file formats.

Inkscape is a cross-platform vector editing program so it has the capability to run on Windows, MAC OS X, and Linux distributions.


Krita

Rating 

Krita is a free and open source painting tool designed for concept artists, illustrators, matte and texture artists, and the VFX industry. Krita is really easy to work with and is certainly an advanced image editor. Like some of the other programs above, you can work with layers in addition to many other tools located in a floating toolbox off to the side of the program, similar to Photoshop.

There are plenty of features available as well, such as brushes, blending modes, advanced selection and masking tools, drawing aids, filters, symmetry tools, and image effects. Krita is a downloadable only editor and is over 100 MB in size and works with Windows, Linux, and Mac.

Visit Website


GIMP - Editor's Choice

Rating 


First things first let's explain that name! GIMP is an acronym for GNU Image Manipulation Program. It is ideal for tasks such as photo retouching, image composition and image authoring.

Whether you are a graphic designer, photographer, illustrator, or scientist, GIMP provides you with sophisticated tools to get your job done. It can be used as a simple paint program, an expert quality photo retouching program, an online batch processing system, a mass production image renderer, an image format converter, etc.

As GIMP is expandable and extensible you can further enhance your productivity with GIMP thanks to many customization options and 3rd party plugins. GIMP is a cross-platform image editor available for GNU/Linux, OS X, Windows and more operating systems.

Visit Website


This article was courtesy of our friends over at www.freedesignstuff.net check out their website for more great, and totally free, design stuff.


Keywords related to the post:


Wednesday, November 22, 2017

The Difference Between Vector and Bitmap Graphics


vector or bitmap graphics
Vector or Bitmap? What is the difference?

Bitmap/Raster graphics and vector graphics are the two main types of image files used in the world of graphic design. People often struggle to understand the difference between vector and bitmap graphics despite the fact that they are very different file types. Both of file types have their advantages, and equally they have their disadvantages so it's important to know the difference between the vector and bitmap so you can make an informed decision about which one is best for your design project. Let's start with the definition of each so we know the basics first and your decision of bitmap or vector might be a little bit easier.


Vector v Bitmap - The Definitions...

Bitmap (Raster) Graphics

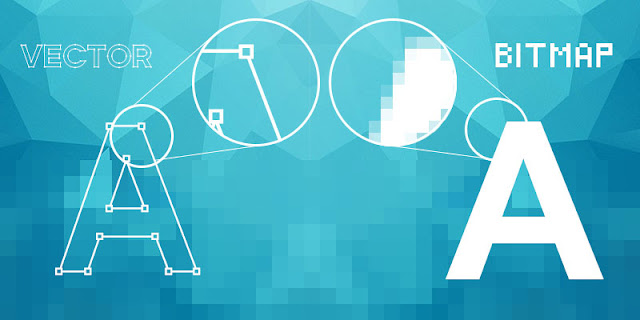
Bitmap (or raster) graphics are made up of as a series of tiny dots called pixels. Each pixel is actually a very small square that is assigned a color, and then arranged in a pattern to form the image.

Vector Graphics

Vector graphics is the use of polygons to represent images in computer graphics. Vector graphics use mathematical formulas to draw lines and curves that can be combined to create an image. These lines (vectors), lead through locations called control points/nodes/ anchor points.

Vector v Bitmap - The Differences...


difference between vector and bitmap
One of the main differences of vector and bitmap can be seen when you zoom in

So the obvious difference between vector and bitmap graphics is how they are created, as identified in the above definitions. Bitmap are made up of pixels while vector graphics are created using a mathematical formula. But there are numerous other differences between vector and bitmap graphics.

For starters, when you zoom in on a bitmap image you can begin to see the individual pixels that make up that image, most noticeably at the edges of the image. When a vector image is scaled up, the image is redrawn using the mathematical formula and the resulting image is just as smooth as the original.

In terms of file size, vector images tend to be smaller than bitmap images. That’s because bitmap images store color information for each individual pixel that forms the image while a vector image just has to store the mathematical formulas that make up the image, which take up less space. Unfortunately, vector formats have not always been well supported on the web. Currently the most popular image file formats used on the web, GIF, JPEG and PNG, are bitmap formats. Most vector images are first converted into bitmaps images (rasterized) before they are used on the web, although the SVG format is growing popularity due the rise in responsive web design.

In terms of colour, bitmap graphics are best for images that need to have a wide range of color gradations, such as photographs. Vector formats, on the other hand, are better for images that consist of only a few areas of solid color such as logos and type (text). This also means that vectors can't create realistic gradients, and although some vector softwares will allow it, they are actually using raster effects on the vector graphic.

When To Use Vector...

Vector graphics are excellent for graphics that frequently require resizing. A company logo is a prime example of a file that should be created as a vector and saved as a master file so you can use it with smaller items such as your business card, letterhead and brochure, but also on larger surfaces, such as billboards or the corporate jet. Vectors can also be used to create stylized modern graphics as their solid colours and sharp lines help them to appear crisper and with more visual impact that a bitmap image.

When To Use Bitmap...

Bitmap graphics are best used for photographs or other graphics with a wide range of colours such as a movie poster. They are also ideal for graphics with effects such as drop shadows (as they use gradients). Bitmaps can also be used to create realistic graphics and images using image editing or "paint" softwares such as Photoshop or CorelDraw. They are the most common type of graphic used and are supported on all digital systems.


Vector & Bitmap File Types...


vector and raster file types
Vector and Raster Graphics can come in different file types

Vector File Types

  • .ps (Adobe PostScript) 
  • .eps (Encapsulated PostScript)
  • .svf (Simple Vector Format)
  • .ai (Adobe Illustrator)
  • .cdr (Corel Draw)
  • .svg (Scalable Vector Graphic)

EPS, PDF (for transferring vcector files) and SVG (responsive web design) are the best file types in which to save your vector graphics outside of the editing software you are using.

Bitmap (Rater) File Types

  • .jpg (Joint Photographic Experts Group) 
  • .gif (GIF transparent file) 
  • .png (Portanble Network Graphic Transparent file)
  • .tiff or .tif (Tag Interleave Format)
  • .psd (Photoshop Document)

The best file types in which to save your bitmap graphics are JPG (for photos), GIF (for basic images like cartoons) and PNG (for images with transparency).

Vector and Bitmap File Types

Encapsulated PostScript files (.eps) are self-contained files that are the same mathematically as vector files, though they can be created from raster images as well. The format is one of the most compatible and portable because they are supported by almost all graphics software.

Then there is the Adobe Portable Document Format (.pdf) files in which files render as they were created thus using (potentially) a combination of vector and raster images.In a PDF file vector images are rendered as such as and be scaled and extracted. Fonts are embedded within a file and are rendered as type, not flattened as an image element. Raster images, such as photos, will appear as intended at 100 percent but, being bitmap graphics, they will still lose quality if they are over-enlarged.


Vector v Bitmap - Web or Print?


vector or bitmap for web or print
Which graphic format is suited for web or print or both?

This questions is much more relevant to bitmap graphics due the fact that they can lose quality when scaled up. Units of measurement such as dpi (dots per inch) or ppi (pixels per inch) refer to the number of pixels in one inch of the image. To determine whether your bitmap images are a suitable resolution for a specific situation (poster/business card/web banner etc.), you should first need to check their pixel density. 

As mentioned earlier, vector graphics have not always been well supported on the web and currently the most popular image file formats used on the web are bitmap formats such as .jpg or .png. The web displays 72 dpi, a relatively low pixel density, so raster images with a low dpi (such as 72 dpi) look nice and crisp on the web but this same image may not be suitable for printing on a brochure, poster or packaging which require a higher pixel density to maintain quality when printed. 

Why is this relevant you ask? Well to correctly print an image, it should be at least 300dpi, a much higher pixel density than the web displays so if you try to resize a low dpi image pulled from the web to use for your high dpi print project it won’t work because the image still has the same amunt of pixels and will distort (pixelate) when you try to scale it up. For example, if have a 72 dpi .jpg of an image it will need to be “stretched” to more than 3 times it's size to get it up to 300dpi. So that 72dpi image will look fine on your computer monitor, but when it prints at 300dpi it will look pixilated.

In this situation you should use a vector image (.EPS or .AI format) or create a bitmap/raster (.JPG or PNG or GIF) in the exact final print dimensions and at 300dpi.


Vector v Bitmap - Conclusion...

So after all that what we can say is that neither vector or bitmap is a better format than the other but rather that each format has it's advantages and disadvantages. The main thing is that once you know what these advantages and disadvantages are you can make an informed decision on which format is the right one for your design project. Vector or Bitmap... it's your call!


Friday, November 11, 2016

Take Your Designs To A New Level With The All Purpose Vector Supply Kit

All Purpose Vector Supply Kit
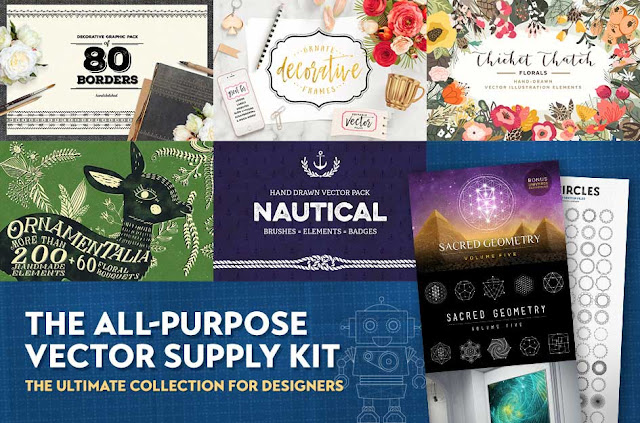
There are a lifetime of graphics available in this amazing vector graphics bundle

We've been talking recently about vectors and how important they are for designers and the great impact a vector based design can have on an audience. So to follow up and help give you a quick leg-up in terms of getting started with using vectors in your design projects I bring to you the "All Purpose Vector Supply Kit".

This vector bundle is the ultimate vector toolkit, especially for young designers yet to build up an archive of resources, as it contains vector resources for designs of all types, themes, topics and styles. And the great news is that it is now available for just $29 which is actually 99% off the initial price! Unfortunately this is a limited time offer and expires on Nov 14th at which time it will revert to it;s original $2,800 price!

One of the many selection of vector packages within the bundle that may catch your eye is the range of Christmas themed vectors which will certainly be useful for every designer over the next couple of months. The images below show just a small selection of the huge range of Christmas themed vectors available to download in this bundle.


My personal favourite though is the Logo Creator Bundle which has almost 1,000 vectors specifically designed for use in creating vector based logos. It's a must have for logo design projects and is something I have already started using in my own design projects and have really saved me a lot of time already. With over 950 logo related elements and over 100 ready made sample logos it's worthy of a vector bundle all by itself.


This vector graphics bundle contains a huge array of logo related elements
This vector graphics bundle contains a huge array of logo related elements.

Taking everything into account this vector collection brings you an incredibly practical set of elements including frames, florals, icons, badges, shapes, icons, silhouettes, textures, machine parts, artistic markings, sunbursts, labels, borders and much, much more! It’s a complete solution for every designer, so whatever your next project, you’ll be able to dip into this collection and find the exact elements you need!

All the components in this vector bundle come with an extended licensing for each and every item, which means that you can use them within your own wider designs available for resale, from greeting cards, to posters and merchandise! So no restrictions, no strings, just quality design elements for you to use. Remember it is a limited time offer (ending Nov 14th 2016), so buy now and it's yours for life.


Thursday, August 11, 2016

Create A Logo In 10 Easy Steps

This tutorial is completed in Illustrator but all the tools and techniques used are also available in Photoshop. The reason I am using Illustrator is that Illustrator is the best program (in my opinion) for creating vector graphics using the pen tool. Professional Logos are made as vector graphics, allowing them to be resized up or down without loss of quality.

Logo Design
The Logo we will be making in this tutorial

Although this tutorial focuses on the actual production stage of the logo it is important to remember that the graphic design process should always be used. Therefore this stage should be preceded by analysis of any brief, research, brainstorming, and idea development (ideally through sketching). Alongside these design process stages you should also be considering the logo design principles.

Ideally read the article in full before completing your own logo design but to recap quickly the principles state the logo should be...

  • Simple 
  • Versatile 
  • Timeless 
  • Memorable 
  • Appropriate 

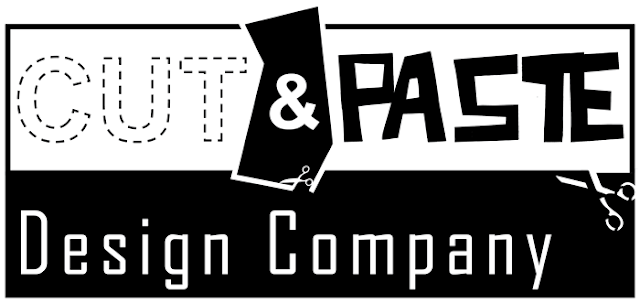
For the purposes of this tutorial we will be creating a logo for a design company called 'Cut & Paste'. The design aims to reference the company name within the text styles and shapes used. Now lets begin.

Logo - Step 1

Go to File-> New and create a canvas 700px wide and 500px tall. This is not a mandatory size, as the logo (once completed and exported) can be scaled up or down to any size. However, if you want to follow the tutorial exactly using the font sizes and other dimensions used then keep to 700px X 500px.

Logo - Step 2

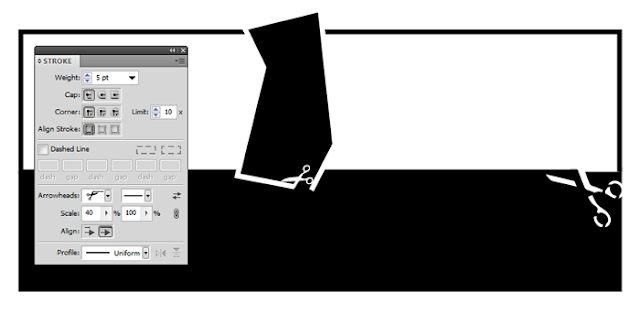
Open the layers window and rename the layer 'Shape 1'. Now use the rectangle shape tool to create a shape 610px x 125px. With the shape selected (with the path selection tool) open the stroke window and add a 5pt white stroke using the settings shown in the image below. Depending on how you clicked and dragged to create the shape the scissors arrow head on the stroke may appear in a different corner. To set the scissors to the position shown, go to Object-> Transform -> Reflect and edit the settings until you get it into the position shown.

Logo Design Stage 1

Logo - Step 3

Now, press the new layer button in the layers window and name the layer 'Shape 2'. With the new layer selected use the rectangle shape tool to create a shape 600px x 115px. Set the shape colour to white and add a uniform stroke of 5pt with the scissors arrowhead (the 5pt stroke all around should make the shape the same size as the previous shape). Position the shape directly on top of the first shape getting the scissors arrowheads to overlap as shown below. Once again go to Object-> Transform -> Reflect and edit the settings until you get the arrowheads into the position shown.

Logo Design Stage 2

Logo - Step 4

For the next shape we will once again create a new layer, call it 'Shape 3'. Use the pen tool to create a black coloured shape similar to the one shown below, remember to complete the shape by joining the last anchor point to the initial anchor point. Once completed you can move the anchor points of the shape into the exact form you want using the direct selection tool. Once again set a 5pt white stroke with a scissors arrowhead, the settings are shown alongside the shapes in the image below. That completes our work on the shapes.

Logo Design Stage 3

Logo - Step 5

Now we will add the text. You can add the text all on one layer but as we will be using 4 different fonts in 4 separate text boxes it is easier to create a new layer for each piece of text too.

TIP: For maximum flexibility in graphic design always create a new layer each time you add a new piece of text.

Logo - Step 6

Firstly we will add the 'CUT' text. Create a new layer call it 'CUT' and use the text tool to click and drag out a text box roughly to size you want (you can resize it afterwards if needed) and type the word CUT in Arial Bold and with a font size 110pt.

Logo Design Stage 4

Logo - Step 7

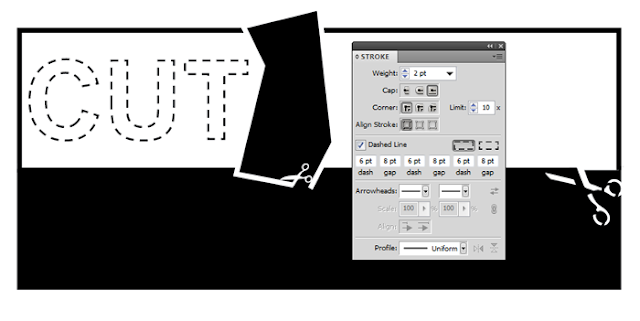
Highlight the text with the text tool and change the text colour to white and add a 2pt black stroke. Open the stroke window and tick the dashed line box and set the values to those shown in the image above.


Logo - Step 8

Next, we will add the ampersand. Create a new layer for the ampersand, and create a text box on that layer. Type '&' in font style Arial Bold, in a font size of 72pt and set the text colour to white.


Logo - Step 9

Now the 'Paste' text. Once again create and name a new layer, use the text tool to create a text box and type 'Paste'. The font used for the paste text is called 'Cut It Out' and is a free to download font available HERE. Set the font colour to Black and the font size to 90pt as shown in the image of the font settings tab below. Use the path selection tool to position the text as shown.
Logo Design Stage 5

Logo - Step 10

Finally the 'Design Company' text. As before, create and name a new layer, add a text box and type in 'Design Company'. The image below shows the text settings used.


The completed logo should now resemble the image below. You can continue to develop the logo by editing the colours of the text or shapes, trying out different font styles or adding effects from the 'Effect' tab in the top menu.
The completed logo design
The completed logo design 

You can easily create your own logo for new your company or a class project using the tools and techniques explained here but always remember to follow the previous steps of the design process as it is always easier and quicker to create the logo once you have a design sketch to follow. Trust me on that, you don't want to have to learn the hard way!

If you are still struggling or feel you need a detailed vector that your skill set isn't capable (yet) of creating you can find free vector graphics that you can then edit tot suit your needs.


Wednesday, June 8, 2016

Create your own Angry Bird

The Angry Bird Family
Which Angry Bird will you create? 

Following the release of the Angry Birds Movie we thought it might be fun to practice our graphic design skills and make our very own Angry Bird. This tutorial is completed in Illustrator but all the tools and techniques used are also available in Photoshop. The reason I am using Illustrator is that Illustrator is the best program for creating vector graphics using the pen tool. Logos and cartoons are normally made with the pen tool so they are created as vector graphics, allowing them to be resized up or down without loss of quality, therefore this image will be created using the pen tool. If you are not familiar with the pen tool then you can read this guide to using the pen tool before you start.

Now that that is cleared up, let's begin making an Angry Bird!


1. Go to File-> New and create a canvas 700px wide and 500px tall.


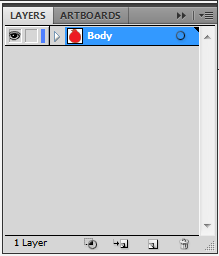
2. Go to the layers window and rename the base layer 'Body'. Select the ellipse shape tool and create a circle, set the colour of the circle to red, as we'll be creating the red Angry Bird, and put a 7px black stroke on the circle.


3. Use the direct selection tool to move the top and left anchor points slightly, as seen in the image below.
The Angry Bird's Body

4. Now use the add anchor point tool (within the pen tool) to add 6 anchor points across the top of the body, don’t be too particular about the placement as we will be moving them soon anyway. See the image below.


5. Next select the direct selection tool and drag the 2nd and 4th anchor points upwards and the use the handles on each anchor point until the shape resembles the image below. (If there are no handles on the anchor points it is possible they are straight line anchor points, use the convert anchor point tool and click and drag slightly on each point to convert them to curved line anchor points.)

The infamous 'quiff' of the red angry bird

6. Now open the layers window and click the button circled in the image below and create a new layer, call it 'belly'.


7. Next, while on the belly layer, use the ellipse shape tool to create the rough shape of the belly, colour the shape in white and set the stroke to 0pt. Then zoom in and use the direct selection tool to move the anchor points and their handles into a shape similar to the image below.


8. Open the layers window again and click the new layer button and create a new layer, call it 'eyes'. If it is not the top layer, move it to the top. Use the ellipse tool to create two circles for the eyes, each circle should be white with a 3pt stroke. To overlap one eye over the other as show in the image below, right click on one eye and select move to front.


9. Next create a new layer, call it 'eyeballs'. Use the ellipse tool to create two small black circles without any stroke. Position the eyeballs as shown in the image below.


10. Again create a new layer, call it 'eyebrow' and ensure it is the top layer. Use the Pen tool and click (do not click and drag) one at a time creating new straight line anchor points in the shape shown below remembering to join the last anchor point to the original point.

The angry bird eyebrow
Getting the mono-brow right is the key to making him look angry
11. The next part of the image is the nose. Create a new layer, call it 'nose' and once again ensure it is the top layer. Use the pen tool to create the rough shape of the nose, remembering to join the last anchor point to the original anchor point. Give the shape a yellow colour and a 3pt stroke. To edit and refine the shape of the nose use the direct selection tool to move the anchor points and their handles around. You may also need to use the convert point tool as the nose shape uses both curved line and straight line anchor points. The image below shows the image alongside the layers used so far to create it.

The angry bird and the layers used so far

12. Finally, create one more layer - call it "tail" and again use the pen tool to create straight line anchor points to make up the tail shape. Position the layer beneath the body layer for best results. If you wish you can use the ellipse shape to create 2 more shapes for the 'freckles' , or whatever they are, on the body.
Red angry bird
The completed angry bird 

TIP: The pen tool can be difficult but remember practice makes perfect so after completing this tutorial perhaps try creating the rest of the angry bird family or other cartoon images.

Wednesday, March 9, 2016

How to Use The Pen Tool

The Photoshop Pen tool
The pen tool and associated tools

The Pen Tools...

The Pen: This is what you use to draw paths and shapes of all kinds precisely by clicking to add a straight line anchor point and/or clicking and dragging to add a curved line anchor point. As you click to add anchor points they automatically join up in order of creation until you complete the shape by clicking back on the original (first) anchor point added.

The Freeform Pen: This freehand style is usually used when you are confident in what you’re going to draw and do not want to bother with anchors. However, it’s not commonly used as it is hard to draw perfect shapes with a mouse.

Add Anchor Point: Used to add a new anchor point after the shape is made.

Delete Anchor Point: Used to delete an anchor point from a shape.

Convert Point: Click on an anchor point in this mode to turn it into a Corner Point, or hold down your mouse and drag on an anchor point to turn it into a Smooth/Rounded Point.


Straight, Curved or Freeform Lines

Straight and curved lines created using the pen tool
A shape in progress showing 4 straight and 2 curved anchor point

As already mentioned there are two types of anchor points; straight line anchor points and curved line anchor points.

  • To create a straight line point you simply left click on the canvas when using the pen tool.
  • To create a curved line point left click, hold and drag to create the curve you want. A preview line will appear to show you what the line will look like. Once you release the left click the point is created.
  • As you continue to left click on different parts of the canvas the anchor points will automatically join together until you join the last anchor point with the original anchor point, thus completing the shape/path. You must join back to the first anchor point to properly complete the shape.
  • Once you complete the path/shape it can be moved using the path selection tool or edited using the direct selection tool.
  • You can also use the freeform pen tool to create free hand lines as shown below.
The freeform pen tool
The freeform pen tool allows the creations of shapes quickly but is less accurate
  • Anchor points can also be added to the shape/path, using the add anchor point tool (within the pen tool), or deleted from the shape/path using the delete anchor point tool (also within the pen tool).
  • Anchor points can also be converted from straight line points to curved points and vice versa. To do this, simply click on a point with the convert point tool.
  • Below are the available options under the pen tool options on top.

Pen Tool Modes

The pen tool modes
Add caption
  • Shape Layers – create solid coloured layers, this is the most common use of the pen tool.
  • Paths – create working paths for selection of an area or to create an invisible shape to hold a body of text.
  • Fill Pixels – create rasterized shapes that do not have shape editing capabilities once formed
So in summary, the pen tool can be used to create path selections, basic pre-set solid shapes and
stylish original vector shapes. Have fun testing out your skills with the pen tool in Photoshop, InDesign or Illustrator.


Monday, February 29, 2016

Create a Cartoon Character

The completed cartoon character will look something like this
1. To create this cartoon character we will be using vector graphics created by the shape tool, pen tool and associated Photoshop tools and techniques. First create a new A4 canvas in Photoshop by going to File-> New and choosing international paper and then A4. You could choose any other size but if you wish to follow this tutorial exactly then you need to choose an A4 canvas size.

2. The first part of the character we will create is the body, represented by a simple circle. Use the elliptical shape tool to click and drag out an ellipse and then hold on the shift key (while still clicking and dragging) to get a perfect circle. You can resize the circle once you have released the mouse using Edit-> Transform-> Scale. Try to create a circle approximately half the width, and one third the height of the overall canvas. To change the colour of the circle double click on the Finally, in the layers window, right click on the layer, select layer properties and name the layer 'body'.

3. Next, while still on your 'body' layer, go to Layer-> Layer Styles-> Blending Options. In the window which opens select inner shadow and stroke and set the options to those shown in the image below.


4. Next we will create the eyes of our little character. Again we will use the ellipse shape tool to create two ellipses for the eyes. Set the colour to white, add a stroke of between 10pt and 20pt and name each layer 'right eye' and 'left eye'. Now to reshape the eyes into the shapes shown below; First use the add anchor point tool (within the pen tool) to add two anchor points either side of the bottom anchor point on the left eye. Next use the direct selection tool to move that bottom anchor point upwards slightly. For the right eye add two anchor points either side of the top anchor point and two either side of the bottom anchor point and , once again, use the direct selection tool to move the anchor points to obtain the desired shape. Don't be too particular though as the eyes or eyebrows may cover any wobbly looking lines.


5. Now to add the eyeballs; once again start by using the elliptical shape tool to create two ellipses for the eyes, colour these layers blue and name them 'left eyeball' and 'right eyeball'. Next add an inner shadow to the eyeballs using the options shown in the image below. If the eyeball appears below the eye just drag and drop its layer above the eye layer in the layers window.


6. The pupils of the eyes will once again be started by using the elliptical shape tool to create the shapes. Next colour the shapes layers black and name them 'left pupil' and 'right pupil'. To complete the pupils add a bevel and emboss as shown in the image below.


7. We will now complete the eyes by rotating the eyeballs and pupils slightly and positioning and resizing them as necessary to match the image below. Don’t worry that the right eyeball is out of the eye as the eyebrow will cover this.


8. To create the eyebrows we will be using the pen tool. Click and drag to create the curved line anchor points used to create the shape of the eyebrow. Don't be too particular about the shape to start just be sure to join the last anchor point to the initial anchor point to complete the shape. You can then use the direct selection tool to move the anchor points around to achieve a better shape. Finally colour the eyebrows orange.


9. To complete the face of our character we will use the pen tool to create a quizzical smirk and for a little detail use the elliptical shape tool to create cheeks. Colour the cheeks either one tone darker or lighter than the yellow of the face and colour the mouth the same orange as the eyebrows.


10. The last parts of our little cartoon character are the arm and hand. To keep the quizzical look going we want to have the arm and hand scratching the chin (if he had one!) of our character. Similar to the eyebrows, we will use the pen tool to create the arm and hand in three separate shapes. First the arm. Use the pen tool to click and drag creating curved line anchor points and complete the shape by joining the final anchor point to the initial anchor point. Tip: The fewer anchor points you can use the smoother the curve on the arm will be, 6 anchor points would be enough if you can manage it!


11. Finally the hand is made up of 2 shapes, a simple warped ellipse for the wrist and then a detailed shape representing a hand with thumb and fore finger stretched out with the other fingers closed; only showing knuckles. Take your time to create these shapes and remember to complete the shape by joining the final anchor point to the initial anchor point. Don't be too particular about getting the shape perfect the first time around as you can always use the direct selection tool to move the anchor points around or even add or remove anchor points using the appropriate tools.

12. For added detail add an inner shadow to the hand and wrist shape using the options show in the image below.

The completed emoticon style cartoon character should now look something like this. Hope you enjoyed the tutorial, now how about trying to create different emoticon cartoons.


close
Banner iklan disini