Showing posts with label pen tool. Show all posts

Wednesday, June 8, 2016

Create your own Angry Bird

The Angry Bird Family
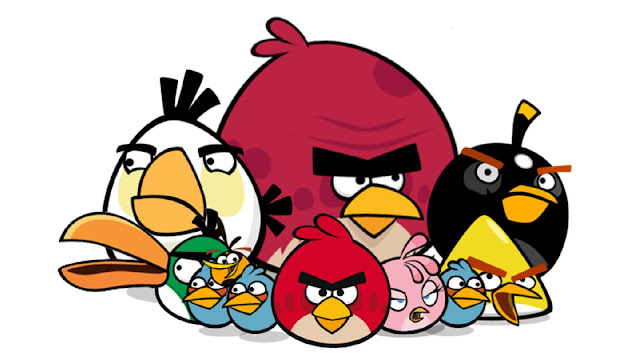
Which Angry Bird will you create? 

Following the release of the Angry Birds Movie we thought it might be fun to practice our graphic design skills and make our very own Angry Bird. This tutorial is completed in Illustrator but all the tools and techniques used are also available in Photoshop. The reason I am using Illustrator is that Illustrator is the best program for creating vector graphics using the pen tool. Logos and cartoons are normally made with the pen tool so they are created as vector graphics, allowing them to be resized up or down without loss of quality, therefore this image will be created using the pen tool. If you are not familiar with the pen tool then you can read this guide to using the pen tool before you start.

Now that that is cleared up, let's begin making an Angry Bird!


1. Go to File-> New and create a canvas 700px wide and 500px tall.


2. Go to the layers window and rename the base layer 'Body'. Select the ellipse shape tool and create a circle, set the colour of the circle to red, as we'll be creating the red Angry Bird, and put a 7px black stroke on the circle.


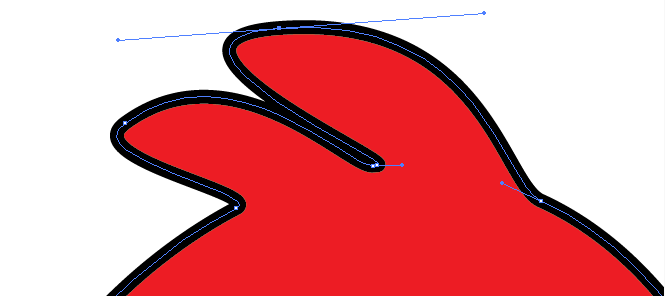
3. Use the direct selection tool to move the top and left anchor points slightly, as seen in the image below.
The Angry Bird's Body

4. Now use the add anchor point tool (within the pen tool) to add 6 anchor points across the top of the body, don’t be too particular about the placement as we will be moving them soon anyway. See the image below.


5. Next select the direct selection tool and drag the 2nd and 4th anchor points upwards and the use the handles on each anchor point until the shape resembles the image below. (If there are no handles on the anchor points it is possible they are straight line anchor points, use the convert anchor point tool and click and drag slightly on each point to convert them to curved line anchor points.)

The infamous 'quiff' of the red angry bird

6. Now open the layers window and click the button circled in the image below and create a new layer, call it 'belly'.


7. Next, while on the belly layer, use the ellipse shape tool to create the rough shape of the belly, colour the shape in white and set the stroke to 0pt. Then zoom in and use the direct selection tool to move the anchor points and their handles into a shape similar to the image below.


8. Open the layers window again and click the new layer button and create a new layer, call it 'eyes'. If it is not the top layer, move it to the top. Use the ellipse tool to create two circles for the eyes, each circle should be white with a 3pt stroke. To overlap one eye over the other as show in the image below, right click on one eye and select move to front.


9. Next create a new layer, call it 'eyeballs'. Use the ellipse tool to create two small black circles without any stroke. Position the eyeballs as shown in the image below.


10. Again create a new layer, call it 'eyebrow' and ensure it is the top layer. Use the Pen tool and click (do not click and drag) one at a time creating new straight line anchor points in the shape shown below remembering to join the last anchor point to the original point.

The angry bird eyebrow
Getting the mono-brow right is the key to making him look angry
11. The next part of the image is the nose. Create a new layer, call it 'nose' and once again ensure it is the top layer. Use the pen tool to create the rough shape of the nose, remembering to join the last anchor point to the original anchor point. Give the shape a yellow colour and a 3pt stroke. To edit and refine the shape of the nose use the direct selection tool to move the anchor points and their handles around. You may also need to use the convert point tool as the nose shape uses both curved line and straight line anchor points. The image below shows the image alongside the layers used so far to create it.

The angry bird and the layers used so far

12. Finally, create one more layer - call it "tail" and again use the pen tool to create straight line anchor points to make up the tail shape. Position the layer beneath the body layer for best results. If you wish you can use the ellipse shape to create 2 more shapes for the 'freckles' , or whatever they are, on the body.
Red angry bird
The completed angry bird 

TIP: The pen tool can be difficult but remember practice makes perfect so after completing this tutorial perhaps try creating the rest of the angry bird family or other cartoon images.

Wednesday, March 9, 2016

How to Use The Pen Tool

The Photoshop Pen tool
The pen tool and associated tools

The Pen Tools...

The Pen: This is what you use to draw paths and shapes of all kinds precisely by clicking to add a straight line anchor point and/or clicking and dragging to add a curved line anchor point. As you click to add anchor points they automatically join up in order of creation until you complete the shape by clicking back on the original (first) anchor point added.

The Freeform Pen: This freehand style is usually used when you are confident in what you’re going to draw and do not want to bother with anchors. However, it’s not commonly used as it is hard to draw perfect shapes with a mouse.

Add Anchor Point: Used to add a new anchor point after the shape is made.

Delete Anchor Point: Used to delete an anchor point from a shape.

Convert Point: Click on an anchor point in this mode to turn it into a Corner Point, or hold down your mouse and drag on an anchor point to turn it into a Smooth/Rounded Point.


Straight, Curved or Freeform Lines

Straight and curved lines created using the pen tool
A shape in progress showing 4 straight and 2 curved anchor point

As already mentioned there are two types of anchor points; straight line anchor points and curved line anchor points.

  • To create a straight line point you simply left click on the canvas when using the pen tool.
  • To create a curved line point left click, hold and drag to create the curve you want. A preview line will appear to show you what the line will look like. Once you release the left click the point is created.
  • As you continue to left click on different parts of the canvas the anchor points will automatically join together until you join the last anchor point with the original anchor point, thus completing the shape/path. You must join back to the first anchor point to properly complete the shape.
  • Once you complete the path/shape it can be moved using the path selection tool or edited using the direct selection tool.
  • You can also use the freeform pen tool to create free hand lines as shown below.
The freeform pen tool
The freeform pen tool allows the creations of shapes quickly but is less accurate
  • Anchor points can also be added to the shape/path, using the add anchor point tool (within the pen tool), or deleted from the shape/path using the delete anchor point tool (also within the pen tool).
  • Anchor points can also be converted from straight line points to curved points and vice versa. To do this, simply click on a point with the convert point tool.
  • Below are the available options under the pen tool options on top.

Pen Tool Modes

The pen tool modes
Add caption
  • Shape Layers – create solid coloured layers, this is the most common use of the pen tool.
  • Paths – create working paths for selection of an area or to create an invisible shape to hold a body of text.
  • Fill Pixels – create rasterized shapes that do not have shape editing capabilities once formed
So in summary, the pen tool can be used to create path selections, basic pre-set solid shapes and
stylish original vector shapes. Have fun testing out your skills with the pen tool in Photoshop, InDesign or Illustrator.


Monday, February 29, 2016

Create a Cartoon Character

The completed cartoon character will look something like this
1. To create this cartoon character we will be using vector graphics created by the shape tool, pen tool and associated Photoshop tools and techniques. First create a new A4 canvas in Photoshop by going to File-> New and choosing international paper and then A4. You could choose any other size but if you wish to follow this tutorial exactly then you need to choose an A4 canvas size.

2. The first part of the character we will create is the body, represented by a simple circle. Use the elliptical shape tool to click and drag out an ellipse and then hold on the shift key (while still clicking and dragging) to get a perfect circle. You can resize the circle once you have released the mouse using Edit-> Transform-> Scale. Try to create a circle approximately half the width, and one third the height of the overall canvas. To change the colour of the circle double click on the Finally, in the layers window, right click on the layer, select layer properties and name the layer 'body'.

3. Next, while still on your 'body' layer, go to Layer-> Layer Styles-> Blending Options. In the window which opens select inner shadow and stroke and set the options to those shown in the image below.


4. Next we will create the eyes of our little character. Again we will use the ellipse shape tool to create two ellipses for the eyes. Set the colour to white, add a stroke of between 10pt and 20pt and name each layer 'right eye' and 'left eye'. Now to reshape the eyes into the shapes shown below; First use the add anchor point tool (within the pen tool) to add two anchor points either side of the bottom anchor point on the left eye. Next use the direct selection tool to move that bottom anchor point upwards slightly. For the right eye add two anchor points either side of the top anchor point and two either side of the bottom anchor point and , once again, use the direct selection tool to move the anchor points to obtain the desired shape. Don't be too particular though as the eyes or eyebrows may cover any wobbly looking lines.


5. Now to add the eyeballs; once again start by using the elliptical shape tool to create two ellipses for the eyes, colour these layers blue and name them 'left eyeball' and 'right eyeball'. Next add an inner shadow to the eyeballs using the options shown in the image below. If the eyeball appears below the eye just drag and drop its layer above the eye layer in the layers window.


6. The pupils of the eyes will once again be started by using the elliptical shape tool to create the shapes. Next colour the shapes layers black and name them 'left pupil' and 'right pupil'. To complete the pupils add a bevel and emboss as shown in the image below.


7. We will now complete the eyes by rotating the eyeballs and pupils slightly and positioning and resizing them as necessary to match the image below. Don’t worry that the right eyeball is out of the eye as the eyebrow will cover this.


8. To create the eyebrows we will be using the pen tool. Click and drag to create the curved line anchor points used to create the shape of the eyebrow. Don't be too particular about the shape to start just be sure to join the last anchor point to the initial anchor point to complete the shape. You can then use the direct selection tool to move the anchor points around to achieve a better shape. Finally colour the eyebrows orange.


9. To complete the face of our character we will use the pen tool to create a quizzical smirk and for a little detail use the elliptical shape tool to create cheeks. Colour the cheeks either one tone darker or lighter than the yellow of the face and colour the mouth the same orange as the eyebrows.


10. The last parts of our little cartoon character are the arm and hand. To keep the quizzical look going we want to have the arm and hand scratching the chin (if he had one!) of our character. Similar to the eyebrows, we will use the pen tool to create the arm and hand in three separate shapes. First the arm. Use the pen tool to click and drag creating curved line anchor points and complete the shape by joining the final anchor point to the initial anchor point. Tip: The fewer anchor points you can use the smoother the curve on the arm will be, 6 anchor points would be enough if you can manage it!


11. Finally the hand is made up of 2 shapes, a simple warped ellipse for the wrist and then a detailed shape representing a hand with thumb and fore finger stretched out with the other fingers closed; only showing knuckles. Take your time to create these shapes and remember to complete the shape by joining the final anchor point to the initial anchor point. Don't be too particular about getting the shape perfect the first time around as you can always use the direct selection tool to move the anchor points around or even add or remove anchor points using the appropriate tools.

12. For added detail add an inner shadow to the hand and wrist shape using the options show in the image below.

The completed emoticon style cartoon character should now look something like this. Hope you enjoyed the tutorial, now how about trying to create different emoticon cartoons.


Monday, January 25, 2016

Cartoonize a Photo

Cartoonize a Photo


To create the cartoon effect you need to create multiple shape layers to represent the different areas in the photograph. So what I will do is document the process of completing, colouring and layering just a few shapes as the process is the same for all shapes.


Start by opening the file you want to cartoonize in Photoshop. Equip the pen tool by pressing ''p''. Click where you would like to start off and then follow around the edges of the shape you want clicking to create new extra anchor points as you go. If you simply click you will create a straight line between points but if you click and hold your click and then drag you can create curved lines. 

Don't worry if you don't get it exactly the way you wish you can press ''Ctrl+z'' or you can just go over it again when your finished by pressing ''Ctrl+right click'' or use the direct selection tool to move the anchor points around.

For simpler shapes such as circles you can just use the elliptical shape tool.


Once you come back around to where you began then hover over you're initial anchor point (you should see a little circle icon) and click. This will complete the shape and you will see it added to your layers.


To pick a colour for the shape you can simply double click on the shapes layer image. After you have double clicked this your colour window will appear. Down the bottom it says only web colours, if this is checked then uncheck it to get a wider range of colours to choose from. Once you select the colour you want you will see it on the shape.


Once you have created multiple layers you should rename each layer to a relevant name, eg. "left eye". This will make it much easier to manage the file as you will end up with a large volume of layers.


When you have created all the shapes you should turn off the background layer by clicking on the eye icon beside it. This will highlight any gaps between shapes that you can then fix. After all this is completed and perfected you should have your cartoon style image.


close
Banner iklan disini