Showing posts with label 2d games. Show all posts

Wednesday, May 25, 2016

Top 5 Games Design Tips

Level design
Level design image from Scott Petty
The games design tips below are intended to help you improve your overall games design process but are not a replacement for it. So before we get to our top 5 games design tips our first piece of advice is to always, always use the games design process when creating games.

1. Be Original

Original Game Concept Ideas
Game Concepts Should Always Be Original

One of the best thing about games is that there are no limits to what they can be about, where they can be set, the characters involved or the games' missions or objectives. The only limit is your own creativity, so why on earth would you consider starting your project by copying or mimising an existing game?

Sure you can learn from successful games and sure you can create a game in the genre of existing games but you should always have a unique game concept. New characters, stories, settings and missions are what will attract people to play your game in the first place and with literally no limits on what you can choose there is nothing stopping you from doing that.

The random game idea generator activity is a great way to help you get started. It helped us come up with this gem of a game concept for Colossus Cleaner...
"Arnold Schwarzenegger astride a unicorn carrying a mop in the Colosseum of ancient Rome"
It's weird, it's crazy, it's bordering on stupid but ..... it is original.

2. Prepare All Assets First

A selection of game button assets
A selection of game button assets ready to be used in a game

It is always very tempting to jump straight into the actual level design of the game once you have settled on your idea. However this is one of the worst things you can do as it will lead to you wasting more time than you can imagine as you will have to stop and jump back and in and out of the level design process every time you need an asset whether that be a sound, a texture, a mesh, a font etc.

This will also lead to inconsistency in the overall look and feel of the level as if the assets are not all created together they tend to end up being of a different type, scale or style from each other. This will make the game look unprofessional and even difficult to play/understand as players won't recognise one pick up from the next or understand one symbol from another.

The message is simple, plan ahead and take the time to create or gather all sounds, fonts and images (for UI screens), textures and meshes before you even open the level editor or games engine you are using.

Here are a few good places to get your game assets for free....


3. Detail in Clusters

Detail in Clusters
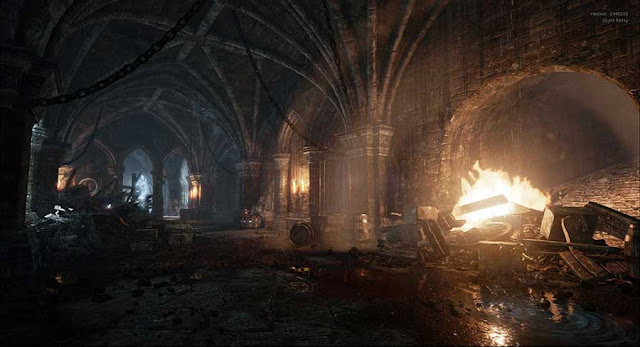
This room looks full of details and objects at first glance but look closer....

We all want to create realistic and interesting game worlds but the more meshes and foliage and particle effects and lights etc. that we add the more likely the game is to lag. Also it is actually becoming less realistic! 

Even in the real world things tend to cluster; clothes pile up in the corner of your room, letters pile up on the hall stand, coats get draped over the back of the same chair, rubbish gathers at the back door waiting to be put out, one kitchen press seems to hold all the random, unused utensils..... Any of those sound familiar to you?

All the while the circulation paths of our home remain clear and uncluttered no matter how untidy we are. When I say circulation paths I am referring to  hallways and corridors but also common directional paths such as from the living room door to the couch or from the bedroom door to the bed.This information can be used in your level design to make it more realistic but also faster and more efficient. Basically, you should not try to detail the entire level but rather create small areas of high detail which then become focus points for the character as they move through the empty (in comparison) circulation paths.

Tip: In outdoor scenes use tall building, trees or other landmarks as focal points for the player to move towards and look at during otherwise empty grasslands or open areas.

4. Create Reusable Elements

dilapidated and derelict building
The seats in this dilapidated and derelict building are made up of the same parts but have been use differently 
We have already told you to prepare your assets and create clustered areas of detail in you game and this tip is partly related to those from a mesh point of view. The image above is a good example of what I mean as it shows the same seat in different positions and in different states of disrepair.

This might seem simple and obvious but if you were planning ahead you would have made the parts of the seat as separate meshes to allow you to do this easily put it together in different ways. On the other hand if your weren't thinking ahead and if you just made the entire seat as a single mesh you would then need to go back and make another mesh for the broken seat and another for the one missing one cushion and another for the one with a missing leg and another, and another....

It's not just meshes that can be reused either. Clever programming can save you a lot of time too. How you do this will vary depending on which game engine you use so lets just use a generic example to explain the point. Let's say you are creating a game where you collects coins, a la Mario. Rather than creating 100 separate coins but each with the same programming code you would instead create a coin 'actor' with built in programming code that can then be added and duplicated within the level editor.

This is an obvious example of course but when you break down your game objectives and requirements you will find that the same actions or events are required for multiple different objects or characters. So why would you create more work for yourself? Plan out your game logic to identify these repeat events and then create a single reusable 'actor' for that event.

5. Don't Neglect The Audio

sound cue editor in Unreal Engine 4
Screenshot from the sound cue editor in Unreal Engine 4

Firstly we must understand that audio is not just the background music in the game. Audio covers a wide range of areas such as...
  • Background music
  • Characters voices
  • Character sound effects (eg. footsteps)
  • Weapon sound effects
  • Ambient sounds
  • User Interface (U.I.) button click sounds
  • U.I. background music
  • Voice overs/ narration
  • Objects/ Pick-ups sound effects
It is very easy to start to create a game without a clear concept of what the game audio will be but by considering game audio at the very beginning of the game’s concept you can then design the other level features to match it and create an overall consistency to the game's atmosphere as opposed to just quickly downloading and importing stock sounds at the end of the project.

With the emergence of Virtual Reality headsets and VR gaming the importance of game audio is becoming more important than ever. The right sounds, in the right place, at the right time will be vital to ensure a fully immersive VR experience for the gamer.


Saturday, April 2, 2016

Create A 2D Game - Part 4: Programming


This is the fourth section of five on how to design and create a 2d game. Before reading this article you should ideally have read the 2D Game Concept, 2D Game Structure and 2D Game Graphics & Audio sections.

2D Game Programming

Programmers work at the heart of the game development process. They design and write the computer code that runs and controls the game, incorporating and adapting any ready-made code libraries and writing custom code as needed. They test the code and fix bugs, and they also develop customised tools for use by other members of the development team. Different platforms (games consoles, PCs, handhelds, mobiles, etc.) have particular programming requirements and there are also various specialisms within programming, such as physics programming, AI (artificial intelligence), 3D engine development, interface and control systems.

As mentioned in the earlier sections we are recommending you use Scratch to create your first 2D game. So in this section we will focus on the Scratch programming method and show you how to create your 2D game using their programming 'blocks'.

2d game programming with Scratch
A sample snippet of scratch code with annotated explanation

These drag and drop programming 'blocks' are colour keyed and split into easy to understand sections.

colour coded 2d game programming with Scratch
The colour coded sections make the programming easier

The scratch website can host your games and embed them into a website so that people can play them online, share them on Facebook or download them to be played on their own computers. Below is a selection of scratch resources, which I have either created or selected for you, including scratch programming demos, game templates and sample games.

You can use these resources to start creating your own games and/or animations. You do not need a scratch user account to play theses games and demos but you will need to create a scratch account to start making and remixing games, but don't worry, it's all free. Be sure to follow the onlinedesignteacher Scratch channel to be sure to get our latest releases.

5 Great Scratch Games To Inspire You ...

Sometimes we need a little inspiration to get our creative juices flowing so here are 5 great little 2D games, made using Scratch, to inspire you to get started.


2D Game Templates To Practice On ...

Even with our game graphics and audio already made in the previous section you should not jump straight into programming your own game without doing a little practice first. These are game templates which you can 'remix' into your own versions of them. This is a great way to get started with 2D game creation and programming and there is already a structure in place to help you. In order to understand the very basics which will allow you to do this then watch this short video.
  • Pong Game Template - the first game ever ready for you to re-invent it.
  • Top Down Game Template - the top down view is a clasic 2D game view, what can you create with it.
  • Shooter Game Template - shooter games were huge in the early years of gaming, have a go yourself and see why.
  • FPS Game Template - another shooter game template! just to give you some variety and options to play around with and practice on.
  • Sniper Game Template - this game template features a XY scrolling sniper view which you can edit and expand into a full 2D game.
  • Side Scrolling Platformer Template - side scrolling platformers like Mario and Sonic are game that we are all fmailiar with and now you can make your own using this template.
  • Catch/ Collect Game Template - ideal for a simple mobile style game, this template uses the Scratch 'cloning' feature to create multiple objects from the same game sprite.
  • Paint Programme Template - while not exactly a game template this paint program showcases more of the features of Scratch that you can utilise in your own 2D game.

Getting Started With Scratch... 

Scratch 2d game engine interface
The different sections of the Scratch User Interface are designed to give you the full range of tools to create your 2D game

The 2D game resources below are a must to help you get started with your own 2D games after you have practiced on the 2D game templates above.

2D Game Features To Use In Your Own Game...

These features are all very basic with simple place-holder graphics so just focus on the programming code and notes and take the bits you need for your own 2D games. You can copy programming code blocks or game sprites using the 'backpack' feature at the bottom of the game editor interface.
  • Game Timer - especially useful for racing games but can also be used to time your 2D game player when completing tasks or levels as well as for ranking players in the leader-board.
  • Ammo Counter - a must for any shooter or FPS game in which ammo is a key variable but can also be used in adventure or platformer games too.
  • Shooting & Scoring - these usually go hand in hand in 2D games so we decided to put them together in this demo which you can use to create your own 2D game scoring and/or shooting features.
  • Player Health Bar - a players health is a key variable in fighter games but health or lives are also an industry standard in most 2D games.
  • 2D Game User Interface - this template includes a score counter, ammo counter, timer and sniper sight and is ideal for shooter games but can be tweaked to suit any type of 2D game.
  • Game Menu  - before we begin any 2D game we first pass through the game menu so we have provided you with a ready made menu to get you started.

Next Up...

Once you have completed the programming stage of the 2D game you should move onto the final step which is the testing of your 2D Game.

Thursday, March 31, 2016

Create A 2D Game - Part 2: Game Objectives and Structure

Once you have settled on all the details of your 2D game idea you should next look to map out how the game will work. This will include listing the game objectives, identifying game controls, game menus and options, user interface layout, number of level, level maps, enemy A.I. and more.

All of these things must be clearly identified in order to be aware of the graphics you will require, the variety of sound effects you will want and the programming elements that will be needed in the next stages.

Main Game Objective:

Game Objectives Screen
You need to settle on the game's objectives as they are the driving force for the player in the game

First clearly and definitively write down the main objective of the game - you may already have done this using the worksheets in the previous section - and then outline how the player can achieve these objectives.

For example if the aim of the game is to collect coins, a la Sonic, then you also need to map out the location of these coins, the amount of coins, the number of coin types or costumes (for graphics), will there be a coin counting system, where will the counter be displayed, will that require a graphic, will there be a sound effect...? There are lots of questions to be answered so I recommend the use of quick annotated sketches to help make this process easier and faster.

Game Structure:

With the main objective of the game now fully explained and planned you can begin mapping out the structure of the game (how it will progress). The list below outlines a possible game structure....
  • Intro Scene  ↓
  • Game Menu  ↓
  • User Interface Layout - Health, Score, Timer, Inventory etc.  ↓
  • Level 1  ↓
  • Level 1 Boss Battle  ↓
  • Cut Scene  ↓
  • Level 2  ↓
  • Level 2 Boss Battle  ↓
  • End Scene  ↓
  • Game Credits

Note: Within your game structure certain sections will require more detail, planning and/or mapping out.

Game Menu:

2D game menu screen
A sample 2D game menu screen

The game menu will be the first point of contact for your players, it is important to provide them with all the information they need about the game in order to begin playing. This should involve creating a section in the menu where the game controls are explained. A section explaining the game story/plot is also recommended to help the player relate to the character they are playing as. A page in which the game options can be altered is also advisable to allow for things such as editing difficulty level, turning sound on/off or choosing a character to play as.

From a design point of view you should also identify the menu graphics and sound effects you will need. For example will you need a different background image for each menu section? How many buttons will you need? Will they have mouse over effects or sound effects? How will the game name/title be displayed?

From a programming point of view any editable options your menu allows for will have to be programmed into the game, this may involve the creation of extra variables or a different programming approach so they need to be decided upon at the outset as they may be very difficult, time consuming or even impossible to add into the game at a later stage.

For now you only need to sketch out possible layouts/designs for your game menu. The creation of and programming of it will be covered in the next sections.

User Interface:

2D game interface for a shooter game
A sample 2D game interface for a shooter game

After the game menu the next point of contact for the player is the game itself. At all points during the game the G.U.I. (Graphic User Interface) should be visible to allow the player to view important information associated with their status in the game. You must decide what this information should be and how it will be represented. For example the players health could be represented numerically, as a value between 0 and 100, or graphically ,through a health bar where red and green represent health or damage amounts. Below is a mock up of a possible user interface layout alongside a list of information which could be displayed on a User Interface...
  • Player Lives
  • Enemy Lives
  • Health
  • Score
  • Collected Items
  • High-score
  • Time
  • Ammunition
  • Selected Weapon
  • Inventory Items/Pack
  • Position/Map
As with the game menu, for now you only need to sketch out possible layouts/designs for your game's user interface. The creation of and programming of it will be covered in the next sections.

Level Map:

Once created the level map is a very useful document to have at your side throughout the rest of the 2D game design process. Your level map should be a detailed outline of your level including the 'landscape' of the level in terms of platforms, terrain or basically whatever the player is standing on or flying through. The position of enemies and obstacles and hazards should also be outlined on the level map to see potential impossible areas or to ensure there are no areas too hard/easy/boring. It should be possible to view the potential route the player will need to take or the actions the player will need to complete. It may be necessary to create 2 or 3 versions of your level map until you are happy that what you have created is interesting, appropriate and achievable.

The two examples below are from http://www.flickr.com/photos/dexteryy

Sample Level Map Version 1.0


Sample Level Map Version 2.0


Next Up...

Once you have completed the 2d game objectives and structure you should move onto the next step - 2D Game Graphics & Audio


Create A 2D Game - Part 1: Concept Development

Some random game concept development notes

The first step in creating a 2D game is to first settle on the idea for the game. It seems obvious but sometimes people waste a lot of time and effort by jumping into creating graphics and programming elements without knowing exactly what their game is actually about. The game idea - known as the concept - is extremely important and must itself be developed in great detail before progressing to the next stage. The concept stage can be broken down into three parts, idea generation, idea development and idea visualisation. Remember, the great thing about games is that anything you imagine is possible so set your imagination free!

Generate The Idea:

First things first then; you need to come up with an idea for your game. Idea generation is often called brainstorming but in reality brainstorming is just one type of idea generation. Brainstorming involves simply writing down as many ideas as possible as quickly as possible without considering their merit (whether they are good or bad). It is important not to think too much while doing this as logical or analytical thinking will restrict your creative mind.

Another idea generation technique is 'the random game' which involves creating headings of time, place, object and person/animal. You then give yourself a minute to write down as many things as possible under each heading. For example, under the 'time' heading you may write things like Jurassic period, iron age, 1960's, 2012, 2233, yesterday...etc. So after 4 minutes you should have 4 full categories which you can use to create a game idea, "but how?" you ask. The next part is the random part, simply take one word from each category at random and force yourself to put them into a scenario. Once again do this as quickly as possible without thinking to engage only the creative part of your brain. Remember, games are not real so anything goes!

If you still can't come up with anything, try out the following resources...

Develop the Idea:

Once you have your main idea the next step is to work out the details. For example, lets say you game idea is to play as...
A robotic turtle sent back from the future to the Jurassic period to find the first turtle and save him from assassination by your future enemies the golden kangaroos using a magic fork
Well I did say anything was possible. Despite having this brilliant idea in the bag there are still numerous questions that need to be answered. What will the game genre be, how many levels are there, what will the obstacles be, what will the game options be...? In order to help you develop your game idea we have developed some worksheets...


Visualise the Idea:


When creating a game you are often working as part of a team or working for a client or your boss. In any case you will need to create a game pitch to portray your game idea to someone else. As part of your game pitch you should also have some images to help visualise your idea. This may be through research images or photos showing the type of landscapes in which the game will be set, concept art or drawings showing what the characters will look like or internet images from existing games which are similar in style to what you are hoping to achieve. Whatever form you choose to use to represent your ideas visually does not matter the important thing is that you do represent them visually. Here are 3 options...

Create sketches and drawings to show your game concept
Find or take photographs to explain your game concept
Use Photoshop to create concept art for your game

It is not vital to have excellent drawing skills (although it wouldn't do any harm), the important thing is that you get your idea out of your head so you can show it to other people in order to get feedback or even just for yourself to see your idea in a physical form.

Career As A Concept Artist ...

Artists create the visual elements of a game, such as characters, scenery, objects, vehicles, surface textures, clothing, props, and even user interface components. Artists also create concept art and storyboards which help communicate the proposed visual elements during the pre-production phase.
Concept artists usually begin with traditional materials (eg pen and paper) and progress onto computer software.

The Concept Artist sketches ideas for the game worlds, characters, objects, vehicles, furniture, clothing and other content. They also suggest level designs, colour schemes, and the mood and feel of the game. They are usually very good at perspective drawing and architecture. Although not involved in creating the actual game art, their concept will determine the look of many aspects of the game.
For more information about concept artists click here.

Next Up...

Once you have completed these three parts of the 2D game concept development stage you should move onto the next step - Game Objectives & Structure


Create A 2D Game - Introduction

Screen shot from a 2D game made using scratch
This is a screen shot from a 2D game made using scratch by a user called GriffPatch

How To Design And Create A 2D Game

This 5 part series will guide you step by step through the stages of developing a 2D game. Two-dimensional games were most frequently developed in the early years of video games with the main reason for this being that the technical limitations of game hardware prevented the ease of creating three-dimensional graphics. When technology developed sufficiently to allow easier and more effective use of 3D graphics there was a temporary decline in 2D gaming. ( For more on games design history click here)

The wheel has now turned full circle however and the rise in popularity of mobile devices such as the iPad, iPhone and Android Phones are now mainly populated with easy to play 2D games. This renaissance in 2D gaming is partly due to the sentimental memories of early gamers joyously reliving their youth on their new gadgets. In reality though it is mainly a decision by developers to meet the demands of the consumers for quick, easy to play, fun games that they can pass 5 or 10 minutes with on the bus or train to work that 2d games are the ideal format.

These 2D games and Apps are made in a variety of ways including the Apple or Android SDK (Software Development Kit), Adobe Flash, HTML5 etc. However, if you are a games design student and are just starting out or you only want to make a game for fun or one to share with your friends then the best option is Scratch. Scratch is a simple, freeware game engine software that is easy to use, edit and publish so it can be easily shared with your friends.

The Scratch website hosts all the games made using it's editor and can sometimes put people off because of this as some of the games can appear childish or low quality (because they are made by children!). The reality is it is an excellent games engine for 2d game development and if you would like to see some examples of quality 2D games using Scratch then click here.

The Scratch 2D Game Engine Interface
The Scratch Game Engine Interface

Lets Get Started...

There are 5 main stages in the 2D games design process and this series will guide you through each one step by step. We will start with stage one - Game Concept Development.
close
Banner iklan disini