Showing posts with label 2d games design. Show all posts

Friday, September 30, 2016

Create A Pong Game

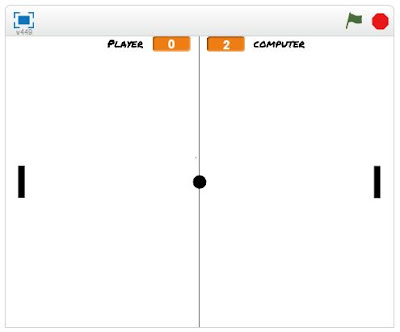
The classic game Pong is a great place to start your game design adventure

If you have an interest in gaming and would like to start making your own games then this little tutorial is an ideal place to start. I'll guide you step by step through the process of creating your very first game. And what better game to start with than the very first game ever made - Pong!

For this tutorial we will be using a free, online software called Scratch which is a great place to start creating games. Normally before we started out creating a 2d game I would direct you to our 5 part series on how to create a 2d game but this game is so simple that that process isn't really needed. So let's get started.

Step 1: Create an account


Go to scratch.mit.edu and create an account. It's free, easy and they don't use your email to send you junk.

Step 2: Enter The Editor


Once logged in, just click on the create link in the main menu. This automatically creates a blank project for you. That will bring you into the scratch editor. Here is a short PDF introduction to scratch. You can also watch this short video to get an idea of the scratch basics.


Step 3: Creating The Sprites

First off, lets delete the scratch cat, which is there by default as we won't be needing it for our game. To do this select the delete tool, which has a scissors icon, in the top toolbar and then click on the cat.

Now we have a clean slate from which to start our game. The first thing we will do is create the "sprites" that we will need for the game - these are a ball and two paddles. To create a new sprite ourselves we click on the paint brush icon in the new sprite section, as shown in the image below.


Now, in the sprite editor area on the right of the screen, you should switch to vector mode as it allows you to create vector graphics which are of a higher quality than bitmap graphics. Simply use the ellipse shape tool (highlighted in the image below) to make a ball shape and then click new sprite again and repeat the process, using the rectangular shape tool to make the paddles.


You should now have 3 separate sprites in your sprites area. You can click on the "i" icon on the corner of each sprite to name them appropriately.


Step 4: Adding The Variables

In programming terms a variable is quite simply something that can/will change and because of this needs to be treated differently from other values which remain constant. In order for us to create our Pong game we need at least 2 variables, one for the player score and one for the computers score.

To create a variable simply go to the Data section in the scripts options and click on create a variable. Choose the "for all sprites" option and call one variable "Player Score" and the other "Computer Score" or something similar. This will create the variables and give you extra programming blocks to work with, as shown below. We will be using these blocks in the next section.


Step 5: Programming The Sprites

In Scratch programming is done by dragging and dropping "blocks" of code from the various scripts section into the scripting window on the right of the screen. Below, I will illustrate the programming code required for each of our 3 sprites.

The Ball....

Click on the image to enlarge


The Player's Paddle...

Click on the image to enlarge


The Computer's Paddle...

Click on the image to enlarge

Step 6: Adding & Programming Sounds

In scratch there are a library of sounds available for you to use but you can also upload your own if you can't find one in the library that you like. For our game we are simply going to add the "pop" sound for when the ball hits a paddle and the "zoop" sound for when the ball hits either end resulting in a score. Simply select the ball sprite and in the Sounds tab click on the speaker icon to select a sound from the library.


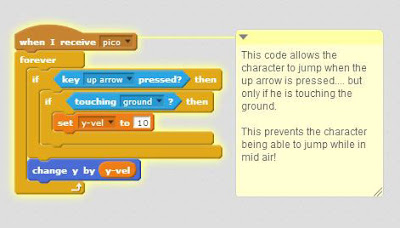
To programme the sounds to activate at the right time simply change your ball sprite programming code as shown below. 

Click on the image to enlarge

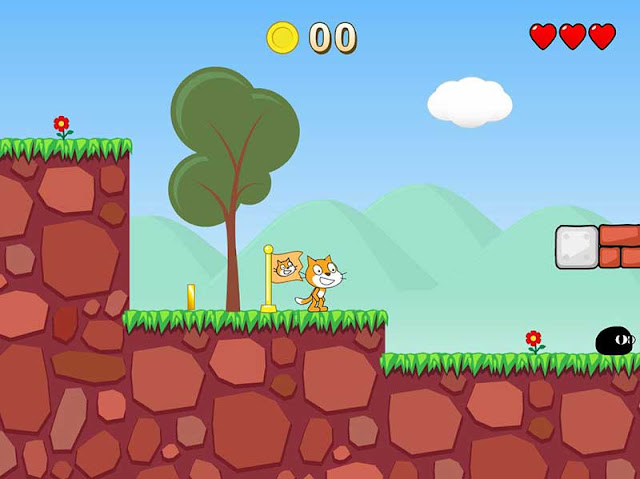
And that completes the basic set up for your game. If you would like you can also add win or lose screens to you game as shown in the sample below. To see how to do that just click here.

The Finished Game:

Click on the green flag to start the game. Have Fun!


Monday, April 4, 2016

Create A 2D Game - Part 5: Game Testing

This is the fifth and final section on how to design and create a 2D game. Before reading this article you should ideally have read the 2D Game Concept, 2D Game Structure2D Game Graphics & Audio and 2D Game Programming sections.

2D Game QA Testing

2d game QA tester
The life of a game tester is a lot more difficult than people think...
Quality Assurance (Q.A.) technicians, or testers, perform a vital role, testing, tuning, debugging, and suggesting the detailed refinements that ensure the quality and playability of the finished game. Their job involves play-testing the game in a systematic way, analysing the game's performance against the designer's intentions, identifying problems and suggesting improvements. They test for bugs in the software, from complete crashes to minor glitches in the programme. They also act as the game's first audience, reporting on its playability, and identifying any aspects which could be improved.

Testers work in teams, sometimes playing together on a multi-player game, and a team might 'own' part of a game. Testing involves playing a game over and over again, testing different levels and builds (incomplete 'development versions' of a game, sometimes with various features missing). The work can be repetitive and tedious, but Testers have to test long after the novelty and fun factor may have worn off.

So 2D game testing is effectively the equivalent of quality assurance for the game. There are two main types of game testing, 'in progress testing' and 'in situ testing'. 'In progress' testing should be conducted throughout the programming stage while the development of the game is still in progress. While 'in situ' testing should be conducted once the game is deemed to be complete and has been published in its final form, whether that be online, on CD or DVD for a console, as an app or on a mobile device.
TIP: It is vital to keep notes while testing to ensure that an identified glitch or suggestion is not later overlooked or forgotten.
Each type of testing will check a variety of different things as shown in the lists below...

'In Progress' Testing will check...

  • Whether the style and size of game graphics are suitable
  • That charcter costumes portray smooth movements
  • Whether game audio and sound effects are suitable
  • If Programmed actions are occurring as they should
  • That in game controls are working correctly
  • Any changes or updates in graphics or programming

'In Situ' Testing will check...

  • If the game loads correctly on its selected platform
  • That the game plays correctly from start to finish
  • All possible game-play scenarios - this may be very tedious
  • How long it takes to play the game
  • What the re-playability level is
  • The learning curve and overall game difficulty
  • The quality of graphics and audio
  • If there are glitches of any kind - are there any jumpy parts/missing elements etc.
  • If the game is interesting or fun

Test Your Testing...

Test out your testing skills on the sample games below (which do have errors/glitches/areas for improvements). When your done write your results in a notepad and then remix the game yourself to improve  or fix it based on your testing notes.


You can also test out a world of games on the Scratch website and especially the OnlineDesignTeacher Scratch Channel. Once testing is complete upgrades to graphics or audio, repairs/changes to the programming code or even an overhaul of the general game structure may be necessary.

That brings to an end our 5 part series on how to create a 2D game. We hope you found it useful and that you managed to use the guide to create a 2D game of your own. You might now be interested in creating a 3D game.


Saturday, April 2, 2016

Create A 2D Game - Part 4: Programming


This is the fourth section of five on how to design and create a 2d game. Before reading this article you should ideally have read the 2D Game Concept, 2D Game Structure and 2D Game Graphics & Audio sections.

2D Game Programming

Programmers work at the heart of the game development process. They design and write the computer code that runs and controls the game, incorporating and adapting any ready-made code libraries and writing custom code as needed. They test the code and fix bugs, and they also develop customised tools for use by other members of the development team. Different platforms (games consoles, PCs, handhelds, mobiles, etc.) have particular programming requirements and there are also various specialisms within programming, such as physics programming, AI (artificial intelligence), 3D engine development, interface and control systems.

As mentioned in the earlier sections we are recommending you use Scratch to create your first 2D game. So in this section we will focus on the Scratch programming method and show you how to create your 2D game using their programming 'blocks'.

2d game programming with Scratch
A sample snippet of scratch code with annotated explanation

These drag and drop programming 'blocks' are colour keyed and split into easy to understand sections.

colour coded 2d game programming with Scratch
The colour coded sections make the programming easier

The scratch website can host your games and embed them into a website so that people can play them online, share them on Facebook or download them to be played on their own computers. Below is a selection of scratch resources, which I have either created or selected for you, including scratch programming demos, game templates and sample games.

You can use these resources to start creating your own games and/or animations. You do not need a scratch user account to play theses games and demos but you will need to create a scratch account to start making and remixing games, but don't worry, it's all free. Be sure to follow the onlinedesignteacher Scratch channel to be sure to get our latest releases.

5 Great Scratch Games To Inspire You ...

Sometimes we need a little inspiration to get our creative juices flowing so here are 5 great little 2D games, made using Scratch, to inspire you to get started.


2D Game Templates To Practice On ...

Even with our game graphics and audio already made in the previous section you should not jump straight into programming your own game without doing a little practice first. These are game templates which you can 'remix' into your own versions of them. This is a great way to get started with 2D game creation and programming and there is already a structure in place to help you. In order to understand the very basics which will allow you to do this then watch this short video.
  • Pong Game Template - the first game ever ready for you to re-invent it.
  • Top Down Game Template - the top down view is a clasic 2D game view, what can you create with it.
  • Shooter Game Template - shooter games were huge in the early years of gaming, have a go yourself and see why.
  • FPS Game Template - another shooter game template! just to give you some variety and options to play around with and practice on.
  • Sniper Game Template - this game template features a XY scrolling sniper view which you can edit and expand into a full 2D game.
  • Side Scrolling Platformer Template - side scrolling platformers like Mario and Sonic are game that we are all fmailiar with and now you can make your own using this template.
  • Catch/ Collect Game Template - ideal for a simple mobile style game, this template uses the Scratch 'cloning' feature to create multiple objects from the same game sprite.
  • Paint Programme Template - while not exactly a game template this paint program showcases more of the features of Scratch that you can utilise in your own 2D game.

Getting Started With Scratch... 

Scratch 2d game engine interface
The different sections of the Scratch User Interface are designed to give you the full range of tools to create your 2D game

The 2D game resources below are a must to help you get started with your own 2D games after you have practiced on the 2D game templates above.

2D Game Features To Use In Your Own Game...

These features are all very basic with simple place-holder graphics so just focus on the programming code and notes and take the bits you need for your own 2D games. You can copy programming code blocks or game sprites using the 'backpack' feature at the bottom of the game editor interface.
  • Game Timer - especially useful for racing games but can also be used to time your 2D game player when completing tasks or levels as well as for ranking players in the leader-board.
  • Ammo Counter - a must for any shooter or FPS game in which ammo is a key variable but can also be used in adventure or platformer games too.
  • Shooting & Scoring - these usually go hand in hand in 2D games so we decided to put them together in this demo which you can use to create your own 2D game scoring and/or shooting features.
  • Player Health Bar - a players health is a key variable in fighter games but health or lives are also an industry standard in most 2D games.
  • 2D Game User Interface - this template includes a score counter, ammo counter, timer and sniper sight and is ideal for shooter games but can be tweaked to suit any type of 2D game.
  • Game Menu  - before we begin any 2D game we first pass through the game menu so we have provided you with a ready made menu to get you started.

Next Up...

Once you have completed the programming stage of the 2D game you should move onto the final step which is the testing of your 2D Game.

Thursday, March 31, 2016

Create A 2D Game - Part 2: Game Objectives and Structure

Once you have settled on all the details of your 2D game idea you should next look to map out how the game will work. This will include listing the game objectives, identifying game controls, game menus and options, user interface layout, number of level, level maps, enemy A.I. and more.

All of these things must be clearly identified in order to be aware of the graphics you will require, the variety of sound effects you will want and the programming elements that will be needed in the next stages.

Main Game Objective:

Game Objectives Screen
You need to settle on the game's objectives as they are the driving force for the player in the game

First clearly and definitively write down the main objective of the game - you may already have done this using the worksheets in the previous section - and then outline how the player can achieve these objectives.

For example if the aim of the game is to collect coins, a la Sonic, then you also need to map out the location of these coins, the amount of coins, the number of coin types or costumes (for graphics), will there be a coin counting system, where will the counter be displayed, will that require a graphic, will there be a sound effect...? There are lots of questions to be answered so I recommend the use of quick annotated sketches to help make this process easier and faster.

Game Structure:

With the main objective of the game now fully explained and planned you can begin mapping out the structure of the game (how it will progress). The list below outlines a possible game structure....
  • Intro Scene  ↓
  • Game Menu  ↓
  • User Interface Layout - Health, Score, Timer, Inventory etc.  ↓
  • Level 1  ↓
  • Level 1 Boss Battle  ↓
  • Cut Scene  ↓
  • Level 2  ↓
  • Level 2 Boss Battle  ↓
  • End Scene  ↓
  • Game Credits

Note: Within your game structure certain sections will require more detail, planning and/or mapping out.

Game Menu:

2D game menu screen
A sample 2D game menu screen

The game menu will be the first point of contact for your players, it is important to provide them with all the information they need about the game in order to begin playing. This should involve creating a section in the menu where the game controls are explained. A section explaining the game story/plot is also recommended to help the player relate to the character they are playing as. A page in which the game options can be altered is also advisable to allow for things such as editing difficulty level, turning sound on/off or choosing a character to play as.

From a design point of view you should also identify the menu graphics and sound effects you will need. For example will you need a different background image for each menu section? How many buttons will you need? Will they have mouse over effects or sound effects? How will the game name/title be displayed?

From a programming point of view any editable options your menu allows for will have to be programmed into the game, this may involve the creation of extra variables or a different programming approach so they need to be decided upon at the outset as they may be very difficult, time consuming or even impossible to add into the game at a later stage.

For now you only need to sketch out possible layouts/designs for your game menu. The creation of and programming of it will be covered in the next sections.

User Interface:

2D game interface for a shooter game
A sample 2D game interface for a shooter game

After the game menu the next point of contact for the player is the game itself. At all points during the game the G.U.I. (Graphic User Interface) should be visible to allow the player to view important information associated with their status in the game. You must decide what this information should be and how it will be represented. For example the players health could be represented numerically, as a value between 0 and 100, or graphically ,through a health bar where red and green represent health or damage amounts. Below is a mock up of a possible user interface layout alongside a list of information which could be displayed on a User Interface...
  • Player Lives
  • Enemy Lives
  • Health
  • Score
  • Collected Items
  • High-score
  • Time
  • Ammunition
  • Selected Weapon
  • Inventory Items/Pack
  • Position/Map
As with the game menu, for now you only need to sketch out possible layouts/designs for your game's user interface. The creation of and programming of it will be covered in the next sections.

Level Map:

Once created the level map is a very useful document to have at your side throughout the rest of the 2D game design process. Your level map should be a detailed outline of your level including the 'landscape' of the level in terms of platforms, terrain or basically whatever the player is standing on or flying through. The position of enemies and obstacles and hazards should also be outlined on the level map to see potential impossible areas or to ensure there are no areas too hard/easy/boring. It should be possible to view the potential route the player will need to take or the actions the player will need to complete. It may be necessary to create 2 or 3 versions of your level map until you are happy that what you have created is interesting, appropriate and achievable.

The two examples below are from http://www.flickr.com/photos/dexteryy

Sample Level Map Version 1.0


Sample Level Map Version 2.0


Next Up...

Once you have completed the 2d game objectives and structure you should move onto the next step - 2D Game Graphics & Audio


Create A 2D Game - Part 1: Concept Development

Some random game concept development notes

The first step in creating a 2D game is to first settle on the idea for the game. It seems obvious but sometimes people waste a lot of time and effort by jumping into creating graphics and programming elements without knowing exactly what their game is actually about. The game idea - known as the concept - is extremely important and must itself be developed in great detail before progressing to the next stage. The concept stage can be broken down into three parts, idea generation, idea development and idea visualisation. Remember, the great thing about games is that anything you imagine is possible so set your imagination free!

Generate The Idea:

First things first then; you need to come up with an idea for your game. Idea generation is often called brainstorming but in reality brainstorming is just one type of idea generation. Brainstorming involves simply writing down as many ideas as possible as quickly as possible without considering their merit (whether they are good or bad). It is important not to think too much while doing this as logical or analytical thinking will restrict your creative mind.

Another idea generation technique is 'the random game' which involves creating headings of time, place, object and person/animal. You then give yourself a minute to write down as many things as possible under each heading. For example, under the 'time' heading you may write things like Jurassic period, iron age, 1960's, 2012, 2233, yesterday...etc. So after 4 minutes you should have 4 full categories which you can use to create a game idea, "but how?" you ask. The next part is the random part, simply take one word from each category at random and force yourself to put them into a scenario. Once again do this as quickly as possible without thinking to engage only the creative part of your brain. Remember, games are not real so anything goes!

If you still can't come up with anything, try out the following resources...

Develop the Idea:

Once you have your main idea the next step is to work out the details. For example, lets say you game idea is to play as...
A robotic turtle sent back from the future to the Jurassic period to find the first turtle and save him from assassination by your future enemies the golden kangaroos using a magic fork
Well I did say anything was possible. Despite having this brilliant idea in the bag there are still numerous questions that need to be answered. What will the game genre be, how many levels are there, what will the obstacles be, what will the game options be...? In order to help you develop your game idea we have developed some worksheets...


Visualise the Idea:


When creating a game you are often working as part of a team or working for a client or your boss. In any case you will need to create a game pitch to portray your game idea to someone else. As part of your game pitch you should also have some images to help visualise your idea. This may be through research images or photos showing the type of landscapes in which the game will be set, concept art or drawings showing what the characters will look like or internet images from existing games which are similar in style to what you are hoping to achieve. Whatever form you choose to use to represent your ideas visually does not matter the important thing is that you do represent them visually. Here are 3 options...

Create sketches and drawings to show your game concept
Find or take photographs to explain your game concept
Use Photoshop to create concept art for your game

It is not vital to have excellent drawing skills (although it wouldn't do any harm), the important thing is that you get your idea out of your head so you can show it to other people in order to get feedback or even just for yourself to see your idea in a physical form.

Career As A Concept Artist ...

Artists create the visual elements of a game, such as characters, scenery, objects, vehicles, surface textures, clothing, props, and even user interface components. Artists also create concept art and storyboards which help communicate the proposed visual elements during the pre-production phase.
Concept artists usually begin with traditional materials (eg pen and paper) and progress onto computer software.

The Concept Artist sketches ideas for the game worlds, characters, objects, vehicles, furniture, clothing and other content. They also suggest level designs, colour schemes, and the mood and feel of the game. They are usually very good at perspective drawing and architecture. Although not involved in creating the actual game art, their concept will determine the look of many aspects of the game.
For more information about concept artists click here.

Next Up...

Once you have completed these three parts of the 2D game concept development stage you should move onto the next step - Game Objectives & Structure


Create A 2D Game - Introduction

Screen shot from a 2D game made using scratch
This is a screen shot from a 2D game made using scratch by a user called GriffPatch

How To Design And Create A 2D Game

This 5 part series will guide you step by step through the stages of developing a 2D game. Two-dimensional games were most frequently developed in the early years of video games with the main reason for this being that the technical limitations of game hardware prevented the ease of creating three-dimensional graphics. When technology developed sufficiently to allow easier and more effective use of 3D graphics there was a temporary decline in 2D gaming. ( For more on games design history click here)

The wheel has now turned full circle however and the rise in popularity of mobile devices such as the iPad, iPhone and Android Phones are now mainly populated with easy to play 2D games. This renaissance in 2D gaming is partly due to the sentimental memories of early gamers joyously reliving their youth on their new gadgets. In reality though it is mainly a decision by developers to meet the demands of the consumers for quick, easy to play, fun games that they can pass 5 or 10 minutes with on the bus or train to work that 2d games are the ideal format.

These 2D games and Apps are made in a variety of ways including the Apple or Android SDK (Software Development Kit), Adobe Flash, HTML5 etc. However, if you are a games design student and are just starting out or you only want to make a game for fun or one to share with your friends then the best option is Scratch. Scratch is a simple, freeware game engine software that is easy to use, edit and publish so it can be easily shared with your friends.

The Scratch website hosts all the games made using it's editor and can sometimes put people off because of this as some of the games can appear childish or low quality (because they are made by children!). The reality is it is an excellent games engine for 2d game development and if you would like to see some examples of quality 2D games using Scratch then click here.

The Scratch 2D Game Engine Interface
The Scratch Game Engine Interface

Lets Get Started...

There are 5 main stages in the 2D games design process and this series will guide you through each one step by step. We will start with stage one - Game Concept Development.
close
Banner iklan disini