|
| Landscape editor mode in UE4 |
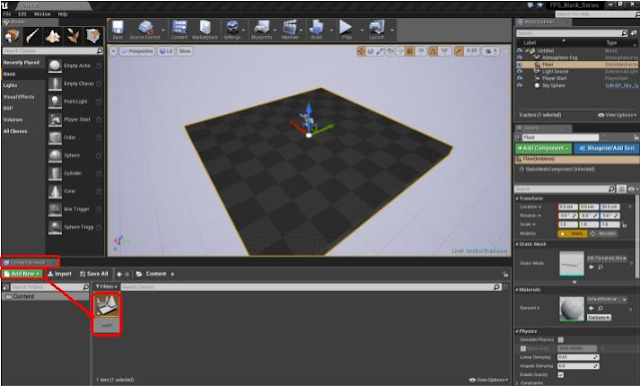
Once you create a new level in Unreal Engine 4 you have to choose the landscape's size and material.
 |
| Landscape |
For this tutorial I am going to be using the default grass material, witch can be found in the content browser in Unreal Engine 4. After choosing the material and clocking Create you level will be filled in with the material you chose and the size you wanted also.
After your landscape has been filled in you can use the selection tool to select certain areas of your level.
The Landscape Tools
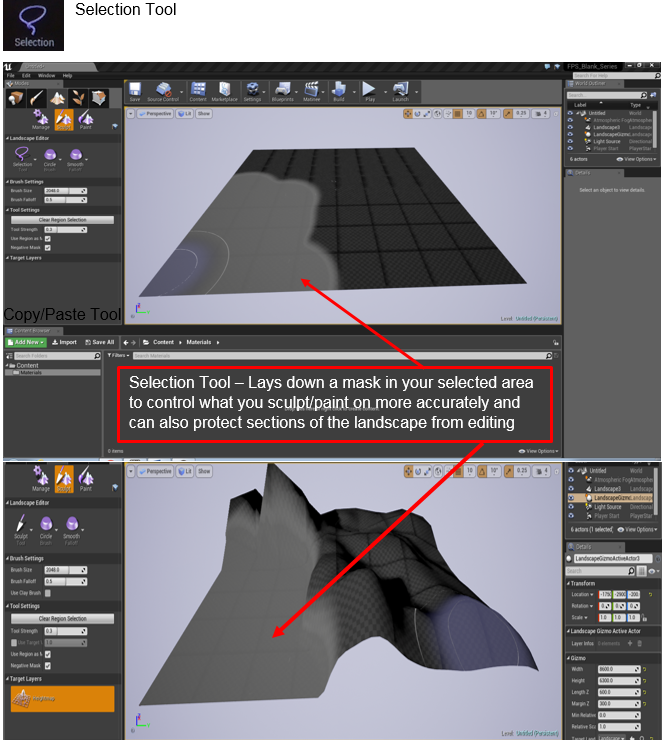
 The Selection tool, selects Landscape components, one at a time for subsequent use with other tools, such as moving components to streaming levels and deleting components.
Controls- Left mouse click to select components, Right mouse click to de- select components.
 The Add tool, adds new components to the landscape one at a time.
Controls- Left mouse click to add new component.
 The Delete tool, deletes selected components from the Landscape
Controls- Left mouse click to delete selected components if there are none selected it deletes the components that are highlighted by moving the mouse over it.
 The More Level tool, moves the selected components to the current streaming level. This makes it possible to move sections of the Landscape into a streaming level so that will be streamed in and out with that level, optimizing the performance of the Landscape.
 The Change Component Size tool, Changes the size of the whole Landscape not individual components. With this tool you can change the size of the Landscape components and adjust how many sections each component has in the Change Component Size.
 The Edit Splines tool, Landscape Splines are a flexible system for creating any linear feature that needs conform to a Landscape, and can even push or pull the
terrain to better facilitate building these features. They are created and edited using the spline tool in the Landscape toll.
The next Tab of the Landscape tools are the Sculpt tools.

Inside the Sculpt Tool bar there are a number of different tools, I will be talking about all of them in this tutorial.
 The Sculpt tool, Increases or decreases the heightmap height in the shape of the currently selected brush and falloff
Controls- Left mouse click, heightens or increases the selected layers weight.
Shift + Left mouse click, Lowers or decreases the selected layers weight.
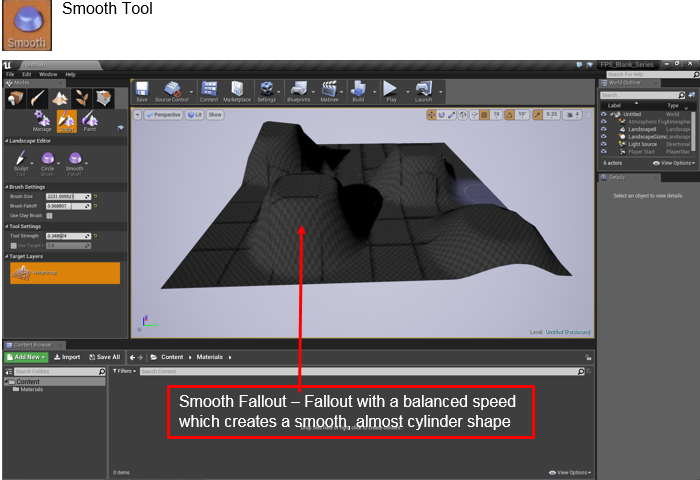
 The Smooth tool, Smooths the heightmap. The strength determines the amount of smoothing.
Controls- Left mouse click to Smooth.
 The Flatten tool, flattens the Landscape to the level of the Landscape under the mouse cursor when you first activate the tool.
Controls- Left mouse click to Flatten
 The Ramp tool, enables to select two different locations on your landscape and create a flat ramp between them with a falloff you specify on the sides.
Controls- Ctrl + Left mouse click on two locations marking the start and the end of the ramp.

The Erosion tool, uses a thermal erosion simulation to adjust the height of the heightmap simulating the transfer of soil from higher elevation to lower elevations. The larger the difference in elevation, the more erosion will occur.
 The Hydro Erosion toll, uses a hydraulic erosion simulation to adjust the height of the heightmap. A noise filter is used to determine where the initial rain distributed. The simulation is calculated to determine water flow from that initial rain as well as dissolving water transfer, and evaporation. The result of that calculation provides the actual value used to lower the heightmap.
 The Noise tool, applies a noise filter to the heightmap or layer weight. The strength determines the
amount of noise. Also the noise filter is related to position and scale, which means if you do not change Noise Scale, the same filter is applied to the same position many times.

The Visibility tool, lets you create holes in your ladscape for such things as caves.
 The Region tool, selects regions of the landscape using the current brush settings and tool strength to be used to fit a landscape gizmo to a specific area or to act as a mask for copying data to/or pasting data.

The Copy/Paster tool, is used to copy height data from one area of the landscape to another through the use of Landscape Gizmo.
I hope this is really helpful for first time users or if anyone wants to brush up on the Landscape Tools.
 |
| Landscape after creating |
The Landscape Tools
Controls- Left mouse click to select components, Right mouse click to de- select components.
The Add tool, adds new components to the landscape one at a time.Controls- Left mouse click to add new component.
The Delete tool, deletes selected components from the LandscapeControls- Left mouse click to delete selected components if there are none selected it deletes the components that are highlighted by moving the mouse over it.
The More Level tool, moves the selected components to the current streaming level. This makes it possible to move sections of the Landscape into a streaming level so that will be streamed in and out with that level, optimizing the performance of the Landscape.The Change Component Size tool, Changes the size of the whole Landscape not individual components. With this tool you can change the size of the Landscape components and adjust how many sections each component has in the Change Component Size.The Edit Splines tool, Landscape Splines are a flexible system for creating any linear feature that needs conform to a Landscape, and can even push or pull theterrain to better facilitate building these features. They are created and edited using the spline tool in the Landscape toll.
The next Tab of the Landscape tools are the Sculpt tools.
Inside the Sculpt Tool bar there are a number of different tools, I will be talking about all of them in this tutorial.
The Sculpt tool, Increases or decreases the heightmap height in the shape of the currently selected brush and falloffControls- Left mouse click, heightens or increases the selected layers weight.
Shift + Left mouse click, Lowers or decreases the selected layers weight.
|
| Showing Increase |
 |
| Showing Decrease |
Controls- Left mouse click to Smooth.
 |
| Showing Smoothing tool |
The Flatten tool, flattens the Landscape to the level of the Landscape under the mouse cursor when you first activate the tool.Controls- Left mouse click to Flatten
 |
| Showing the Flattening tool |
Controls- Ctrl + Left mouse click on two locations marking the start and the end of the ramp.
 |
| Showing unfinished ramp |
 |
| Showing done ramp |
The Erosion tool, uses a thermal erosion simulation to adjust the height of the heightmap simulating the transfer of soil from higher elevation to lower elevations. The larger the difference in elevation, the more erosion will occur.
 |
| Showing Erosion |
The Hydro Erosion toll, uses a hydraulic erosion simulation to adjust the height of the heightmap. A noise filter is used to determine where the initial rain distributed. The simulation is calculated to determine water flow from that initial rain as well as dissolving water transfer, and evaporation. The result of that calculation provides the actual value used to lower the heightmap. |
| Showing HydroErosion |
The Noise tool, applies a noise filter to the heightmap or layer weight. The strength determines the amount of noise. Also the noise filter is related to position and scale, which means if you do not change Noise Scale, the same filter is applied to the same position many times.
 |
| Showing Noise Tool |
The Visibility tool, lets you create holes in your ladscape for such things as caves.
The Region tool, selects regions of the landscape using the current brush settings and tool strength to be used to fit a landscape gizmo to a specific area or to act as a mask for copying data to/or pasting data. |
| Showing Selection Tool |
The Copy/Paster tool, is used to copy height data from one area of the landscape to another through the use of Landscape Gizmo.
I hope this is really helpful for first time users or if anyone wants to brush up on the Landscape Tools.