Wednesday, January 24, 2018

Top Ten Free Image Editors

best free image editing software
The best free image editing software for you

There’s no argument about it — Adobe Photoshop remains the best photo-editing software on the market. But unless you’ve undergone formal training, it’s a difficult program to master, and it’s not the cheapest of options out there. That’s why we’re taking a look at the best free photo-editing software on the market, each of which provides much of the same functionality as Photoshop but without the associated fees.

Each of the programs below can perform basic and semi-advanced tasks, for instance, allowing you to resize, crop, and correct exposure with ease. And you may be surprised to find that some offer all the features you will ever need. You may not need Photoshop as much as you thought, so read through these Photoshop alternatives and see which free image editor is right for your needs.


Rating 

According to Microsoft "Paint is absolutely the best image editor on the market. Paint allows you to edit existing images and draw your own. Forget about complicated layers and tons of useless effects. 'Paint' contains only tools you really need!". The reality is that unless you're a 9 year old child, that statement is simply not true. As nostalgic as I am about paint, having grown up without the internet, I just can't give it a better rating. In fact 'Paint' is probably what gives free image editors a bad name.

In better news for paint lovers, Microsoft Paint 3D is no available on windows 10 as a free app download. It is the classic Paint reimagined, with an updated look and feel and a ton of new brushes and tools. You can make 2D masterpieces or 3D models that you can play with from all angles.

Visit Website


Easel.ly

Rating 

Easl.ly is a free info-graphic oriented web app with a plethora of templates to choose from. If you want to turn your photo into a chart or include it in a report, this is the best free option you’ll find. The blank template allows you to add a number of objects and effects if you aren’t interested in an infographic but still want to spruce up your photo and have a little fun with it before posting online.

It is free to register but some options and functions are reserved for premium users only. However at $3 per month it is a much cheaper option than it's main rival Canva ($12.95 monthly)

Visit Website


PicMonkey

Rating 

PicMonkey is a free editing tool for amateur photographers who want to quickly edit their images and turn them into mini-masterpieces. There are four primary tools in the PicMonkey holster: Editing, Touch Up, Design, and Collage. Editing probably provides the most functionality, allowing you to apply effects, advanced filters, spot correction, and so on. However, Touch Up is also a popular choice for selfies, profile pics, event photos, and so on.

This suite is designed more for the average person, or those who want the best picture possible for social media or sharing, and aren’t afraid to work on it with more advanced tools. PicMonkey also offers a premium version app which offers added functionality, templates etc. Premium option starts from €7.49 a month with the option to trial for free for a seven-day period.

Visit Website


BeFunky

Rating 

BeFunky is another online photo editor that's really easy to work with. Similar to PicMOnkey it offers multiple tools including Photo Editor, Designer and Collage. There are labels, emoticons, tons of textures and frames, a text tool, several effects like oil painting and cartoonizer, as well as all the basic editing and touch up tools. There's also a Facebook Cover crop tool that crops the image to the exact size required to use as a cover image on Facebook.

Many of the effects, borders, etc. unfortunately require you to upgrade to a paid version of BeFunky to use them. This is a real downside but with premium prices starting at just $2.91 per month it is a very affordable premium option.

Visit Website


iPiccy

Rating 

This is an online editor with multiple tools just like PicMonkey and BeFunky but without the restrictions of premium membership for some features. So it's totally free and although some features require you sign up, there is no charge and no hidden strings attached.There are tons of useful tools and the interface couldn't be easier to work with.

The built-in designer editor is a very capable vector editing system with all the main tools you can think of and the collage maker has lots of interesting and useful layouts and templates for you to use when making a collage.

On the downside there are only two file format options when saving and only one sharing option available. Also, the images can't be resized within the collage editor and you are unable to create your own custom collage layout only being able to choose from the set options.

Visit Website


SumoPaint

Rating 

SumoPaint is one of those “Photoshop lite” image editors that have sprung up in recent years, but it stands out from the rest. There is a web-based editor and a downloadable option as well which is great for those with limited or no internet access. You get 30 days free for the downloadable editor before you need to upgrade to pro but it is so cheap and gives you a load of added features so you'll hardly mind.

You will find plenty of the standard, basic image editing tools in the free version of Sumo Paint plus many fun and whacky paint tool features. Using a menu bar that is similar to Photoshop's, you will find the familiar blur, smudge, gradient fill, line tools, clone, and more. But you will also get other cool features, including a bulky star tool, and symmetry and custom shape tools. Sumo's text tool (for adding text to images) is so simple to use it makes you wonder why other programs often lack in this area of software development.

Visit Website


Pixlr

Rating 

Pixlr is an online photo editing tool. Fast, simple and enough features to make this a great find for moderate-level photo editing. You can create a new image, upload an image, or grab one directly from a URL location. With Pixlr Editor you have full control over your images including layers and effects. I would class it as the best of the in browser image editors.

If you are already familiar with Photoshop, you will find the Pixlr Editor menu options familiar both in layout and in how they work. The website is short on tutorials, however, but if you read Pixlr's blog you will find more information about how to get the most out of Pixlr. If you are new to image editing and do not like to play around in software, KT Forlaget has produced 30 video tutorials in English to help you quickly master all the important basic features and tools Pixlr offers.


Inkscape

Rating 

Inkscape is a free and open source vector graphics editor with a clean, consistent, and very stable interface. It uses SVG and an open XML-based W3C standard. SVG is considered as an excellent format for creating and designing logos and banners or any media that has been modified in vector mode to create graphics that could be scaled to any size while retaining their original quality. Among its interesting features are objection creation and object manipulation, fill and stroke tools, paths operations, text support, rendering, and file formats.

Inkscape is a cross-platform vector editing program so it has the capability to run on Windows, MAC OS X, and Linux distributions.


Krita

Rating 

Krita is a free and open source painting tool designed for concept artists, illustrators, matte and texture artists, and the VFX industry. Krita is really easy to work with and is certainly an advanced image editor. Like some of the other programs above, you can work with layers in addition to many other tools located in a floating toolbox off to the side of the program, similar to Photoshop.

There are plenty of features available as well, such as brushes, blending modes, advanced selection and masking tools, drawing aids, filters, symmetry tools, and image effects. Krita is a downloadable only editor and is over 100 MB in size and works with Windows, Linux, and Mac.

Visit Website


GIMP - Editor's Choice

Rating 


First things first let's explain that name! GIMP is an acronym for GNU Image Manipulation Program. It is ideal for tasks such as photo retouching, image composition and image authoring.

Whether you are a graphic designer, photographer, illustrator, or scientist, GIMP provides you with sophisticated tools to get your job done. It can be used as a simple paint program, an expert quality photo retouching program, an online batch processing system, a mass production image renderer, an image format converter, etc.

As GIMP is expandable and extensible you can further enhance your productivity with GIMP thanks to many customization options and 3rd party plugins. GIMP is a cross-platform image editor available for GNU/Linux, OS X, Windows and more operating systems.

Visit Website


This article was courtesy of our friends over at www.freedesignstuff.net check out their website for more great, and totally free, design stuff.


Keywords related to the post:


Friday, January 19, 2018

Tips for Designing and Building a Multilingual Website

Create a multilingual website
English is not the only language out there, so why only design a website with one language in mind

As a modern society, the human race is continuing to grow, expand and connect to one another more instantaneously than ever before. In just a click of your mouse or a tap of your finger, you can be reading about the entire life and legacy of another human being that could have existed hundreds of years ago.

It’s amazing when you think about.

However, with such a connection comes the problem of language barriers. While you might be writing your content in English, statistics show that only 20% of the entire world population actually speaks the language, meaning your website is relatively inaccessible to the remaining 80%, which equates to around 6.6 billion people.

So, to counter this issue, you’ll want to design and build your next website as a multilingual platform that’s accessible to people around the world, or at least your target market. But how you do go about doing this? What problems and milestones will you need to overcome and what features does your website need to include?

To get you off on the right foot, here’s a complete guide to everything you need to know.

Getting Started

To start with, the first thing you’re going to want to consider is not actually the building of your website, but the content itself. You’re going to need to get it translated. Of course, translation services, such as Google Translate, are constantly improving and are updated or a near-daily basis.

However, these services definitely aren’t reliable if you’re looking for a professional finish. Ideally, you’re going to want to hire a human translator to edit and convert your content properly. For this, you have multiple options available.

Firstly, you could use translating companies such as International Translating or Big Assignments to translate your content for you on your behalf. This is of course if you have the budget. If you’re translating hundreds of pages of content, this can prove quite expensive, and you’ll need to find another way, perhaps by hiring someone long-term, such as a freelance translator from Upwork or Ukwritings.

If this is the case, or you plan on translating your content yourself, you’ll need to remember to proofread your content for errors, so your website remains professional. According to recent statistic, 59% of people said that they won't trust the company of service which has errors and mistakes on their website. So proofreading and editing is vital for your business reputation.


Implement Language Change Features

Of course, no multilingual website would be complete without the ability to actually change the language that the viewer wants to read your website in. Most commonly, you’ll notice that a lot of websites use a traditional drop-down menu which is clearly visible in the header or footer of the website.

In theory, you can put it wherever you want, but you want to make sure it’s clear and easy to see as soon as your website loads as people accessing your website will want to change it straight away.

Another key element to consider at this point is adding flag images to your drop-down menu. While this is a graphically powerful element to include, there are a few problems that come with this approach. Most notably is the fact that flags represent countries, not languages and many countries will have more than one official language.

Finally, you’re going to want to make sure that you refer to each language in its own language form, for easier identification purposes. For example, German should be referred to as ‘Deutsch’, French as Français, and Spanish as Español.

Checking Your Readability

You may not speak multiple languages but you can still create a multi language website with the right tools

While you may invest a lot of time in choosing fonts for your website and you’ve chosen one that looks clear and precise for your English readers, it’s important to make sure that the font will still be as legible when it comes to another language.

Sarah Stanford, a translator for Paper Fellows shares...
“One of the biggest problems that trip up multilingual websites up is choosing a fine and relatively small font that went translated, the symbols that appear in certain languages, such as the ‘n’ in ‘Español’ can become unreadable”

To alleviate this problem, be sure to check your character encoding, typically found in the head of your page. If your website is using Unicode, UTF-8 may work perfectly since it supports multiple languages, helping them to maintain their readability.

Reading Line for Line

One of the most common misconceptions that people have regarding other languages is the fact that languages don’t have a reading direction. However, the script in which the language is written in does. For example, Arabic script is read from right to left (RTL) whereas English and other European languages are left to right (LTR).

Of course, the vast majority of languages do read LTR, but if you include language settings for those who read RTL, this is something you’re going to need to consider. To achieve this easily, you simply need to mirror your website pages, which includes everything.

This means your menu bars, your icons, the layout of your navigation menu, the buttons and even the scrollbars will all need to be flipped and mirror what they are usually. Fortunately, there are a number of ways you can do this using basic code which can be found online, depending on what code you’re using to build your website.

Customising Your URL

Another important factor you’ll want to consider is the URL that your website is using when it changes the language. A country code top-level domain, more commonly referred to as ccTLD, are all linked to specific countries. For example, .fr is France and .es is for Spain.

This is such a vital part of the process that you’ll need to remember to complete since this is how search engines will help users to find the content they’re looking for. If you don’t implement it, users won’t be able to find your website easier. Of course, this will eat into your budget, but the ROI is worth it in the long run.

For more information on using ccTLD, as well as for your sub-domains and sub-directories, check out this Google guide on the matter.


Creating a Multilingual Store

If you’re creating a blog with content, this point may not concern you, but if you’re creating a multilingual website that sells products, this is very important as there are a few aspects you’ll want to consider.

Firstly, are all the products that you’re selling on your store available in all the countries you’re trying to sell in? If not, you’ll need to find a way to make certain products only available in a certain language, but of course, this solely depends on what framework and store platform you’re using.

Tom Dewis, SEO-expert at Ox Essays shares, 

What you have to consider is the currency options that are available to your customers. The cost and price tag of each product will need to be converted automatically in regard to the language that is selected, or using a clearly placed drop-down menu where users can choose their preferred currency.

Finally, you’ll want to consider your posting and delivery options. For example, if you’re not going to be able to sell products in France, you need to make this clear in your terms and conditions.


Consider the Details

This is one point that will solely depend on the content of your website and blog, but it’s definitely worth bearing in mind throughout the entire building process. Many cultures will have a different outlook on certain subjects in life, for example, sense of humor, sexuality, gender equality and symbolism.

When translating your content, be sure that you won’t offend anybody’s beliefs with the content you’re posting to avoid it becoming a problem in the future.

What’s more, if you’re using Captchas on your website, have you investing time in making sure the Captchas are in each language rather than just in English? The same if you’re adding citations to your website for this process, be sure to use tools like Cite It In to make sure they’re correct.

Finalising Your Content

Now that your website is nearing completion regarding the multilingual side of things, you’ll need to invest time in finalising your content to ensure that it’s perfect for release. The first thing you’ll want to do is to make sure that all your content has been translated properly.

One simple way to do this is using a tool for Easy Word Count. Using this tool, you can copy and paste in your original content and then your translated content and then refer to the word count. If the word counts are roughly the same, give or take a few words, you’ll know that nothing has been missed during the translation process.

Secondly, you’re going to want to check your translated content to make sure that it doesn’t breach any plagiarism requirements. While your original content may not be plagiarised, your translated copy might be. However, this is easy to check using plagiarism checking services like Academized or Plagium.

Conclusion

In reality, there is a tonne of features and aspects of your website you’ll need to consider when designing and building a multilingual website, but this will solely depend on the kind of website you’re building, its purpose and the industry that you’re operating in.

However, this article has covered the majority of the basics that you’ll need to consider and should give you the best shot at creating a successful multilingual website.


About The Author

Brenda Berg is a professional with over 15 years of experience in business management, marketing and entrepreneurship. Consultant and tutor for college students and entrepreneurs. She believes that constant learning is the only way to success. You can visit her personal blog at Letsgoandlearn.com


Thursday, January 18, 2018

Common Mistakes New Graphic Designers Make

Common Graphic Design Mistakes
Common Mistakes New Graphic Designers Make - And How To Avoid Them

No matter if you are a new graphic designer that's looking forward to landing a first gig or a steady job, or you are the one in need of graphic design, the most important thing is to make sure that the job is done right. Some of the most common mistakes can be overlooked, and even though they are basic, they can cause a lot of harm to the end result.

The difference between good and bad graphic design is a subjective thing to an extent. However, there are some basic rules that must be respected. In the end, a good graphic design has the power to communicate clear information and inspire responses and this is something that is essential. So, in order for the designs to be effective, you must make sure that you avoid making these mistakes.


Missing The Point

Although there is no formula that helps a graphic designer always deliver designs that will leave an impact on 100% of the people looking at it, you can still reduce mistakes to a minimum by finishing your homework and seeing some examples of good designs in a similar niche. 

The focus of the designs should be on the brand for which they are made and not the personal preferences of the designer. Considering the industry, the audience and the brand is essential for delivering effective designs.

After a few years as a designer you can look at the successful examples that customers loved and gave great feedback on. Analyse those projects/campaigns and learn why a certain strategy worked or not. This is how you will be able to learn what suits your target audience and how your designs can be relevant to them.

Solution:

Sit down with the client and set out a short but specific brief detailing the key requirements that the design must meet. Then follow that brief, checking on it regularly during the course of the project to ensure your not straying off track.


Too Many Fonts

Always try to use a minimum of 2 fonts and a maximum of 3

Combining and using different types of fonts can be fun for the designer, but if you put yourself in the shoes of the viewers, you will realize that this has no value to them. When a person is reading a paragraph where several fonts constantly change, they will find it difficult to understand what is written.

This can easily tire out the reader and annoy them. In these situations, people will simply turn off the content and go somewhere else. A general rule is to stick to a maximum of three different styles of fonts on a single layout. Still, this is only if you really have the need for emphasizing three different things.

Have a look at FreeDesignStuff.net for a review of the best websites to get free fonts for your design projects.

Solution:

Stick to the basic rule of  always try to use a minimum of 2 fonts and a maximum of 3. You can also get help pairing fonts at websites such as fontpair.co or typ.io


Too Many Stock Images

A lot of people turn to using stock images because they are cheap, or free, and they can save you a lot of time and work. Although using stock images is not wrong, using too much of them could actually ruin your designs. First of all, when it's obvious that you are using a lot of stock images the project will look cheap, and sometimes even unprofessional, after all, anyone can get their hands on a stock image. 

Stock images are also so common that they will make your design blend into the background. Think of the attention grabbing techniques, one of which is original. An original image will always stand out when compared with any stock image.

To a lot of people, it might seem like you are just stealing stuff from somebody else and this is not a good sign. Additionally, stock images are not uncommon as you might think and if you use a lot of them people will recognize them, which is also bad for the overall effect of the design.

Solution:

It's obvious really isn't it, you need to make or take your own images. Or at least edit them to suit.


No White Space

White space is important in graphic design - maybe not this much though!

Proximity is an essential design principle. All of the elements that you have in your layout should be grouped with visual logic. This is how people will better understand the information displayed and make the connection between different items in front of them.

One of the biggest mistakes is to splatter content everywhere around a page and make the whole design look cluttered. This way, you won’t be able to communicate information properly. 

Solution:

Don’t be scared to leave white space around your elements and give them more room to be recognized and acknowledged. People tend to scan images and text first before deciding whether or not to focus on it for longer so by giving the important elements of a design some space they can help draw a viewer in for a further look.

Design Overkill

New Designers are especially guilty of this. They have likely been studying for years and are keen and eager to show off all their skills so they can tend to overuse filters and effects in an effort to show off. Stick with the design principles

It's important to remember the design is not about you or your skills. Always focus on the products, service or event that you are designing for and ensure the design is what's best for them and not what's best for your portfolio. "Function before form" is the key mantra here. Sometimes that will involve showing of some cool techniques and graphic effects but often less is more. 

Solution:

Try to set out specific guidelines at the outset of the project with your client to help keep you in line. Even if the client gives you free reign over "artistic styling" it is still important to do what's best for them. 


Conclusion

By making the mistakes mentioned above, even some of the best ideas could get lost and lose their value. However, if you make sure that you don’t do the things mentioned above, your designs will fulfill their primary goal of delivering a clear and concise message to your audience.

Thursday, December 28, 2017

The Logo Design Principles

Logo Design Principles
The 5 Principles Of Logo Design

Following up on our article on the logo designs of the summer Olympics we will now learn how to create a logo by using the 5 basic principles in the area of logo design, collectively known as the principles of logo design.

The logo design principles state that a logo should be...

  • simple
  • memorable
  • appropriate
  • timeless
  • versatile
Each logo design principles relates to a particular ideal of logo design and should be considered individually, however all the principles also relate to each other and it is when all the principles are used together that the best logos are created.


Simple:


Simple Apple Logo
Simple Apple Logo 

Simplicity is the most important of all the logo design principles. Logos can appear in various places and in various sizes such as small emblems on t-shirts or as iconic symbols on billboards. It is because of this that they need to be clear and simple so that they still display correctly and effectively at any size. Logos are designed as vector graphics to ensure they retain their image quality at any size but it is just as important that they retain their overall clarity as well. 
A good test of a logo's simplicity is if a child could draw it
By keeping you logo simple you are ensuring that at any size it will be easy to identify and read. In this way, a logo should really only contain a single graphic and a small amount of text. Prime example of simple logo are the Nike 'swoosh' and the Apple 'apple'. They are clearly identifiable at any size and even work without any text as seen above.

Back To Top


Memorable:


Memorably Creative Vividways Logo


There are 3 stages to making a logo memorable. To make a logo memorable you must first ensure it is simple. Like anything, the simpler it is the easier it is to remember, it is no different with logos. The second key element to making a logo memorable is to make it as original as possible, if something is unique or different people tend to remember it and it will be set apart from other similar businesses, products or services. The originality of the logo can be achieved through elements such as interesting fonts, unique shapes, bright colours or a catchy tag line. 
When you think of a brand, if you can visualise it's logo then it's memorable.
The logo above uses bright colours, interesting and unique forms and shapes which themselves create original lettering. The third stage to making a logo memorable is to make it relative or appropriate to the business, product or service it is representing. This is discussed in more depth in the next section.

Back To Top


Appropriate:

Solicitors Logo
This Solicitors Logo Is Appropriately Clean Lined & Serious Looking


Toys Я Us Logo
The Colourful Toys Ð¯ Us Logo Is Appropriately Fun & Quirky


When designing a logo you must consider the business, product or service that the logo is representing. You cannot design in any style or using any fonts or colours that you want. Every logo is different and requires a different approach, an approach that is appropriate to the business, product or service it is representing. To give an example a logo for a solicitor should ideally be clean and linear with a mono or two toned colour scheme to represent the serious and professional nature of the service being offered. 
As long as a logo doesn't feel out of place then it's appropriate
On the other hand bright colours, quirky fonts and curved lines would not be suitable for a solicitor's logo, however they would be suited to a toy store or play-school to represent the fun nature of the business. An appropriate graphic, such as a house for an auctioneer, also helps to immediately associate the product or service being offered with the name of the business which by itself may not suggest a specific product/service. 

For example a local business called after the owner, lets says 'Smiths' does not in itself suggest any particular product/service that is why an appropriate graphic is necessary. An appropriate logo graphic is also vital for new businesses logo to help consumers to identify with them and their logo while they are still in the process of marketing their company identity.

Back To Top

Timeless:

Olympic Logo
Olympic Logo Is Iconic & Timeless


London Underground Logo
London Underground Logo Unchanged Since 1908

A company can be in business for months, years, decades or even centuries; therefore it needs a logo that will stand the test of time and not 'age' badly. A logo may be tweaked or updated slightly over time but it should not require a full overhaul as that would mean the company would have to spend lots of money re-marketing its new identity, which can be a very expensive process, especially for large companies. 
An unchanged logo, is a timeless logo
Public bodies or services also require logos and as they cannot go out of business they tend to be around for a long time and thus need a timeless logo design, the London underground logo is a classic example of this. It is a simple logo design using basic shapes, primary colours and clean, simple text. As previously mentioned, all the logo design principles link together and it is evident in the London Underground logo as it is because of it's simple and appropriate style that it has remained unchanged for so long. The Coca Cola logo, the Olympic logo and numerous car company logos such as Toyota, Ford, Volkswagen and Mercedes are other examples of timeless logos which have remained unchanged for decades.

Back To Top


Versatile:


Apple Logo Showing It's Versatility


A versatile logo is one that will work equally well at any size and in any colour scheme. The logo must first be simple in order for it to have the potential to be versatile, again reinforcing simplicity as the key logo design principle. 
If the same logo will work on a badge, banner and bus then it's versatile
The best way to achieve a versatile logo design is to first design the logo in black and white, as, if the logo works in black and white it will most likely work in any suitable colour scheme. See the example of the Apple logo above.

Back To Top

Now You're Ready To Create The Logo...

Once you have used the logo design principles above to actually plan out and design your logo on paper the next step is to actually create the logo. There are numerous ways to do this but one of the best and easiest is to use an online logo generator, such as LogojoyLogojoy's simple 5 step process enables you to create an industry standard logo without the need for software or an in depth knowledge of design and is definitely a great option for anyone, but especially those without any Adobe Photoshop or Illustrator skills. It’s totally free to make logos. Only pay for a design when you're happy with it, so why not try it out here.

If you do have good Photoshop or Illustrator skills then you can create the logo yourself as a vector graphic. If your skills are not the best you can always find free vector graphics and edit them to suit your needs. Well, we have you covered there too with this illustrator logo design tutorial. We hope you find it useful. You may also be interested in exploring the general principles of design, if so, then click here.


Friday, December 8, 2017

How To Become An Interior Designer

How to become an interior designer
An Interior Designer At Work

What is the job?

So what is an Interior Designer? Well firstly - they are not the same as interior decorators! Interior designers use a range of design techniques to make the best visual and physical use of space; they plan and organise the design of commercial and domestic interiors such as offices, hotels, shops, public buildings, ships, aircraft and homes. In contrast, an interior decorators sole focus is the selection of furniture and finishes to create a consistent style within a space. The role of an Interior designer is more complex and will also usually involve the use of architectural software(s) and a working knowledge of the architectural/construction process.

Interior designers may specialise in residential or commercial interiors or both. Interior designers formulate designs which are intended to be practical, aesthetic, and conducive to intended purposes, such as raising productivity, selling merchandise, or just improving life style within the home. Commercial contracts include hotels, restaurants, schools and universities, office buildings, factories and clubs. In addition to planning the interiors of new buildings, they may also redesign existing interior spaces. Interior designers in the United States earned a median annual salary of $50,000.

Training and qualifications

Training to become an interior designer can take from two to four years and is available from professional design schools, colleges and universities. One can earn an associate degree or certificate by attending a two to three-year program, or a bachelor's degree by attending a four-year program. 

Upon graduating with a bachelor's degree, an interior designer would most likely begin a one to three-year apprenticeship program at a design or architecture firm and work under the supervision of an experienced interior designer before later taking on projects by themselves. 

A graduate with a certificate or associate degree would usually start his or her career as an assistant to an interior designer.

Developing your own portfolio while studying and during an internship or apprenticeship is also a vital part of progressing your career as an interior designer. For freelance work and during interviews for promotions or new jobs a quality portfolio of work will help you stand out from the crowd. 

Essential knowledge and skills

skills of an interior designer
The skills of an interior designer
If you want to become an interior design the key skills that you will need include...
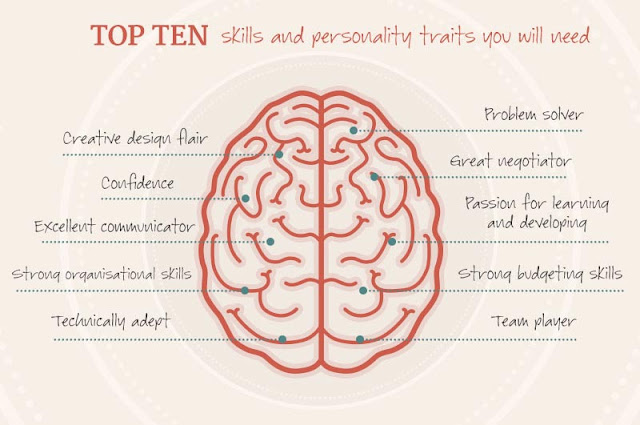
  • Excellent communication skills in order to deal with colleagues, clients, suppliers and craftsmen.
  • Ability to use multiple softwares such as Auto Cad, Archi-Cad, Sketch-Up, Artlantis, PhotoShop etc in order to create plans and 3D visuals to present to a client or local authorities.
  • Strong creative skills matched with a desire to produce original designs. High level of organisation skills - managing finances, project timelines, suppliers deliveries, craftsmen, client objectives - potentially on multiple projects simultaneously.
  • Excellent attention to detail and accuracy, especially in creating plans and layouts which may need to meet building and safety regulations depending on the project.
  • Resourcefulness and problem solving to overcome issues arising such as unexpected costs, unavailable materials, missed deadlines, personality clashes or multiple other potential issues which can arise during a project.
  • Ability to work as part of a team or as a team leader.

Typical Workday Activities:

A day in the life of an interior designer.
A day in the life of an interior designer
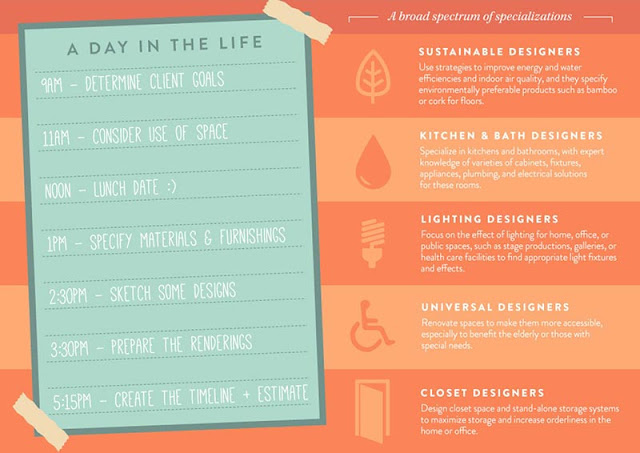
A typical day in the life of an interior designer may include the following activities...

  • Establishing what the client wants to achieve and the budget available for the project.
  • Consider how the space will be used and how people will move through the space.
  • Developing initial ideas and concepts through sketching preliminary design plans, including electrical and partition layouts.
  • Producing designs using hand drawings and computer-aided design (CAD), showing how the spaces inside the building will be organised, constructed and finished.
  • Ensuring all proposals comply with the relevant regulations.
  • Producing detailed drawings for the contractors to use once proposal is accepted.
  • Detailing to scale the construction and finish of all areas of the project and writing specification of works including schedules for finishes, ironmongery and equipment.
  • Preparing tender documents where necessary for the construction work.
  • Visiting the site to check progress and inspect the work.
  • Project managing for the client where required, to ensure the project is constructed and finished to suit the proposals and to keep control of design issues which may arise on site.
  • Working closely with other construction professionals such as architects, quantity surveyors, structural engineers etc.
  • Searching for and bidding on new projects.
  • Specifying materials and furnishings, such as lighting, furniture, wall finishes, flooring, and plumbing fixtures.
  • Creating timelines for the interior design project and estimate project costs
  • Placing orders for materials and oversee the installation of the design elements.
  • Conduct the construction administration of the project and coordinate with general building contractors to implement the plans and specifications to build the project
  • Visiting the site during the project
, to ensure progress is being made in accordance with agreed timelines and plans are being adhered to.

Typical career routes

The job tends to be divided into various levels of seniority, based mostly on experience. As a general rule, the greater the seniority, the more responsibility the designer will have for the overall project.

Environment - Large design firms may have the resources for a more comfortable work environment and state-of-the-art equipment. They also have established connections with related firms and specialists. This can be an important consideration for anyone starting an interior design career.
Clients - If you are self-employed, you may have more say in which jobs you take; however, you are responsible for finding your own clients and connections.

Many interior designers are self-employed or do contract work on top of their jobs at design firms. When deciding where you want to work, you must evaluate the risks and rewards for yourself.
Work Hours - If you are self-employed or work for a small firm, you are more likely to work flexible hours as you adjust your schedule around your clients' needs and deadlines. If you start your interior design career in a large design firm, you will probably have more predictable hours.


Specialist Areas:

interior design career specialists
Many interior designers will specialise in a particular field

As your interior design career progresses, you may discover a preference for one type of interior design over another. You can specialize in designing for corporate settings, restaurants, hotels, and hospitals or other health care facilities, or you may decide to focus on residential design. You may even narrow your focus further to kitchens or bathrooms, for example. If you like choosing colors and fabrics, but would rather not handle the nitty-gritty details, such as safety codes, you may want to be an interior decorator rather than an interior designer. Although many people use the terms interchangeably, interior decorating is less technical than interior design.

Whether you prefer sticking to one interior design style that fits you perfectly, or you want to switch things up now and then, an interior design career gives you many options. Choose from the following types of interior design...
  • Corporate Interior Design - Design ergonomic and efficient work spaces that will project the right image for a company. They focus on creating spaces that are efficient, functional, and safe for employees. They may incorporate design elements that reflect a company’s brand in their designs.
  • Bathroom Design - Help your clients get the bathrooms of their dreams with designs that are elegant and restful as well as functional. You will need expert knowledge of the variety of relevant cabinets, fixtures, appliances, plumbing, and electrical solutions.
  • Exhibit Design - Create exhibits for clients ranging from art galleries to zoos, or help companies design exhibits for tradeshows and showrooms.
  • Feng Shui Interior Design - Use the principles of Feng Shui to get the energy flowing and create balance in an environment.
  • Green Interior Design - Develop expertise in designing spaces using products and methods that are environmentally friendly. They may obtain certification in Leadership in Energy and Environmental Design 
  • Health Care Interior Design - Help make health care centers such as hospitals, cancer centers, drug treatment centers, nursing homes, social services providers, doctors' offices, dental offices, etc. more efficient and welcoming through interior design.
  • Hotel Interior Design - Create inviting spaces for the hotel industry while considering several important factors such as: comfort, function, aesthetic appeal, concept and budget.
  • Japanese and Asian Interior Design - Bring the graceful, uncluttered aesthetic of Japanese and Asian interior design to clients in any geographic location.
  • Kitchen Design - Give your clients the kitchen they've always wanted. Develop expertise on appliances and efficient kitchen design.
  • Modern Interior Design - Incorporate the sleek look and practical principles of modern design into your work.
  • Residential Interior Design - Work with clients to improve the form and function of their living spaces, while helping them define and reflect their personal style.
  • Restaurant Interior Design - Develop design concepts that will contribute to positive customer experiences and the success of restaurant businesses.
  • Set Design - Use your design skills to work in film, television or theater.
  • Zen Interior Design - Create beautiful interior spaces using the minimalist style of Zen interior design.
  • Universal designers renovate spaces in order to make them more accessible. Often, these designs are used to renovate spaces for elderly people and people with special needs; however, universal designs can benefit anyone.

*If you enjoyed this article you may also find our interior design process, interior design styles and design presentation boards


close
Banner iklan disini