Showing posts with label polygonnal lasso tool. Show all posts

Thursday, October 6, 2016

Read Airbrushing Skin In Adobe Photoshop Now

using the blur tool to airbrush


Airbrushing models skin is very common in many the photo editing industry today and has been for some time. This short tutorial will teach you how to airbrush skin in a few easy steps.


Step 1: Import an image that you wish to edit.

Step 2: Select the polygonal lasso tool and trace an outline around the area the face.

using the polygonnal lasso tool to trace an outline
Outline Traced Using The Polygonal Lasso Tool

Step 3: After tracing an outline around the face, select the option "subtract from selection" so that you can trace around other parts of the face and keep your previous traces.

Step 4: Using the polygonal lasso tool trace around the eyes, mouth and nostrils next.

tracing around the face
                   Outline Traced Around The Eyes, Mouth and Nostrils 

Step 5: Now use the polygonal lasso tool to trace around the eyebrows.

tracing around facial features
Eyebrows Traced Using The Polygonal Lasso Tool

Step 6: Go to Layer, New and select New Layer Via Copy and press the eye symbol to turn the first layers visibility off so you can only see the outline you traced on the face with the polygonal lasso tool.

creating a new layer via copy
The Traced Outline Of The Face

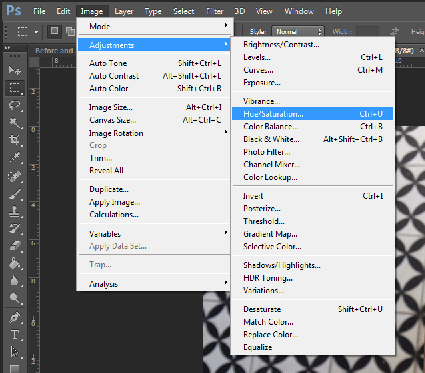
Step 7: Go to Filter, Blur and then select Gaussian Blur.

selecting a gaussian blur
Selecting The Gaussian Blur


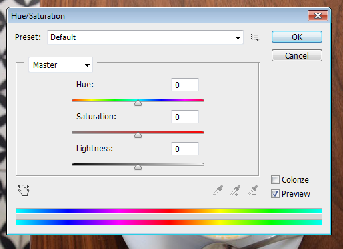
Step 8: Set the radius of the blur to 15 pixels.

adding a gaussian blur
Applying The Gaussian Blur

Step 9: Press the eye symbol again so that the first layer is now visible. The layer with the Gaussian Blur is on top of the original image so the skin on the face will now appear smoother due to the blur that was applied.

the blur effect on the face
The Blur Effect On The Skin


                                                                           BEFORE

before airbrush
Before Airbrush Was Applied


                                                                          AFTER

after airbrush
After The Airbrush Was Applied


Friday, January 22, 2016

Photoshop: Lasso Tool

Photoshop: Lasso Tool

Step 1: 

You can find the Lasso Tool, third from the top in the single column tool bar.


Or if your tool bar is in double column layout, second from the top, on the left.

Step 2:

Right click on the lasso tool and make sure the top tool in the sub menu is selected. Also you can select the Lasso tool by pressing the ‘L’ key in Photoshop.

Step 3

The basic premise of the lasso tool is to left click and hold on the screen and move the lasso line around the outline of the area you want to select. It’s usually good practice when learning the lasso tool to choose items or objects with a definite outline. Fuzzy and obscure furry objects can prove problematic. Take for example, this cup of coffee…


Pick any point on the outline of the saucer of the cup and move the cursor gradually around the object, holding the left mouse button through out, until you are back at the point of initiation. It is important to fully enclose the desired area with the lasso tool, if you do not complete the shape, Photoshop by default will finish the shape for you, with a straight line from where you released the left click to where it was originally pressed.

Then release the left mouse button and the object will be surrounded by what is commonly known as “marching ants”. When starting to select the item a general outline of the object is sufficient, you can go in to detail later with the add and subtract methods. 

Step 4:

When you attempt the fine details it’s a generally a good idea to avail of Photoshop’s zoom tool. You can do this by using the by pressing and holding Ctrl + Space barand left clicking where you want to zoom in. You can also zoom out in a similar fashion by pressing and holding Alt + Space-bar and left clicking to move out. You can then navigate by holding the Space-bar, left clicking and dragging on the screen and therefore dragging the view around the image.

Step 5:

If you have cut in on the area you were supposed to outline, you can use the Add to Selection mode by holding down Shift and left clicking. Just like with original shape you defined, if you do not complete the shape, Photoshop will finish the shape with a straight line, and in a lot of cases you will be left with a, perhaps undesired, island of deselected image.

Step 6:

Likewise if you have gone too far away from the outline and you need to remove some of the Lassoed image you can use the subtract key, by pressing down the Alt and holding down Alt. Again if you do not complete the shape Photoshop will complete it for you with a straight line possibly giving you an isolated island of selected image.

Step 7: 

After you have defined the shape you want, press and hold Ctrl + Shift + I to inverse the selection. Then left click on the Image, then click Adjustments. 

Step 8:

Once in the Adjustment sub-menu click Hue/Saturation. Then bring the Saturation down to 0, or the toggle bar all the way to the left. 

Step 9: 

Enjoy.

Photoshop: Lasso Tool


close
Banner iklan disini