In this tutorial I will show you how to create water that your character can swim in.
Step 1: Adding in BSP Brush
To create water we first need somewhere to put it, so I am going to drag out a box.
 |
| BSP box brush. |
Step 2: Creating and resizing subtractive brush
Then duplicate that box and change the brush type to subtractive. To duplicate the box you can go to the scene outliner panel, right click on the box and go to edit and select duplicate.
 |
| Box brush in scene outliner. |
To change the brush type, go to the details panel, under brush setting. Where is says brush type click and select subtractive from the drop down bar.
 |
| Brush settings - Additive |
Resize this box to create a hole in the first box, this is where we can put the water. You can resize the box in the details panel under transform, just so it’s a bit smaller than the other box.
 |
| Transform options. |
Step 3: Adding physics volume
Go to the modes panel, in placement mode. Select volumes, scroll down until you see “physics volume”. Drag in a physics volumes, make it a little bigger than the subtractive box.
 |
| Physics volume. |
On the details panel under character movement tick the box beside water volume, and under volume tick the box beside physics on contact.
 |
| Water volume and physics on contact location on details panel. |
Step 4: Adding in post process volume
Now duplicate the physics volume, and in the details panel under actor go to convert actor and in the drop down select “PostProcessVolume”.
 |
| Convert actor. |
In the details panel, under scene colour make sure to tick the first three boxes. Beside scene colour tick that box and then double click the space beside it and you can change the colour to a shade of blue, this just makes it look like you are under water when you are in play mode.
 |
| Scene colour options. |
Step 5: Creating water surface
To add the water drag out another box, and this time add a material to it. To apply a material to the box, select it. Go to the details panel under brush setting and extend the tab, select create static mesh.
 |
| Create static mesh. |
When you click this the select path screen opens, you name the static mesh and then click create static mesh.
 |
| Name and create static mesh. |
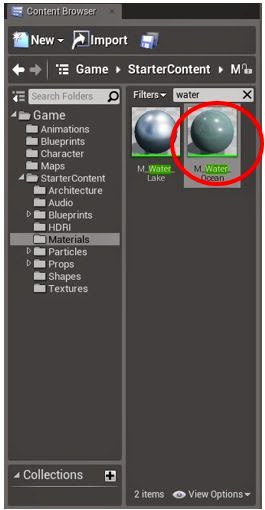
Go to the content browser, extend starter content and click materials. Then search water in the search bar. Then choose one of the water materials that comes up and drag it onto the static mesh you just made.
 |
| Select material. |
Step 6: Adding a water material to the static mesh
Now click onto the viewport, and you will see the material isn't working yet.
 |
| You will see this on your static mesh. |
Go back over to the details panel under static mesh and double click static mesh.
 |
| Static mesh in detail panel. |
The editor will open, make sure you have the material selected in the content browser when you are doing this. Click on the little arrow beside the material in the editor, it’s in the upper right hand corner. Then save and close the editor.
 |
| Editor. |
 |
| Material in content browser. |
Step 7: Making the water more realistic
Click on your post process volume, using the details panel you can add Depth of field. This gives the impression of blurred vision when under the water. I ticked the first two options under the depth of field tab. Beside method choose Gaussian in the drop down and set focal distance to about 1000.
 |
| Depth of field in details panel. |
Step 8: Testing the water
Now right click on your view port and select play from here to test your water.
 |
| Character on screen. |
 |
| Character on screen. |


No comments:
Post a Comment