 |
| Wine Glass made from Curves in Blender |
Bezier Curves have no tangent and are connected to the line. NURBS do not have tangents and their curve control points are not connected to the line. When choosing between the two it is best to go for the one you feel most comfortable using, although Bezier Curves are considered easier to control due to the control points being on either side of the line, while NURBS Curves are easier for the computer to calculate efficiently.
 |
| Bezier Curve |
 |
| NURBS Curve |
Curves are used to model the outline of a shape or object. Curves can be 2-D or 3-D. 3-D curves can be mapped to anywhere in the 3-D space but 2-D curves are restricted to staying in the X and Y plane. Curves are 2-D by default when you bring them into a scene.
Bezier Curve
To get a Bezier Curve press ('Shift' + 'A'), select curve then Bezier Curve. It helps to press ('7') on number pad to get a better view. Pressing ('Tab') gives brings you into Edit Mode. Once pressed you will see a Black line with two pink lines on either side and other smaller black lines that look like legs coming off the larger black line. At each end of the pink lines there are 2 orange dots, these are control points and are used to alter the curve of the line.
The position and length of the pink lines can be manipulated by right clicking any of the control points. Changing the position alters the direction of the curve while changing length alters the curve of the line.
Moving the orange control points on the X-Axis increase the length of the curve while moving it in the Y-Axis changes the bend in the curve. This is similar to the Bezier Curve.
*To turn of the lines that look like legs on your curve press 'N' then un-tick the box that says Normal underneath Curve Display.*
 |
| Bezier Curve in Edit Mode |
NURBS Curve
To get a NURBS Curve press ('Shift' + 'A'), select the curve option and then choose NURBS Curve. Next it helps to go into a top-down view by pressing ('7') on the number pad as it gives you a better view of the curve. Press ('Tab') to bring the curve into edit mode. This should show something similar to the Bezier Curve except instead of two pink lines there is one yellow line broken into 3 segments. On the yellow line are 4 orange control points that allow you to manipulate the curve to the shape you require. |
| NURBS Curve in Edit Mode |
Moving the orange control points on the X-Axis increase the length of the curve while moving it in the Y-Axis changes the bend in the curve. This is similar to the Bezier Curve.
*To turn of the lines that look like legs on your curve press 'N' then un-tick the box that says Normal underneath Curve Display.*
Properties of Curves
The properties of curves can be altered in the side panel to suit your preferences. Everything from 2-D to 3-D, resolution, twisting, path/curve deform and fill can be adjusted in this panel. |
| Curve Properties Panel |
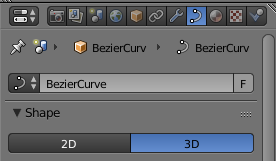
2-D and 3-D Curves
When you bring a new curve into a scene it automatically comes into the scene in 2-D. This can be changed so that curves are 3-D when they are brought into a scene. To do this just switch press either the 2D or 3D button in panel under curves.
Enter Edit Mode: Press the 'Tab' button to enter Edit mode.
Top-Down View: Press number '7' on the number pad to go into top-down view giving you a better view of the curve.
Subdivide a Curve: Select two parts of a curve segment and press 'W' to divide the curve into two new segments.
Join Separate Curves: Highlight the curves and press 'CTRL' + 'J'.
Fill: To fill a closed curve press 'Ctrl' + 'J'.
Tilt a Curve: To tilt a curve select an endpoint and press 'CTRL' + 'T' and move the mouse.
Convert Curve to Mesh: To convert a curve to a mesh press 'ALT' + 'C'.
Extrude a line: To extrude a line select the point you want to extrude from and press 'E'.
 |
| 2D or 3D Curve Option |
Scaling Curves
Curves can be made bigger by selecting the curve and pressing 'S' on the keyboard. The curve can -now be made bigger by moving the mouse, once you left-click the screen the curve will stay the size that you left it. |
| Scaled Bezier Curve |
Hotkeys for Curves
New Curve: For a new curve press 'Shift' + 'A' and under the curve option select the curve type you want.Enter Edit Mode: Press the 'Tab' button to enter Edit mode.
Top-Down View: Press number '7' on the number pad to go into top-down view giving you a better view of the curve.
Subdivide a Curve: Select two parts of a curve segment and press 'W' to divide the curve into two new segments.
Join Separate Curves: Highlight the curves and press 'CTRL' + 'J'.
Fill: To fill a closed curve press 'Ctrl' + 'J'.
Tilt a Curve: To tilt a curve select an endpoint and press 'CTRL' + 'T' and move the mouse.
Convert Curve to Mesh: To convert a curve to a mesh press 'ALT' + 'C'.
Extrude a line: To extrude a line select the point you want to extrude from and press 'E'.
How to Make a 3-D Wine Glass using Bezier Curves
First open a new Blender file and delete the starting cube. Next press numbers '5' and '7' on the number pad to go into a top-down orthographic view. This will give you a better perspective of things in the scene.
 |
| Top Orthographic View |
Next press 'Shift' + 'A' then select Curve, then select Bezier Curve. This will add the Bezier Curve to the scene. You can change the resolution of the curve if you wish underneath the Curve Panel. This technique can be used for many similar objects but for the purpose of this tutorial I decided on doing a wine glass as it is simple and easy to do.
 |
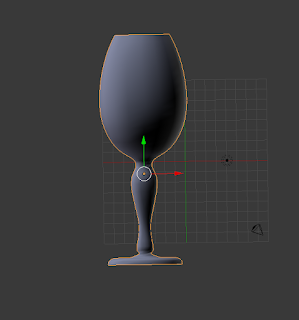
| Outline of Glass |
Next in order to get the 360 degree object that you are looking for you will want to go to the right hand panel and click on the modifiers panel. Click add 'Add Modifier' and add a 'Screw Modifier'. Under Apply switch the Axis to the X-Axis.
Move the different parts of your object around until you are happy with its appearance. This is what my wine glass ended up looking like.
 |
| Add Screw Modifier |
|
| Finished Glass |