Showing posts with label CSS basics. Show all posts

Tuesday, March 22, 2016

CSS Positioning and Layering

CSS Positioning
CSS positioning is a lot more advanced than just top, middle or bottom!

CSS Positioning

With CSS positioning, you can place an element exactly where you want it on your page. Together with floats, positioning gives you many possibilities to create an advanced and precise layout. To help us understand imagine a browser window as a system of coordinates, as in the image below.
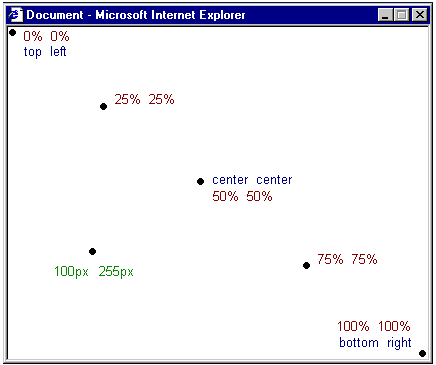
Browser window screen coordinates for use with CSS Positioning

The principle behind CSS positioning is that you can position any box anywhere in the system of coordinates. Let's say we want to position a headline. By using the box model we can make a headline appear as follows...


If we want this headline positioned 100px from the top of the document and 200px from the left of the document, we could type the following in our CSS:


The result will be as follows...
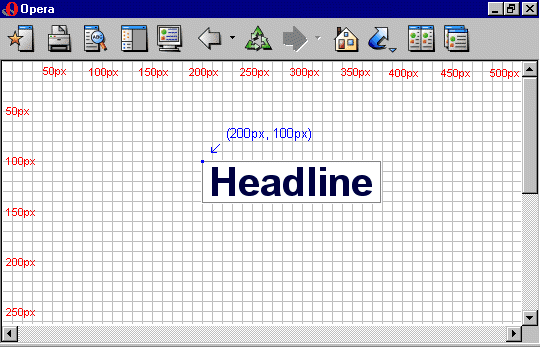
CSS Positioning
CSS Positioning

As you can see, positioning with CSS is a very precise technique to place elements.

Note: The element is positioned from its top left corner.

Absolute or Relative Positioning

There are two types of positioning, absolute and relative. In the sample above we used absolute positioning . An element which is positioned absolute does not obtain any space in the document, which means that it does not leave an empty space after being positioned. To position an element absolutely, the position property is set as absolute. You can subsequently use the properties left, right, top, and bottom to place the box. As an example of absolute positioning, the CSS code below would place 4 boxes in each corner of the browser window.


The difference between absolute and relative positioning is that for an element which is relatively positioned the position is calculated from the original position of the element in the document.

To position an element relatively, the property position is set as relative. That means that you move the element to the right, left, up or down. This way, the element still obtains a space in the document after it is positioned. An example code is shown below...


Tip: When using positioning it is recommended that you use either all absolute positioning or all relative positioning, mixing the two types can lead to problems, especially when the page is being viewed in different browsers. In my opinion it is best to use relative positioning, but don't just trust me try it out for yourself.

CSS layering with z-index

CSS operates in three dimensions, height, width and depth. In this lesson, we will learn how to let different elements become layers. This means we will be able to let elements overlap one another. To do that, you can assign each element a number using the CSS property z-index. The element with a higher number overlaps on top of an element with a lower number. Let us say we are playing poker and have a royal flush. Our hand can be presented in a way where each card has got a z-index:
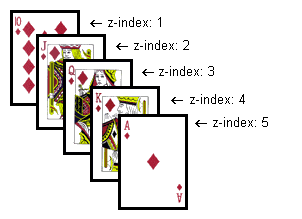


The CSS code in the  example above would result in something like this...

CSS layering with z-index

The method is relatively simple but the possibilities are numerous. You can place text over images or text above text etc. Try it yourself to create effects in headlines or banners.

Next Up

Our ten steps to learning CSS has come to an end but we have a treat in store will a selection of CSS resources just for you coming soon. (sign up to our newsletter to be first to hear about their release)

http://www.onlinedesignteacher.com/2016/03/css-positioning-and-layering.html

CSS Floating

CSS Floating
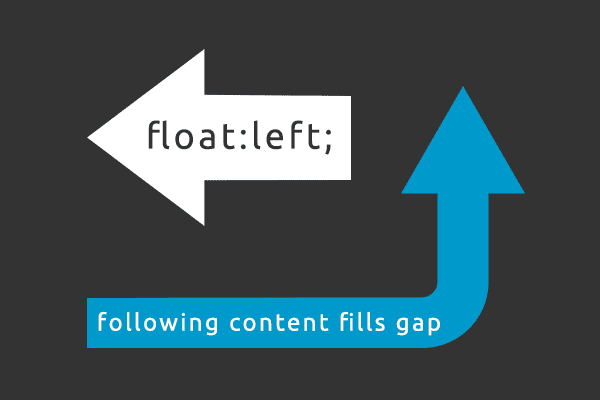
The basic principles of CSS floating are displayed in this simple diagram

Floating elements with CSS

Any HTML element or <div> block can be floated to the right or to left by using the property float. That is to say that the <div> block or element, including its contents, either floats to the right or to the left in a document (or another containing box). The content which follows will fill the gap left behind. Float can be set as either left, right or none. The following figure illustrates the general principle in a little more detail than the on above.

CSS Float
CSS float in action

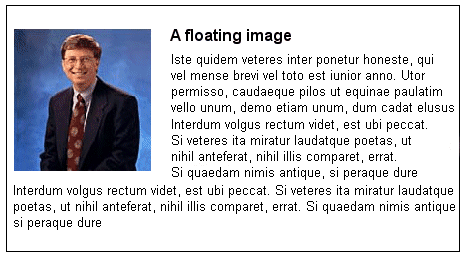
If, for example, we would like to have text wrapping around a picture we could float the image to the left and the following content would fill the gap (thus wrapping around it). The result would be like this...

Floating elements with CSS
CSS float example

The HTML code for the example above, look as follows:


To get the picture floating to the left and the text to surround it, you only have to define the width of the box which surrounds the picture, so none of the image is cut off, and then set the property float to left:


Floats can also be used to create columns in a document. To create two columns, you simply have to structure the desired columns in the HTML code with <div> as follows.


Now the desired width of the columns is set to 50%, and then you simply float each column to the left by defining the property float. Try it out for yourself.


Clear (Stop filling after floating)

The clear property is used to control how the elements following floated elements in a document behave. By default, the subsequent elements are moved up to fill the available space which will be freed up when a box is floated to the side. The property clear can assume the values left, right, both or none. The principle is, if clear, is set to both for a box, the top margin border of this box will always be under the lower margin border for possible floating boxes coming from above. In other words, it won't fill the gap left behind.


To avoid the text from floating up to fill the gap and sit next to the picture, we can add the following CSS, Try it out for yourself.


Next Up

Floats are useful in many situations and will often be used together with positioning. In the next section we will take a closer look at how to position html elements using CSS. There are two main types of positioning, relative and absolute, both are explained.


CSS Padding, Borders and Margin

CSS Padding, Borders and Margin

Margin and Padding:

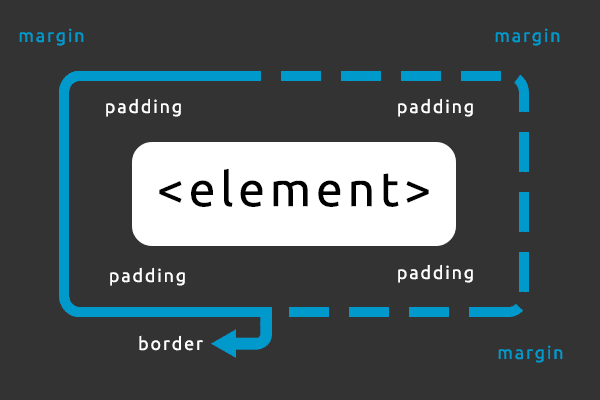
Now let's look at how you can use your knowledge of the box model to change the presentation of elements by setting the margin and padding properties as shown in the above example.

An element has four sides: right, left, top and bottom. 
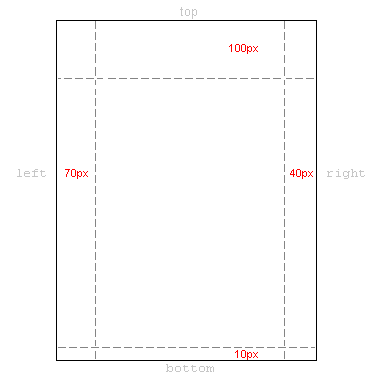
The margin is the distance from each side to the neighbouring element or the outer borders of the document. As the first example, we will look at how you define margins for the document itself i.e. for the element <body>. The illustration below shows how we want the margins in our pages to be.

CSS Margins
CSS Margins

The CSS code for the above page would look like this,


Or, like background and font, you could compile the CSS code using just margin. Margin recognises the values in the order top, right, bottom, left.


You can set the margins in the same way on almost every element. For example, we can choose to define margins for all of our text paragraphs marked with <p>:


Padding can also be understood as 'filling'. This makes sense as padding does not directly affect the distance of the element to other elements but rather defines the inner distance between the border and the content of the element.

The usage of padding can be illustrated by looking at a simple example where all headlines have background colours. By defining padding for the headlines, you change how much filling there will be around the text in each headline. Try out the code below yourself and see what it looks like.


Borders

Borders can be used for many things, for example as a decorative element or to underline a separation of two things. CSS gives you endless options when using borders in your pages.

border-color

The width of borders is defined by the property border-width, which can obtain the values thin, medium, and thick, or a numeric value, indicated in pixels. The image below illustrates the system.

CSS Borders
CSS Borders

border-color

The property border-color defines which colour the border has. The values are the same as with the normal color-values for example "#123456", "rgb(123,123,123)" or "yellow".


border-style

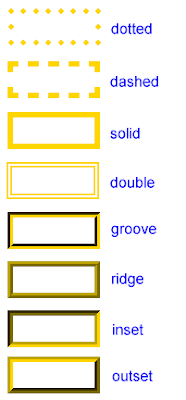
The property border-style defines which type of border the element has. There are numerous different types of borders to choose from. Below 8 different types of borders are demonstrated, all the examples are shown with the colour "gold" and the thickness "thick" but can be shown in other colours and thicknesses.

CSS Border Styles
CSS Border Styles

CSS Border Samples

Let's look at some sample CSS codes, try these out yourself to see how they look.


It is also possible to state special properties for the top, bottom, right or left borders. The following example shows you how:


As is the case with many other properties, you can compile many properties into one using border. Let us take a look at an example:


Can be compiled into:


Next Up

In the next lesson we will learn how to float html elements using CSS.


CSS Class and Id

CSS Class and Id with div and span
class and id work together with div and span to help you make the most of your CSS

This section on CSS actually focuses on the use of HTML attributes 'class' and 'id' and the HTML elements <div> and <span>. These are very important if you are to use CSS effectively as they hold the key to giving you complete control over every aspect of your website.

Class

Sometimes you want to apply a special style to a particular element or a particular group of elements and yet not every single element of that type! Confused? Don't be. Let's say that we have two lists of links to different grapes used for white wine and red wine. The HTML code could look like this:


What if we want the white wine links to be yellow, the red wine links to be red and the rest of the existing links on the webpage to stay blue? To achieve this, we first need to divide the links into two categories using the HTML attribute 'class'.

So we assign a class to each link using the HTML attribute class. We use class instead of id as class is used for multiple or group effects while id is used for single or individual effects. Let us try to specify some HTML classes from the example above:


We can then define special properties for links belonging to white wine and red wine, respectively by using .classname after the element it was used on (in this case 'a') in the style sheet of the document.


The above CSS code combined with the HTML shown earlier will result in the following...

This is a normal link

Grapes for white wine:

Grapes for white wine:

Id

In addition to grouping elements with class, you might need to identify one unique element. This is done by using the attribute id. What is special about the attribute id is that there cannot be two elements in the same document with the same id. Each id has to be unique. Now, let us take a look at an example of a possible usage of id:


The above could be headings of any document split into chapters or paragraphs. It would be natural to assign an id to each chapter as follows:


Let us say that the headline for chapter 1.1 must be in red. As shown in the example below you must define the properties in a specific element by using #id in the stylesheet of the document.


The above CSS combined with the previous HTML would result in something like the following...

Chapter 1

Chapter 1.1

Chapter 2

Chapter 2.1


Div and Span

The HTML elements <span> and <div> are used to group and structure a document and are usually used together with the attributes class and id. The difference between div and span is that <span> is used within an element (inline) while <div> is used to group one or more elements (block-level).

Span

In My Honest Opinion, <span> is not the most useful of elements as it is only used inline so it is often easier to use basic HTML code to format the part of the element (usually text within a paragraph) that you want to edit. However, with my little rant over, let's look at an example of <span> in use. Let's take a famous Benjamin Franklin phrase.


Let's say we want what Mr Franklin sees as the benefits of not sleeping your day away emphasized in red. For that purpose, we can mark the benefits with <span>. Each span is then added a class, which we can define in our style sheet:


In order to make those tagged words red then the CSS code would simply be...


The result would be....

Early to bed and early to rise makes a man healthy, wealthy and wise.

As mentioned earlier this is a bit long-winded for something that could have been done using the HTML <font color='red'>. Anyway not to worry, as you probably won't be using <span> too often. One element you definitely will be using though is <div>, so let's look at how it is used.

Div

As mentioned earlier while <span> is used within a block-level element, <div> is used to group one or more block-level elements. Aside from this difference, the grouping with <div> works in the same way. Let us take a look at an example with two lists of relatively recent U.S. presidents divided into their political affiliations:


And in our style sheet, we can utilize the grouping in the exact same way as above:


The above CSS code combined with the previous HTML would result in something like this...

  • John F. Kennedy
  • Lyndon B. Johnson
  • Jimmy Carter
  • Bill Clinton
  • Barack Obama

  • Richard Nixon
  • Gerald Ford
  • Ronald Reagan
  • George Bush
  • George W. Bush

These examples for <div> and <span> are very basic and are only intended to show you how to link the HTML elements with the associated CSS code. We will now look at the 'box model' which, when used with <div> and <span> and class and id, will really open up your design and layout possibilities with CSS.

Next Up

In the next lesson we look at the CSS Box Model which explains the details of how each HTML element is structures.


CSS Links

CSS LInks
CSS LInks

You can apply the CSS that you already learned to links in order to change their backgrounds, colours, fonts, text style, etc. What we will learn in this lesson is that CSS allows you to define these properties differently depending on whether the link is unvisited, visited, active, or whether the cursor is on the link (hover). This makes it possible to add useful effects to help visitors navigate your website more easily. To control these effects you use what is called a CSS pseudo-class.

Links and pseudo-classes

A pseudo-class allows you to take into account different conditions or events when defining a property for an HTML tag. As you know, links are specified in HTML with <a> tags. We can therefore use 'a' as a selector for links in CSS. A basic example like the one seen below, simply changes the colour of all links to blue.


The css code above would result in something like this (provided the HTML is already in place)

This is a link

Unlike different elements, links can have different states. It can be visited or not visited. You can use pseudo-classes to assign different styles to links. Use a:link and a:visited for unvisited and visited links respectively. Links that are active have the pseudo-class a:active and a:hover is when the cursor is on the link. See the example CSS code below.


It is particularly popular to create different effects when the cursor is over a link. We will therefore look at a few extra examples related to the pseudo-class :hover.

CSS a:hover example 1:


When hovered over, the CSS code above will change your links from...

This is a link

to

This is a link

CSS a:hover example 2:


When hovered over, the CSS code above will change your links from...

This is a link

to

This is a link

The two CSS link a:hover examples give you an idea about the various possibilities for combining different properties. You should now try to create your own effects.

Next Up

In the next lesson we will learn the basics of using the HTML elements div and span along with the HTML attributes class and id to give you more control over editing your website with CSS.


close
Banner iklan disini